<.NET Core, now consolidated into the .NET platform as of .NET 5 and beyond, is a versatile, open-source development platform maintained by Microsoft and the .NET community on GitHub. It's used for developing modern applications for the web, servers, cloud, and more. If you're running Ubuntu 22.04 LTS (Long Term Support), installing .NET can open up a plethora of development opportunities. Here's how you can install .NET on your Ubuntu system, step by step.
Prerequisites
- A machine running Ubuntu 22.04 LTS
- Access to a terminal/command line
- Sudo privileges or access to an account with sudo privileges
Step 1: Update Your System
Before installing any new package, it’s a good practice to update your package lists and your system. Open your terminal and run the following commands:
sudo apt updatesudo apt upgrade -y
This ensures that all of your system’s software is up-to-date, reducing the likelihood of compatibility issues.
Step 2: Install the Required Dependencies
.NET Core requires certain dependencies to run. Install them using the command below:
sudo apt install -y wget apt-transport-https software-properties-common
These packages include tools for adding new repositories to your APT sources, as well as utilities for transferring data from the internet.
Step 3: Add Microsoft Package Signing Key and Repository
Microsoft provides a package repository for Linux distributions including Ubuntu. You need to add Microsoft’s package signing key and the package repository to your system. Execute the following:
wget -q https://packages.microsoft.com/config/ubuntu/22.04/packages-microsoft-prod.deb -O packages-microsoft-prod.debsudo dpkg -i packages-microsoft-prod.deb
This command downloads the package containing Microsoft’s signing key and repository configuration and installs it.
Step 4: Install the .NET SDK or Runtime
With the repository added, you can now install the .NET SDK (Software Development Kit) or just the runtime, depending on your needs. The SDK includes the runtime and is necessary for developing .NET applications. If you only need to run .NET applications, the runtime will suffice.
- To install the .NET SDK, run:
sudo apt updatesudo apt install -y dotnet-sdk-6.0 - To install the .NET Runtime, instead use:
sudo apt updatesudo apt install -y aspnetcore-runtime-6.0
Replace 6.0 with the version you wish to install. It’s advisable to check the official .NET documentation for the latest versions.
Step 5: Verify the Installation
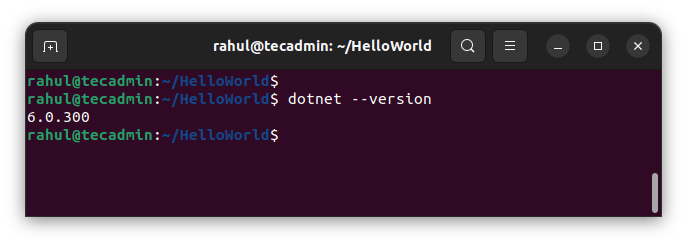
To ensure that .NET has been installed correctly, you can run the following command to check the version:
dotnet --version
Output:
This should output the version of the .NET SDK or Runtime you installed.
Step 6: Create a Hello World Application (Optional)
Now that you’ve successfully installed .NET, you can test it by creating a simple “Hello World” application.
dotnet new console -o HelloWorld
This will create a .Net core application on your system. This will create a directory named “helloworld” under the current directory. You can change to this directory and start working on your application.
cd HelloWorld
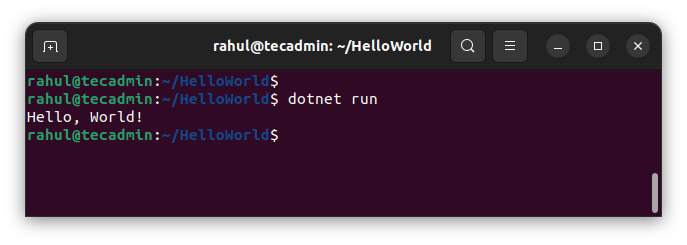
Make your changes to the application and execute the below command to run this application.
dotnet run
You will see the following output as a result.

Uninstall .NET Core on Ubuntu
In case, the .NET Core is not more required on your system. You can uninstall it from the system with the following commands.
sudo apt remove --purge dotnet-sdk-6.0 dotnet-runtime-6.0
Also, remove unused packages installed as dependencies:
sudo apt auto-remove
Conclusion
Congratulations! You’ve successfully installed .NET on Ubuntu 22.04 LTS and even tested it with a simple application. With .NET installed, you can explore a wide range of software development opportunities, from web applications to microservices and more. Happy coding!
Additionally, you may also like to install Visual Studio Code or Sublime Text editor on your Ubuntu desktop systems.


4 Comments
Hello everyone.
Since upgrading Ubuntu 20.04 => 22.04 my dotnet is not working anymore.
Had also tried to reinstall dotnet according to these instructions. It does not work.
Get these error messages:
heiko@Worf:~$ dotnet –list-sdks
A fatal error occurred. The folder [/usr/share/dotnet/host/fxr] does not exist
heiko@Worf:~$ dotnet –list-runtimes
A fatal error occurred. The folder [/usr/share/dotnet/host/fxr] does not exist
heiko@Worf:~$ dotnet –version
A fatal error occurred. The folder [/usr/share/dotnet/host/fxr] does not exist
heiko@Worf:~$
The subfolder /usr/share/dotnet/host/fxr doesn’t exist either.
Under the old Ubunzu 20.04 these folders existed. With a file.
What could that be?
Thank you.
Greetings Heiko
This is how to install netcore 6 by script
“`
sudo apt remove ‘dotnet*’
sudo apt remove ‘aspnetcore*’
sudo rm /etc/apt/sources.list.d/microsoft-prod.list
sudo apt update
sudo apt install dotnet-sdk-6.0
“`
PS it may be because I am running ARM
Doesn’t work yet:
E: Unable to locate package dotnet-runtime-6.0
E: Couldn’t find any package by glob ‘dotnet-runtime-6.0’
It isn’t in the Microsoft repos yet.