Transport Layer Security (TLS) is a widely used cryptographic protocol designed to secure communications over a computer network. Nginx, a popular web server and reverse proxy server, relies on TLS to encrypt and secure data transmitted between clients and servers. As TLS evolves, new versions are released to address security vulnerabilities and improve performance. In this guide, we will walk you through the process of configuring Nginx to use a specific TLS version.
Prerequisites
Before we begin, ensure that you have the following:
- A running Nginx server: If you haven’t installed Nginx, follow the official installation guide for your operating system.
- Root or sudo access: You will need administrative privileges to edit Nginx’s configuration files.
- A valid domain name: Ensure that your domain name is correctly pointed to your server’s IP address.
Step 1: Backup Configuration Files
Before making any changes to the Nginx configuration, create a backup of the existing files:
sudo cp /etc/nginx/nginx.conf /etc/nginx/nginx.conf.backupsudo cp /etc/nginx/sites-available/default /etc/nginx/sites-available/default.backup
Step 2: Edit Nginx Configuration
Now, open the Nginx configuration file using your preferred text editor:
sudo nano /etc/nginx/nginx.conf
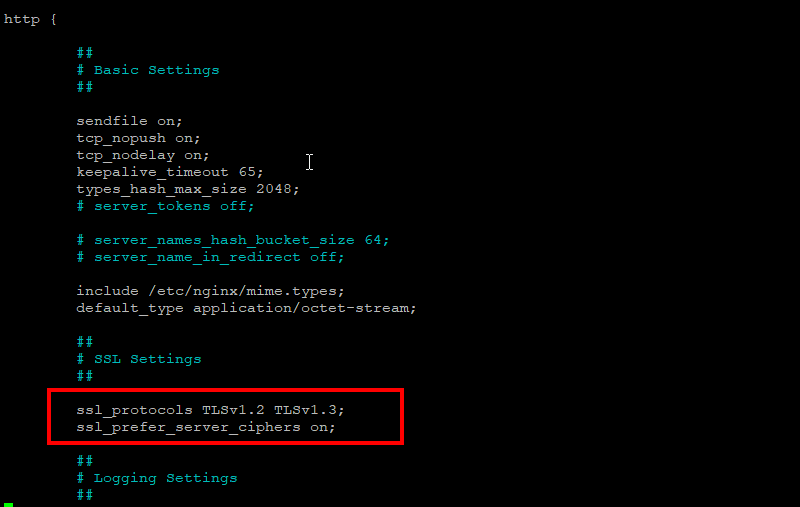
Locate the `http` block and add the following lines to specify the desired TLS version:
ssl_protocols TLSv1.2;
Replace `TLSv1.2` with your desired TLS version, such as `TLSv1.3` for the latest version. To enable multiple TLS versions, separate them with a space:
ssl_protocols TLSv1.2 TLSv1.3;
Save and close the configuration file.

Step 3: Edit Site Configuration
Next, edit your site’s configuration file, which is usually located in `/etc/nginx/sites-available/default`. Open the file using your preferred text editor:
sudo nano /etc/nginx/sites-available/default
Locate the `server` block for your desired site and add the following lines inside the block:
listen 443 ssl;
listen [::]:443 ssl;
ssl_certificate /etc/ssl/certs/your_cert.pem;
ssl_certificate_key /etc/ssl/private/your_key.pem;
Replace “/etc/ssl/certs/your_cert.pem” and “/etc/ssl/private/your_key.pem” with the paths to your SSL certificate and private key, respectively.
Save and close the site configuration file.
Step 4: Test Configuration and Restart Nginx
Before applying the changes, test the configuration to ensure there are no errors:
sudo nginx -t
If the test is successful, restart Nginx:
sudo systemctl restart nginx
Step 5: Verify TLS Version
To verify that your Nginx server is using the specified TLS version, use an online SSL/TLS testing tool, such as SSL Labs’ SSL Server Test. Enter your domain name and run the test. In the results, you should see the configured TLS version(s) under the “Configuration” section.
Conclusion
In this guide, we walked you through the process of configuring Nginx to use a specific TLS version. By selecting the appropriate TLS version, you can enhance the security of your server while maintaining compatibility with clients. Remember to regularly update your Nginx and TLS configurations to ensure optimal security and performance.

1 Comment
Ubuntu 22.04 server. I want the server to support and run only TLSv1.3.
I did put “ssl_protocols TLSv1.3;” (removed previous TLSv1.2 from the line) into nginx.conf, restarted the server and it still offers me TLSv1.2 + TLSv1.3. How can I remove (forcefully) TLSv1.2 support??!