The Ubuntu team has once again kept their promise and released a new long-term support version, Ubuntu 24.04 (Noble Numbat), which comes with many great features. After installing it, setting up the network interface is an important first step for users. Usually, the system automatically gets an IP address from DHCP, but sometimes you might need to set up a static IP address. A static IP address does not change even when the system restarts, which is very helpful for managing networks and running servers.
This guide will show you how to set up a static IP address on Ubuntu 24.04, whether you are using the desktop environment or managing servers using the command line.
Introduction
A static IP address is set up manually on a computer to make sure it stays the same, unlike dynamic IP addresses that a DHCP server assigns and can change. Static IPs are commonly used for servers, network printers, and other devices that need to be consistently reachable over the network.
Requirements
- A machine running Ubuntu 24.04 (Noble Numbat).
- Basic familiarity with the system’s terminal and network configuration files.
- Administrative (sudo) privileges.
Setting Up a Static IP in Ubuntu 24.04 Desktop Environment
Ubuntu 24.04 continues to use GNOME as its default desktop environment, which provides an intuitive interface for managing network settings. Follow the below steps to configure static IP address on your Ubuntu desktop system.
Step 1: Access Network Settings
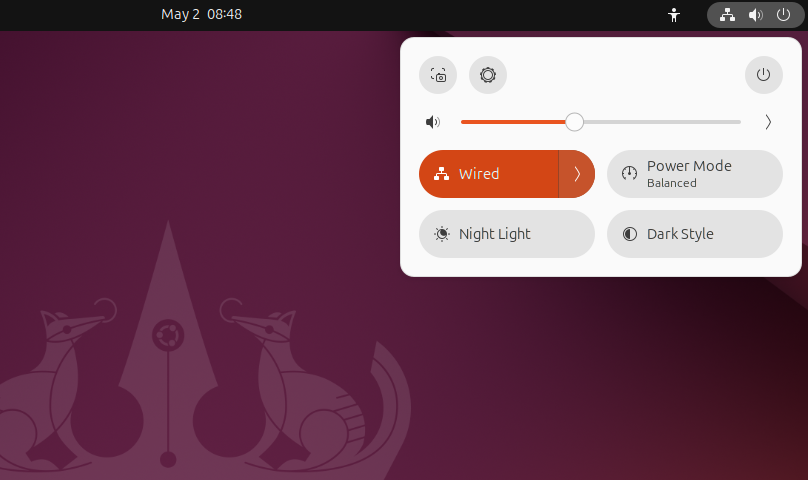
- Click on the icons at the top right corner of the screen.
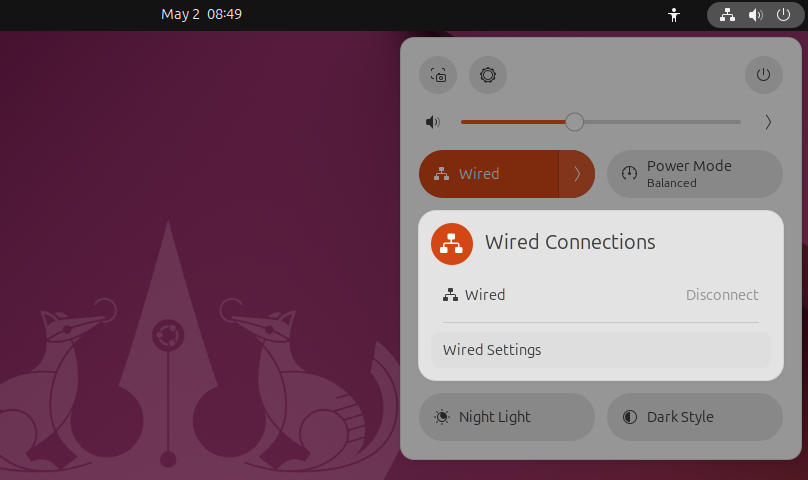
- Click the
>icon next to Wired or Wireless connection.

- Click the (Wired) Settings option as shown in screenshot.

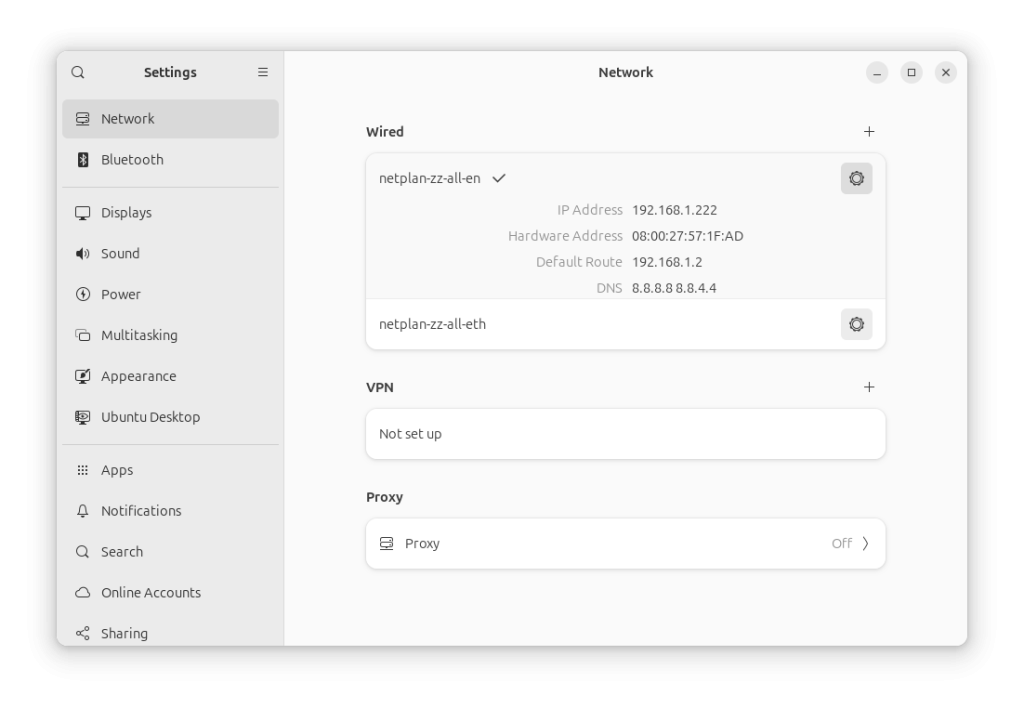
- This will show you the current IP address with other network details. Click the gear icon in front of them:

Step 2: Configure IP address
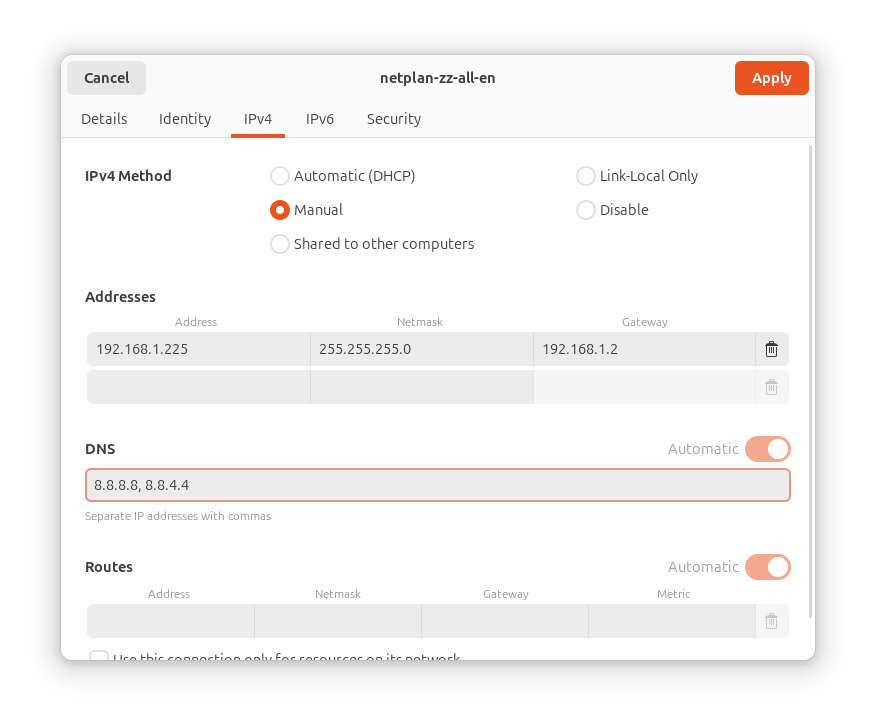
- In the settings menu, go to the IPv4 tab.
- Toggle the IPv4 Method to Manual.
- Enter your desired IP address, netmask (often 255.255.255.0), and gateway.
- Add DNS servers if necessary.

Step 3: Apply Configuration
Click Apply button to save your settings. This will automatically update your system ip address. Wait for a to apply the changes. Then you can check updated IP address in details tab.
Setting Up a Static IP in Ubuntu 24.04 using Command Line Interface
If you like using the command line or need to set up a server without a graphical interface, the command line method is easy and effective.
Step 1: Open Terminal
You can open the terminal by pressing Ctrl + Alt + T or by looking for ‘Terminal’ in the applications menu.
Step 2: Identify Your Network Interface
Type the command ip link to see all network interfaces.
ip link
Find the interface you want to set up, like eth0 for a wired connection or wlan0 for wireless.
Step 3: Edit Netplan Configuration
Ubuntu 24.04 uses Netplan to manage network settings. Find the Netplan configuration files in /etc/netplan/.
Open a file with a text editor, for example, type:
sudo nano /etc/netplan/01-netcfg.yaml
Step 4: Configure Static IP
Change the file to add your static IP details. For instance:
network:
  version: 2
  renderer: networkd
  ethernets:
    eth0:
      dhcp4: no
      addresses:
        - 192.168.1.100/24
      gateway4: 192.168.1.1
      nameservers:
        addresses:
          - 8.8.8.8
          - 8.8.4.4
Switch eth0 with your network interface and adjust the IP settings as needed.
Step 5: Apply Changes
Save the file and update the changes with sudo netplan apply.
sudo netplan apply
Check the new settings with ip addr show or by pinging another device.
Conclusion
Whether you like a graphical interface or the command line, setting up a static IP address in Ubuntu 24.04 (Noble Numbat) is easy. This setup can make your network more reliable and easier to access. Always test your settings to make sure the network works as you expect.
