
Managing multiple databases can be a challenging task, especially when they are hosted on different servers. phpMyAdmin, a popular tool for handling MySQL over the web, provides a convenient way to manage multiple hosts. In this guide, we will walk you through the steps to add multiple hosts in phpMyAdmin, simplifying your database management tasks.
Step 1: Understanding phpMyAdmin Configuration
Before you start, it’s important to understand that phpMyAdmin’s configuration is handled by a file named config.inc.php. This file resides in the root directory of your phpMyAdmin installation. If you haven’t modified this file before, it may be named config.sample.inc.php.
Step 2: Accessing the Configuration File
To access the configuration file, you’ll need to navigate to your phpMyAdmin installation directory. Once there, locate config.inc.php or rename config.sample.inc.php to config.inc.php if you’re setting it up for the first time.
Step 3: Configuring Multiple Hosts
Open config.inc.php in a text editor. To add multiple hosts, you’ll need to define each host in the configuration array. Below is an example configuring additional host with exiting localhost:
$i = 0;

/* Default localhost */
$i++;
$cfg['Servers'][$i]['verbose'] = 'localhost';
$cfg['Servers'][$i]['host'] = 'localhost';
$cfg['Servers'][$i]['auth_type'] = 'cookie';
$cfg['Servers'][$i]['compress'] = false;
$cfg['Servers'][$i]['AllowNoPassword'] = false;

/* Second host */
$i++;
$cfg['Servers'][$i]['verbose'] = 'Database Server 2';
$cfg['Servers'][$i]['host'] = '192.168.1.100';
$cfg['Servers'][$i]['port'] = '';  # Keep emtry for default
$cfg['Servers'][$i]['auth_type'] = 'cookie';
$cfg['Servers'][$i]['connect_type'] = 'tcp';
$cfg['Servers'][$i]['compress'] = false;
$cfg['Servers'][$i]['AllowNoPassword'] = false;
You can add more hosts as much you required.
Step 4: Customizing Host Settings
You can customize settings for each host. For instance, you can specify a different port or socket, enable SSL, or set other MySQL-specific options. Refer to the phpMyAdmin documentation for a full list of options.
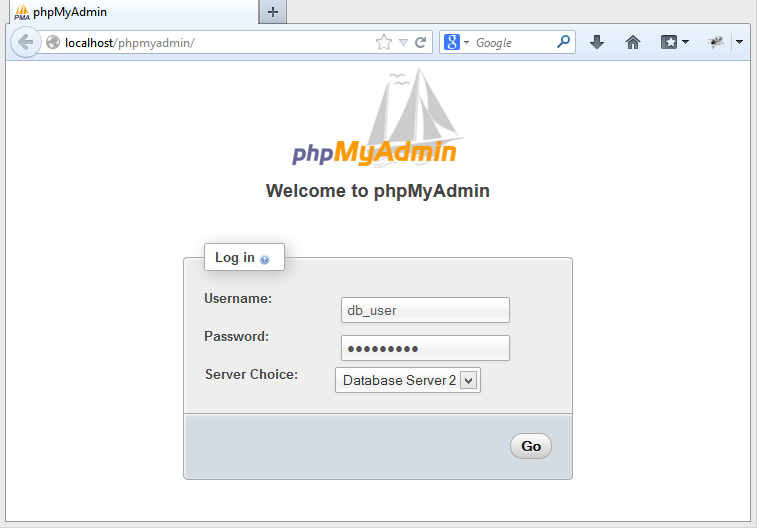
Step 5: Saving and Testing
After configuring the hosts, save the config.inc.php file. Open your phpMyAdmin in a web browser. You should now see a dropdown menu on the login page, allowing you to select from the configured hosts. Log in to each host to ensure your settings are correct.
Conclusion
Adding multiple hosts in phpMyAdmin is a straightforward process that can greatly simplify database management across different servers. By editing the config.inc.php file, you can efficiently manage several MySQL databases from a single phpMyAdmin interface. Remember to always backup your configuration file before making changes, and refer to the phpMyAdmin documentation for detailed configuration options.
Additional Tips:
- Keep your phpMyAdmin version updated for security and functionality.
- Use strong passwords for your database users.
- Consider using ‘cookie’ authentication for better security.
By following these steps, you can set up a multi-host phpMyAdmin environment that is efficient, secure, and tailored to your specific needs.
17 Comments
How to set Server Choice internally based on a URL , say for UAT I have abc.xyz.com , it should set to UAT , else prod
On Ubuntu 18 this config file was under /etc/phpmyadmin/config.inc.php
Thanks a loot, old but gold!
Thank you , it worked.
Thank you Very Much from Argentina
Thanks Rahul.
Very clear! Thanks for your tips. It works on my localhost envrionment.
Rahul, thanks for your tutorial
Thank you very. It works for me..
Like Irfan said, some distributions (eg. Debian or Ubuntu) store config.inc.php in /etc/phpmyadmin instead of /usr/share/phpmyadmin.
Thanks, this with IRFAN and JPACHTA comments works for me on Ubuntu
Hi, thanks for sharing this solution. It works.
Just remove extra white spaces in all string enclosed in apostrophes!
Does not work.
Hi Makinero,
What issue are you facing ? Which operating system are you using ?
Rahul, I don’t know about other distributions, but in Ubuntu, after your instructions, it was needed to copy the config.inc.php to /etc/phpmyadmin/.
cp /usr/share/phpmyadmin/config.inc.php /etc/phpmyadmin/

service apache2 restart #I don't know if this is really needed
Good comment. Nice explanation. Nice “Roboto Slab” font btw. The sun is shining, everything is awesome. I’m not a robot!
Hi Rahul
Thanks for your post, it is really nice and helpful.
But i found two things while doing the same on my localhost/phpmyadmin on my ubuntu machine.
1. The file was NOT available at the said location (/usr/share/phpMyAdmin or /usr/share/phpmyadmin). Then i created the file with the above code but nothing happened.
2. Then i updated /etc/phpmyadmin/config.inc.php with the above code and it worked!!! 🙂
Once again, thank you so much for your post.