
Today I have installed a new Citrix XenServer 6.2 at my workplace. When I connect it through XenCenter 6.2, I could not find a template for Ubuntu 16.04 LTS or 14.04 LTS. After googling I found below steps to create template for Ubuntu 16.04 LTS or 14.04 LTS in XenServer. How To Add Ubuntu 16.04 LTS Template in XenServer 6.2.
Step 1 – Update pygrub in Xenserver
- Edit the file /usr/lib/python2.4/site-packages/grub/GrubConf.py on the XenServer host machine.
- Got to line no 428 and change
from:if arg.strip() == "${saved_entry}":to:
if arg.strip() == "${saved_entry}" or arg.strip() == "${next_entry}": - Let’s start with creating new vms.
Step 2 – Create Templates for Ubuntu
Now execute following commands one by one to add a new template to the XenServer host. Below is the commands for adding Ubuntu 16.04 LTS and Ubuntu 14.04 LTS templates in your system. Add template as per your requirements.
Add Ubuntu 16.04 LTS Template
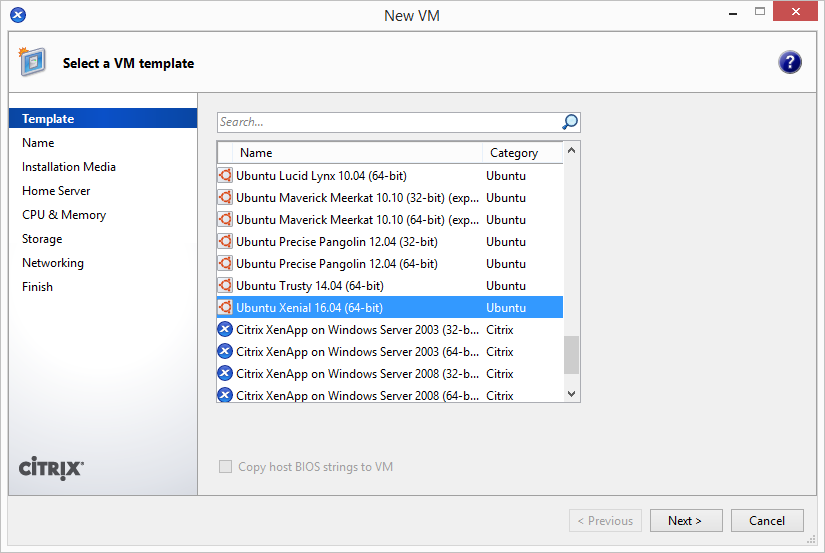
$ UUID=`xe template-list name-label="Ubuntu Precise Pangolin 12.04 (64-bit)" params=uuid --minimal`
$ NEW_UUID=`xe vm-clone uuid=$UUID new-name-label="Ubuntu Xenial 16.04 (64-bit)"`
$ xe template-param-set other-config:default_template=true other-config:debian-release=xenial uuid=$NEW_UUID
Add Ubuntu 14.04 LTS Template
$ UUID=`xe template-list name-label="Ubuntu Precise Pangolin 12.04 (64-bit)" params=uuid --minimal`
$ NEW_UUID=`xe vm-clone uuid=$UUID new-name-label="Ubuntu Trusty 14.04 (64-bit)"`
$ xe template-param-set other-config:default_template=true other-config:debian-release=trusty uuid=$NEW_UUID
Step 3 – Create New VM using Template
At this step, start with creating new VM using the newly created template. Open XenCenter, Right click on XenServer host and click New VM.
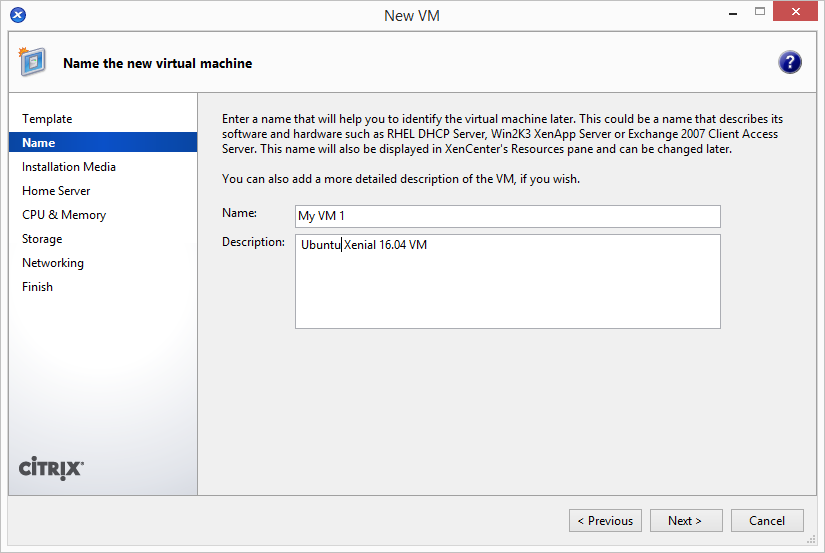
Enter the name and description of your new VM.
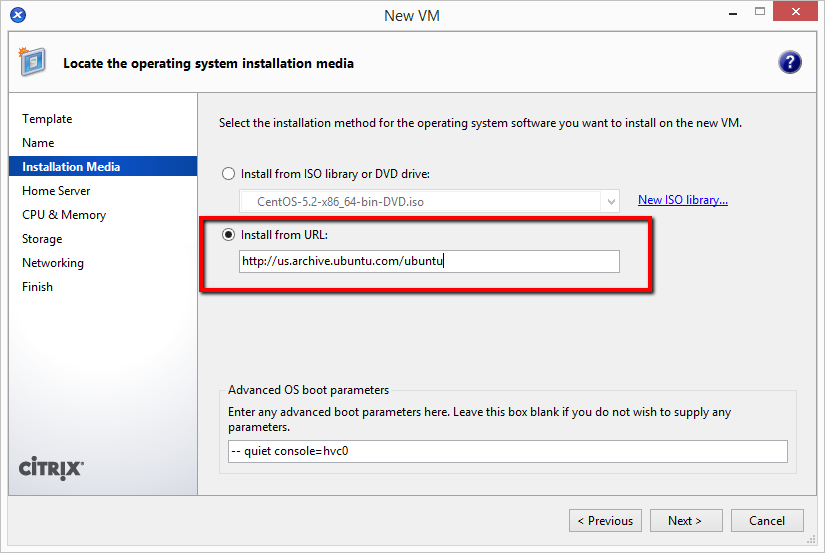
Select installation media source. If you have already had ISO, select the first option and choose ISO from the library. Else you can use the second option to install using net install URL. Enter http://us.archive.ubuntu.com/ubuntu as net install URL.
Now, follow the remaining on screen steps and complete Ubuntu 16.04 virtual machine installation on Citrix XenServer.
10 Comments
I am really happy to say it’s an interesting post to read. I learn new information from your article……….
I keep getting an error
Unable to access a required file in the specified directory: http://us.archive.ubuntu.com/ubuntu/dists/xenial/main/installer-amd64/current/images/netboot/xen/vmlinuz
I followed the instructions and it all went fine until it tries to start the VM and fails. I have inserted the http://us.archive.ubuntu.com/ubuntu
Still does not work. Any tips?
Thank you very much. You saved my time…
Thanks a lot!
This solution works perfect even on XenCloudPlatform 1.1 based on XenServer 5.6 (if I remember correct).
I have basically same questions like Dan and Andrea. Did someone try it for XenServer 6.5?
Thanks.
I’m confused as to why you would do a new deploy of XenServer 6.2 in May 2016…
• XenServer 6.5 was released Jan 2015 and added support for Ubuntu 14.04
• XenServer 7.0 was released May 2016 and added support for Ubuntu 16.04
Both these versions support HVM mode, and running under PV mode using the 12.04 template is not recommended on these versions.
I don’t need a NEW deploy of XenServer 6.5, I already have a XenServer 6.5 in production from years (with mostly Ubuntu 12.04 as guest) and the need to install 16.04 without upgrading XenServer itself.
I currently working on XenServer 6.5 and I just would like to tell you that the the changes to GrubConf.py is not needed (see /usr/lib64/python2.4/site-packages/grub/GrubConf.py)
However, I’m wondering why you configure “other-config:debian-release=trusty” for 16.04 (xential) too, is it a typo?
It is a typo and still not removed.
Works perfectly for me…. thanks a lot