
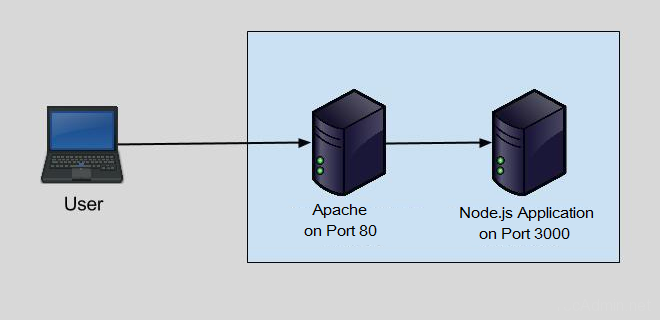
If your Node.js application is running on a server that is accessible to the internet, you will need to set up a reverse proxy so that external users can access your application via a URL, such as https://example.com. Even if your Node.js app is running on a private network and only accessible to internal users, setting up Apache reverse proxy will make it easier for you to scale your app in the future by allowing you to add new servers without changing all the existing URLs.
In this blog post, we are going to discuss how you can set up Apache Reverse Proxy for your Node.js application using Apache web server and Let’s Encrypt TLS Certificate along with other related configurations.
Before Start
- I am using Ubuntu 22.04 Linux system running in Virtualbox. You can also buy the VPS instance from DigitalOcean at low prices.
- Installed latest Node.js version using this tutorial on this Linux machine.
Step 1 – Create Sample Node Application
As you are here 🙂 You must have a running Node.js application on some port. We assume you are running your application on port 3000. For the demonstration purpose, I am creating a sample web application on Node.js and running on port 3000. So it will be easier to understand for you.
nano myapp.js
Then, add the following content in the JavaScript file.
const http = require('http');

const hostname = '127.0.0.1';
const port = 3000;

const server = http.createServer((req, res) => {
  res.statusCode = 200;
  res.setHeader('Content-Type', 'text/plain');
  res.end('Hello TecAdmin\n');
});

server.listen(port, hostname, () => {
  console.log(`Server running at http://${hostname}:${port}/`);
});
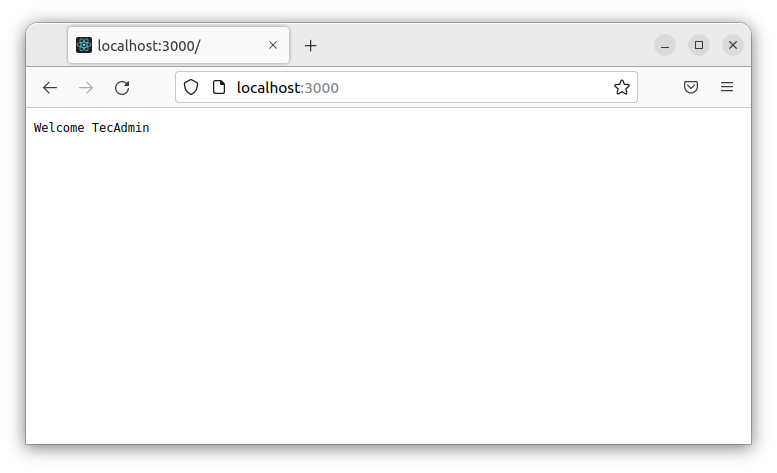
Your Node application is ready to serve on port 3000. Let’s start the Node.js application in the background.
node myapp.js &
And access this in the browser. You will see the result below:

Step 2 – Installing Apache
Now install the Apache web server using the default Package manager. The Ubuntu and Debian-based systems use apt, Fedora and CentOS/RHEL 8 use DNF, and CentOS/RHEL 7/6 use yum. Apache packages are available under default repositories on almost operating systems.
sudo apt install apache2### Debians based systemssudo dnf install httpd### Fedora & CentOS 8
After installation of the Apache web server, you must have enabled the Proxy module. This module is enabled in Apache for users who installed using rpm packages. If you don’t have enabled edit your Apache configuration /etc/httpd/conf/httpd.conf or for Apache 2.4 /etc/httpd/conf.modules.d/00-proxy.conf file and uncomment the following lines or put them in the file.
LoadModule proxy_module modules/mod_proxy.so
LoadModule proxy_http_module modules/mod_proxy_http.so
For the Debian-based systems use the following command to enable the Proxy module with Apache.
sudo a2enmod proxy proxy_http
Step 3 – Configure Virtual Host in Apache
As you have configured and run a Node.js demo server. Now, start configuration with the Apache web server. Create a virtual host configuration file for your domain under /etc/apache2/sites-available/ directory.
### Debian based system'ssudo nano /etc/apache2/sites-available/example.com.conf### Redhat based system'ssudo vim /etc/httpd/conf.d/example.com.conf
Add the following content.
<VirtualHost *:80>
      ServerName example.com
      ServerAlias www.example.com
      ServerAdmin webmaster@example.com

      ProxyPreserveHost On
      ProxyPass / http://localhost:3000/
      ProxyPassReverse / http://localhost:3000/

      ErrorLog /var/log/apache2/error.log
      CustomLog /var/log/apache2/access.log combined
</VirtualHost>
Save the file and close it.
After creating the configuration, restart the Apache webserver using the following command.
### Debian based system'ssudo a2ensite example.comsudo systemctl restart apache2### Redhat based system'ssudo systemctl restart httpd
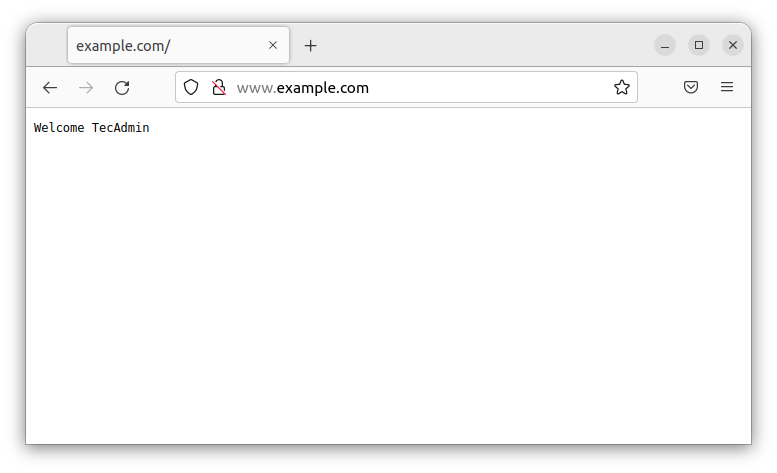
Step 4 – Verify Setup
The Apache reverse proxy server is configured to accept requests to send them to the backend Node application. Now, access your domain name in a browser. If everything is configured correctly, you should see the Node application.
Conclusion
In this blog post, we discussed why you need to set up reverse proxy and how you can set up Apache Reverse Proxy for your Node.js application. We also discussed why it is important to configure Nginx in such a way and how you can do so. Now that you know how to set up Apache Reverse Proxy for your Node.js application, you can rest assured that your application will be accessible to anyone who wants to access it. Alternatively, Nginx has better performance as a Proxy server, so if you are not bounded with Apache, go with the Nginx proxy server.
9 Comments
Be careful, having “ProxyRequests On” will turn your Apache into an open proxy that can be used for spamming unless you configure some access rules ( which are not configured by default ). According to apache’s documentation this is not required if you use “ProxyPass”
Thanks, Mihai, I have updated the tutorial as per your suggestions.
Hi,
How to setup https instead?
Hi Dohab, YOu can install free ssl certificate with lets encrypt on Apache:
https://tecadmin.net/apache-lets-encrypt-ssl-ubuntu/
Thanks for the tutorial on “How to Setup Apache As Frontend Proxy for Node.js” Will it work for a https connection ie. in your case https://example.com
You accidently mentioned “Nginx” instead of “Apache” at some places in you article, e.g.
– “Now install the Nginx web server…”
– “Nginx is available under default repositories…”
Thanks, Updated tutorial
nginx is the most popular webserver not Apache
Nice! Thank you for this guide!