
In the realm of software development, version control is paramount. Among the various version control systems available, Git has emerged as an industry standard due to its robustness, flexibility, and distributed architecture. In this article, we’ll be focusing on the fundamental steps of a basic Git workflow: Add, Commit, and Push.
Understanding Git
Before delving into the intricacies of Git’s workflow, it’s crucial to understand what Git is. Git is a distributed version control system that allows multiple developers to work on a project simultaneously without overwriting each other’s changes. This is achieved by creating different versions of the project, which can be merged later on.
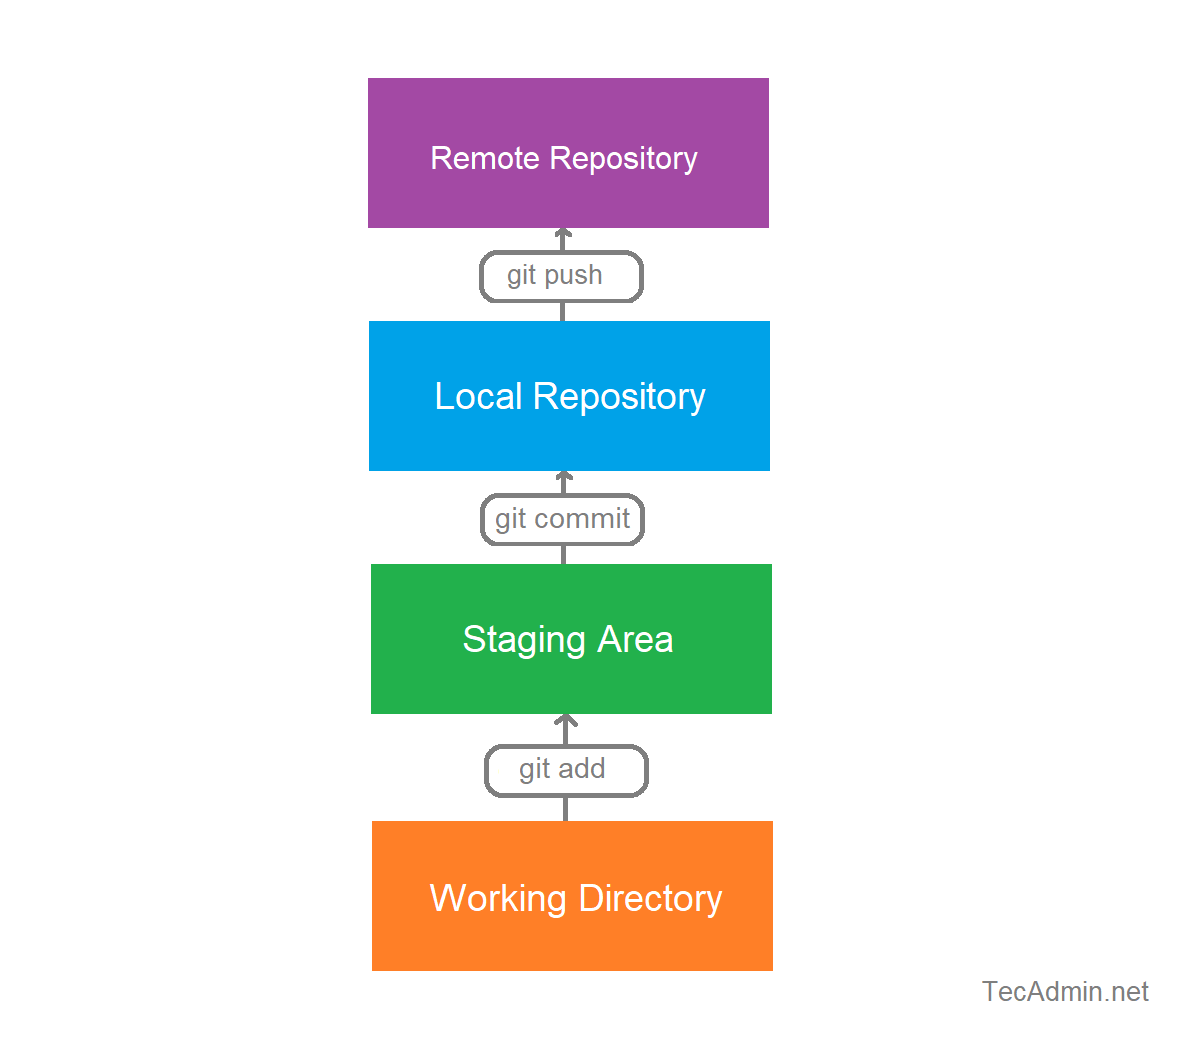
The Git Workflow
A standard Git workflow consists of four stages:
- Workspace (Working Directory)
- Index (Stage)
- Local Repository (Head)
- Remote Repository

Git Add
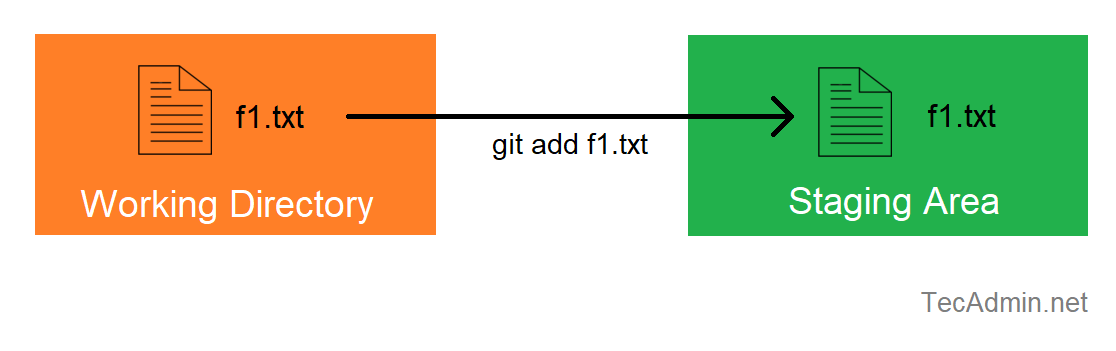
`git add` is a command used in Git, a version control system that allows developers to track changes in their projects. The `git add` command is a crucial part of the Git workflow, which stages changes in the working directory for the next commit. When you make changes to your project, these alterations are initially untracked by Git. If you want Git to track these changes, you need to add them to the staging area, and you do this with the git add command.
There are a few different ways to use git add:
- `git add .` : This command stages all changes in the entire working directory. This includes all new, modified, and deleted files.
- `git add `: This command stages changes made to a specific file.
- `git add -p` or `git add –patch`: This command allows you to interactively choose chunks of content to stage.
- `git add -u` or `git add –update`: This command stages changes to tracked files only (modified and deleted, but not new).
Think of the git add command as your way of telling Git, “Hey, I’ve made some changes over here, and I want you to be aware of them”. At this point, Git acknowledges the changes, but it doesn’t record or save them just yet. That’s where the next command comes into play. In essence, `git add` puts your changes in a queue, waiting to be permanently saved to your project’s history.
Here’s how you use it:
1 2 | $ git add f1.txt # to add specific files $ git add . # to add all modified and new files |

Git Commit
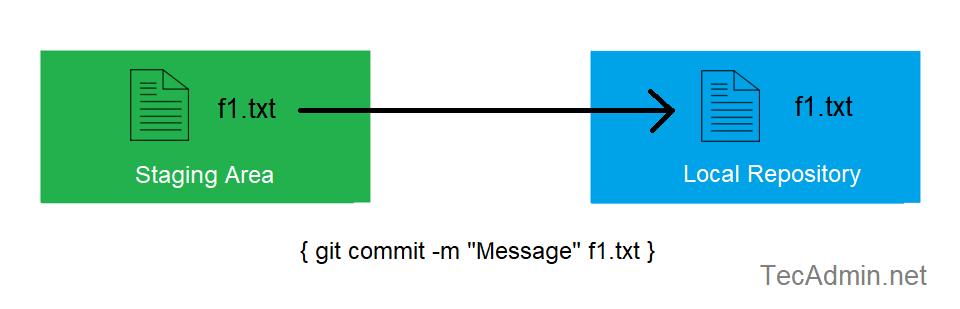
The `git commit` is a command used in Git, a version control system, to save changes to the project. The command takes all the changes that have been staged with the `git add` command, and records a new ‘snapshot’ or ‘commit’ of the project history.
Each commit in Git creates a unique ID (a SHA-1 hash) that allows you to keep record of specific changes along with who made them and when. Commits provide a historical timeline of your project, allowing you to navigate and understand how your project evolved over time, or even revert changes if needed.
When you run the `git commit` command, it usually opens up a text editor where you can write a commit message. This message should provide a brief description of the changes made for future reference.
The command is typically used as follows:
1 | $ git commit -m "Your descriptive message about changes" |
The -m option stands for message and allows you to write the commit message directly in the command line. If you don’t include the -m option, Git will open up a text editor for you to write your message.

Git Push
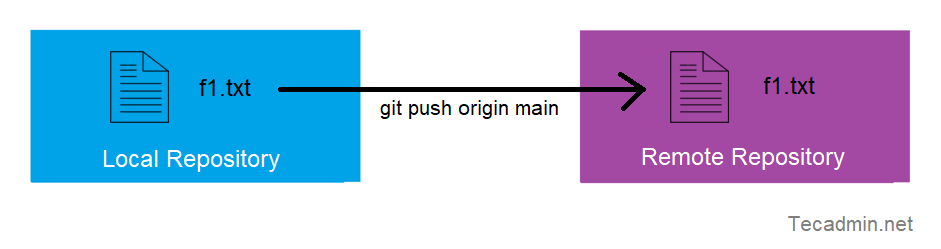
The `git push` command is used in Git to upload local repository content to a remote repository. It is essentially the command that transmits your commits to a remote repository on a server (like GitHub or GitLab), allowing others to see and collaborate on your changes.
After you have made changes to your project and committed those changes with `git commit`, you use `git push` to share these updates with the wider team or public. If you’re working in a team setting, this is a crucial step because it allows your changes to be accessible to everyone else.
The `git push` command is generally used in conjunction with a repository and branch name:
1 | git push <remote> <branch> |
- <remote> is the alias of the URL of the remote repository. By default, this is usually origin.
- <branch> is the branch that you want to push.
For example, if you want to push your local commits to the main branch of the origin remote, you would use the following command:
1 | git push origin main |
Remember, the git push command requires network access to reach the remote repository, and appropriate permissions to make changes to the repository.

Bringing it All Together
Here’s a simple example of how to use these commands in a real-world situation:
- First, navigate to your local repository on your computer using the terminal or command line.
- Make changes to your files.
- Once you’re satisfied with your changes, use `git add .` to add all the changes to the staging area.
- After adding the changes, commit them using `git commit -m “Your informative commit message”`
- Finally, push your changes to the remote repository using `git push origin main` (assuming you’re pushing to the main branch).
Conclusion
Mastering the basic Git commands of add, commit, and push can drastically improve your productivity as a developer. These commands form the backbone of many teams’ development workflows, allowing for collaborative work and version control. It is essential to note that this is just the tip of the iceberg, and Git has a lot more to offer, including branching, merging, and resolving conflicts.

