Configuring a Dynamic Host Configuration Protocol (DHCP) server on CentOS or Red Hat Enterprise Linux (RHEL) systems is a fundamental task for network administrators aiming to automate the assignment of IP addresses and other network settings to client devices. This not only simplifies network management but also enhances the efficiency and reliability of network services. This article delves into essential tips, tricks, and best practices for configuring a DHCP server on CentOS/RHEL, ensuring a robust and efficient network setup.
Understanding DHCP
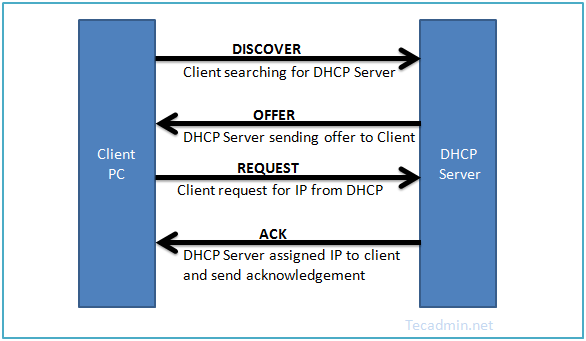
Before diving into the configuration nuances, it’s crucial to grasp the essence of DHCP. This network management protocol automates the distribution of IP addresses, subnet masks, gateway addresses, and other networking parameters, eliminating the need for manual setup on each client device.
Prerequisites
Before diving into the setup process, ensure that your system meets the following prerequisites:
- A machine running CentOS/RHEL or Fedora system.
- Root privileges or access via an account with sudo permissions.
- A basic understanding of networking concepts and terminal commands.
Step 1: Planning Your IP Address Scheme
Before setting up your DHCP server, carefully plan your network’s IP address scheme. This involves deciding on the range of IP addresses you’ll allocate for dynamic assignment and those you’ll reserve for static assignment to servers and network devices. A well-thought-out IP address scheme prevents address conflicts and ensures efficient use of IP addresses.
For this article, we will use IP network 192.168.1.0/24.
Step 2: Installing the DHCP Server
The first step involves installing the DHCP server package. On CentOS/RHEL, the DHCP server software is provided by the dhcp package. Open your terminal and execute the following command to install it:
sudo dnf install dhcp -y
Step 3: Configuring the DHCP Server
Once installed, the next step is to configure the DHCP server. This involves editing the DHCP configuration file located at /etc/dhcp/dhcpd.conf.
1. DHCP configuration file
Backup the original configuration file (optional but recommended):
sudo cp /etc/dhcp/dhcpd.conf /etc/dhcp/dhcpd.conf.backup
Then edit the dhcpd.conf file with your preferred text editor, for example, nano:
sudo nano /etc/dhcp/dhcpd.conf
2. Subnet Declaration
The subnet declaration specifies the network segment, including the range of IP addresses available for dynamic assignment, network mask, default gateway, DNS servers, and lease time. Here’s how you might set it up:
# Sample /etc/dhcp/dhcpd.conf configuration

# Define the subnet and range of IP addresses for dynamic assignment
subnet 192.168.1.0 netmask 255.255.255.0 {
    range 192.168.1.10 192.168.1.200; # Dynamic IP range
    option routers 192.168.1.1; # Default gateway
    option subnet-mask 255.255.255.0; # Subnet mask
    option domain-name-servers 8.8.8.8, 8.8.4.4; # DNS servers (Google's DNS used here for example)
    default-lease-time 600; # Lease time in seconds
    max-lease-time 7200; # Maximum lease time in seconds
}
3. Static Reservations
For devices requiring fixed IP addresses, you define static reservations within the DHCP scope. This involves mapping the device’s MAC address to a specific IP address. Here’s how you can configure static reservations for a printer and a server as examples:
# Static IP reservation for a printer
host printer1 {
    hardware ethernet 00:11:22:33:44:55; # MAC address of the printer
    fixed-address 192.168.1.210; # Reserved IP address for the printer
}

# Static IP reservation for a server
host server1 {
    hardware ethernet 66:77:88:99:AA:BB; # MAC address of the server
    fixed-address 192.168.1.220; # Reserved IP address for the server
}
4. Final Notes
- MAC Address: Replace 00:11:22:33:44:55 and 66:77:88:99:AA:BB with the actual MAC addresses of your devices.
- IP Addresses: Adjust 192.168.1.210 and 192.168.1.220 to the IP addresses you wish to reserve for your devices. Ensure these addresses are outside the dynamic range you specified (192.168.1.10 to 192.168.1.200) to avoid conflicts.
- DNS Servers: In the example, Google’s public DNS servers (8.8.8.8 and 8.8.4.4) are used. You may replace these with your preferred DNS servers.
Step 4: Starting and Enabling the DHCP Server
After configuring the DHCP server, you need to start the service and enable it to launch at boot:
sudo systemctl start dhcpdsudo systemctl enable dhcpd
Step 5: Configuring the Firewall
If you’re using a firewall, you’ll need to allow DHCP traffic through it. You can do this by running:
sudo firewall-cmd --add-service=dhcp --permanentsudo firewall-cmd --reload
Step 6: Testing the DHCP Server
To test if the DHCP server is working correctly, try connecting a client device to your network. The device should automatically receive an IP address from the DHCP server if everything is configured correctly.
Conclusion
Setting up a DHCP server on a CentOS/RHEL system can significantly streamline the management of IP addresses within a network. By following the steps outlined in this guide, you should now have a fully functional DHCP server that automatically assigns IP addresses to client devices. Remember, the example configurations provided are a starting point; customize them to fit the specific needs of your network.

12 Comments
Hay Thank you for explained, but how to setup dhcp multi vlan ?
Thanks for the dhcp setup. Had it working in minutes.
Thank you for this information
very helpful, concept got cleared
Hello Rahul,
Thank you very much for such a great information, I have a quesiton I’m working on a project at universtiy. I’m assigned to create a server client environment with CentOS server, I need to configure DNS, DHCP and LDAP. If you can please recommend any youtube channel or something else. At the moment scenario is, I have got 7 different subnets, each on a different VLAN, I want to configure dhcp scopes for those networks. I managed to configure the same on Windows 2012, because it is very simple and easy to configure by the help of dhcp scopes. but I have no idea how I am going to achieve the same on CentOS. Can you please help???
DHCP server is used to assigning the IP address to the clients. This process is used for the LAN network. For the production servers, DHCP is also used.
In centos/rhel 7.x the daemon should be dhcpd not dhcp.
Just one notice, the command to copy the example configuration has a small mistake.
# cp /usr/share/doc/dhcp-4.1.1/dhcpd.conf.sample /etc/dhcp/dhcpd.conf
should be example instead of sample (because it is an example).
# cp /usr/share/doc/dhcp-4.1.1/dhcpd.conf.example /etc/dhcp/dhcpd.conf
Nice tutorial, thanks a lot!
Good Knowledge and Also Give Step by Step Configuration,
i want other details for Configuration like DNS, iSCSI, LDAP, TFTP etc…
Yep, explained really well. All working!
Well done, it works!!
easy to understand website and quite helpful.