When it comes to handling keys for SSH (Secure Shell) connections, different software utilities often require different formats. Two of the most commonly used key file formats are PEM (Privacy Enhanced Mail) and PPK (PuTTY Private Key). As an SSH client, PuTTY prefers the PPK format, but often times you might receive or generate a PEM format key. Hence, there’s a need to convert PEM to PPK.
In this article, we’ll walk you through a detailed, step-by-step guide on how to convert PEM to PPK using a free, open-source tool called PuttyGen.
PEM to PPK conversion (quick instructions)
Here is the quick instructions to convert PEM file to PPK using puttygen.
- Download and install PuTTYgen on your system.
- Launch PuTTYgen application.
- Click on “Load” and select your PEM file.
- Click on “Save private key” and choose the PPK format.
- Save the file.
PEM to PPK conversion (detailed instructions)
PuttyGen is a key generator tool for creating pairs of public and private SSH keys. It is part of the PuTTY suite, though it can also be downloaded independently.
- You can download it from the official PuTTY website. Once downloaded, run the installer and follow the on-screen instructions to install it on your system.
- Double-click on the downloaded PuttyGen file to launch the application. You’ll see the key generation interface. For our current task, we won’t generate a new key but instead convert an existing one.
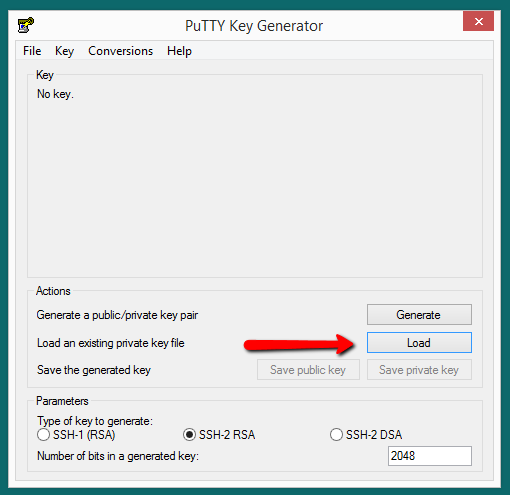
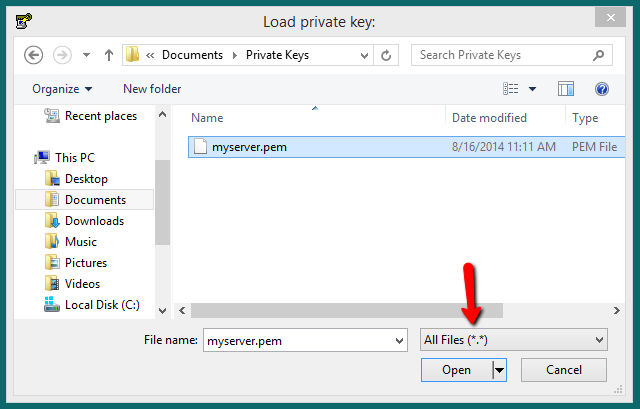
- In the PuttyGen interface, click on the ‘Load’ button in the right-side panel. Navigate to the location of your PEM file, select it, and click ‘Open’. If you don’t see your PEM file, ensure the file type dropdown is set to ‘All Files (*.*)’.
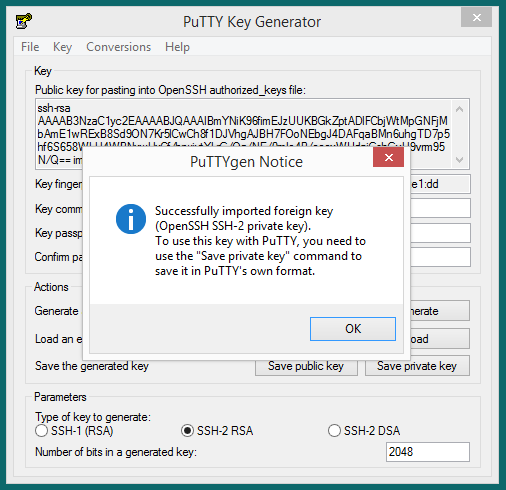
- In case, puttygen shows error message “Couldn’t load private key (not a private key).” Don’t worry, this just means that we need to tell PuttyGen that this is an RSA key.
Go back to the main PuttyGen window and navigate to ‘Conversions’ from the top menu. Click on ‘Import key’. Navigate back to your PEM file, select it, and click ‘Open’.
- At this point, your PEM key will be loaded successfully into PuttyGen.
- Back on the main PuttyGen window, click on the ‘Save private key’ button. A warning will pop up asking if you want to save this key without a passphrase. For simplicity’s sake, click ‘Yes’. However, for real-world usage, it’s generally recommended to secure your key with a passphrase. In the file explorer window, navigate to where you want to save your PPK file, give it a name, and click ‘Save’.
And voila! You’ve successfully converted a PEM file to a PPK file using PuttyGen. You can now use this PPK key file to authenticate your SSH sessions with PuTTY or any other SSH client that supports PPK.
Conclusion
Working with different SSH key formats might seem complicated at first, but tools like PuttyGen streamline the process considerably. By following these steps, you can easily convert your PEM keys to PPK, ensuring they’re compatible with your SSH client of choice. Always remember to handle your keys with care, as they provide access to your secure servers and services.

3 Comments
Does this also convert .P12 to .PPK?
it worked. thanks
Awesome post, thanks for sharing the info.