SSL is useful for secure communication between user and web server. Certificate encrypt the data while traveling on public lines, So it will be secure from hackers. Self-signed certificates are free to use but do not use in the production environment where confidential data like a credit card, PayPal information are used. Click here to read more details about Self-signed certificates.
This how-to guide will help you to step by step create and install Self Signed Certificate in Apache server on Linux systems.
Step 1 – Install mod_ssl Package
In order to set up a SSL certificate, make sure mod_ssl is installed on your system. If it’s not already installed, use the following command to install it. Also, install OpenSSL package to create the certificate.
sudo apt-get install openssl          # Debian based systems
sudo yum install mod_ssl openssl      # Redhat / CentOS systems
sudo dnf install mod_ssl openssl      # Fedora 22+ systems
Step 2 – Create Self Signed Certificate
After installing mod_ssl and OpenSSL, Create a self-signed certificate for your domain using the following command.
sudo mkdir -p /etc/pki/tls/certs
sudo cd /etc/pki/tls/certs
Now create SSL certificate
sudo openssl req -x509 -nodes -newkey rsa:2048 -keyout example.com.key -out example.com.crt
Generating a 2048 bit RSA private key
....................................+++
...................................+++
writing new private key to 'example.com.key'
-----
You are about to be asked to enter information that will be incorporated
into your certificate request.
What you are about to enter is what is called a Distinguished Name or a DN.
There are quite a few fields but you can leave some blank
For some fields there will be a default value,
If you enter '.', the field will be left blank.
-----
Country Name (2 letter code) [XX]: IN
State or Province Name (full name) []: Delhi
Locality Name (eg, city) [Default City]: Delhi
Organization Name (eg, company) [Default Company Ltd]: TecAdmin
Organizational Unit Name (eg, section) []: blog
Common Name (eg, your name or your server's hostname) []: www.example.com
Email Address []: [email protected]
The above command will create one ssl key file example.com.key and one certificate file example.com.crt in current directory.
Step 3 – Install Self Signed Certificate in Apache
Now you have self-signed SSL certificate and key file. Next to edit Apache SSL configuration file and edit/update as per following directives.
1 2 3 4 5 6 7 8 9 10 11 | <VirtualHost *:443> ServerAdmin admin@example.com ServerName www.example.com ServerAlias example.com DocumentRoot /var/www/html SSLEngine on SSLCertificateFile /etc/pki/tls/certs/example.com.crt SSLCertificateKeyFile /etc/pki/tls/certs/example.com.key </VirtualHost> |
Step 4 – Restart Apache
If above command doesn’t show any error restart Apache service.
sudo systemctl restart apache2       # Debian based systems
sudo systemctl restart httpd         # Redhat based systems
Step 5 – Test Website with HTTPS
Finally, open your site in your favorite web browser using https. It required opening port 443 to access a site using https.
https://www.example.com
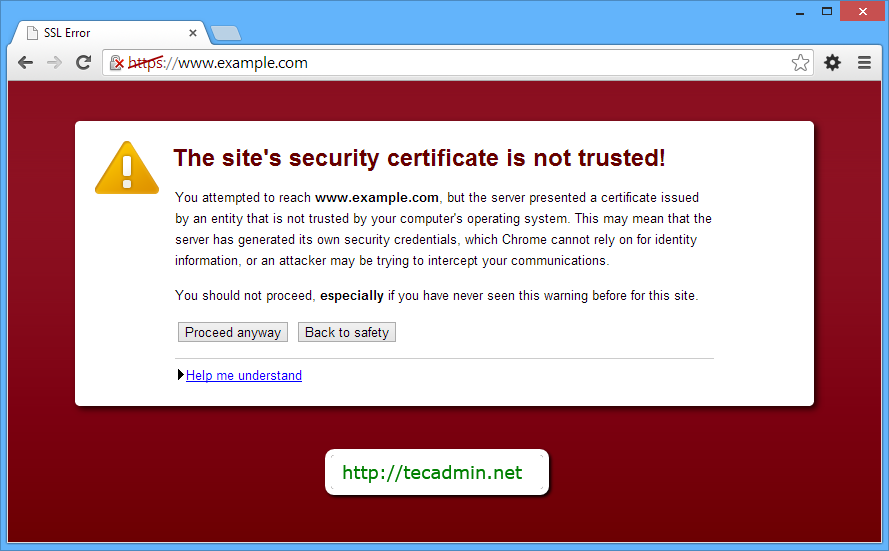
As we are using a self-signed certificate, you will get a warning message in your browser. You can simply ignore this message using below steps
Firefox User: Expand
Chrome User: Click
IE Users: Click
7 Comments
I like the efforts you have put in this, thanks for all the great posts.
there is no location provided for configuration files
cd /etc/httpd/conf.d/
edit file ssl.conf
very good writeup
Great Work
I have been looking for this a long time ago
Thank you very much!!!
Nice doc
Thanks
Subhash Chandra Bijarniya