Phusion Passenger is an application server which can be integrated into web server like Apache and Nginx and allows to serve Ruby/Rails applications via the web server. It’s a good option to deploy Ruby on Rails application on productions systems. This article will help you to deploy Ruby app with Nginx on Linux systems like Ubuntu and Debian systems. You can use this tutorial for staging as well as production deployments.
First of all, we assume you already have Ruby installed on your system. If you do not have Ruby installed on your system, Use one of below URL to install it as per your application requirements.
Step 1 – Prerequisites
First of all, enable the HTTPS support for Apt repositories and install the PGP keys for passenger packages on your system.
sudo apt-get install -y dirmngr gnupg
sudo apt-key adv --keyserver hkp://keyserver.ubuntu.com:80 --recv-keys 561F9B9CAC40B2F7
sudo apt-get install -y apt-transport-https ca-certificates
Then, add the passenger repository reference to below file. The `lsb_release -cs` will set the codename of your operating system. You can also change this and set the codename manually.
sudo sh -c 'echo deb https://oss-binaries.phusionpassenger.com/apt/passenger `lsb_release -cs` main > /etc/apt/sources.list.d/passenger.list'
Step 2 – Install Passenger Nginx Module
Now install the passenger module and Nginx on your system. If you already have Nginx installed, this will installed latest Nginx packages from the passenger repository, which is compiled with passenger libraries.
$ sudo apt-get install -y nginx-extras passenger
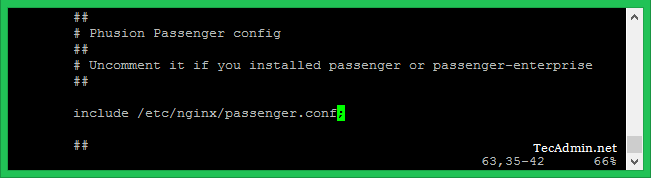
Edit Nginx configuration file /etc/nginx/nginx.conf and uncomment the include /etc/nginx/passenger.conf; line. For example see the below screenshot.
Step 3 – Create Nginx VirtualHost
Now, you can deploy your Ruby/Rails application on this server. Create a Nginx configuration file and configure the virtual host like the blow.
$ vim /etc/nginx/conf.d/example.com.conf
Change the document root as per your application location on disk.
  server {
        listen       80 default_server;
        server_name  example.com www.example.com;
        root         /path-to-ruby-app/public;
        passenger_enabled on;

   }
Step 4 – Verify Setting and Restart Nginx
Execute the below command to validate the passenger installation on your system. All checks should be passed properly. If any of check failed, it will help you to fix.
$ sudo /usr/bin/passenger-config validate-install
What would you like to validate? Useto select. If the menu doesn't display correctly, press '!' ‣ ⬢ Passenger itself ⬡ Apache ------------------------------------------------------------------------- * Checking whether this Passenger install is in PATH... ✓ * Checking whether there are no other Passenger installations... ✓ Everything looks good. :-)
Finally, reboot the Nginx web server to reload any changes made to its configuration files.
$ sudo systemctl restart nginx.service

