
Git is one of the most popular Version Control Systems (VCS) currently in use, and it provides a wide range of commands to manage and manipulate the history of your codebase. Understanding these commands and their subtleties can significantly improve your efficiency and the way you work with a codebase. One such command is git reset, which comes with a few options that can significantly change its behavior: --soft, --mixed, and --hard.
Introduction to Git Reset
The git reset command is a powerful tool used to undo changes in a Git repository. It essentially allows you to move the HEAD pointer to a specific commit, thus changing what is considered the “latest” commit in your local repository. But the command can affect your working directory, staging area (also known as the index), and your commit history in different ways depending on whether the --soft, --mixed, or --hard flag is used.
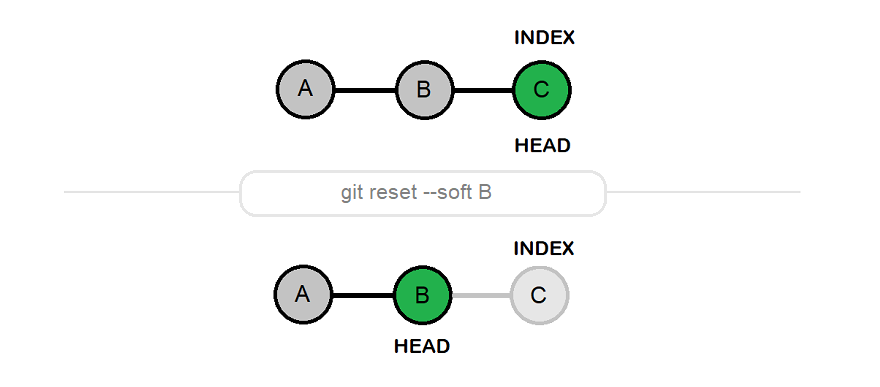
Git Reset --soft
When using `git reset --soft `, Git moves the HEAD pointer to the specified commit, but leaves the staging area and working directory unchanged. This means all changes from the commits after the specified commit will be kept in the staging area, ready to be committed again.
Let’s consider an example. Suppose you have the following commit history:
1 | A -- B -- C (HEAD -> main) |
If you execute `git reset --soft B`, your commit history will look like this:
1 | A -- B (HEAD -> main) |
However, the changes introduced in commit C will be left in your staging area, as if they’re ready to be committed again. This option is particularly useful if you want to redo the commit message of commit C or squash it into commit B.

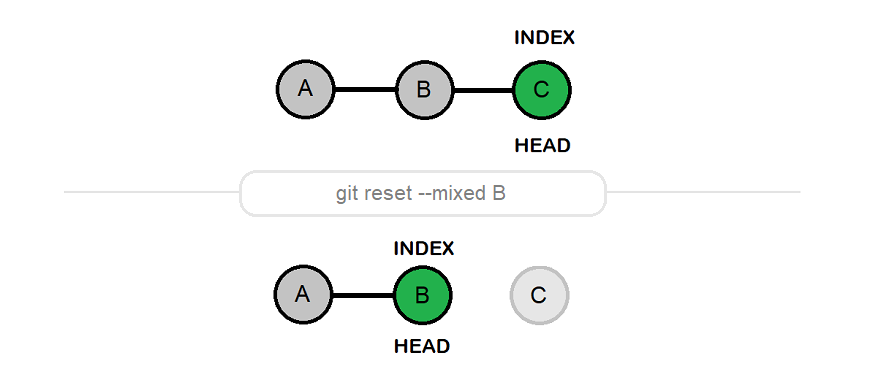
Git Reset --mixed
The `git reset --mixed <commit>` is the default option for git reset. It moves the HEAD pointer to the specified commit, just like --soft. However, it also resets the staging area to match this commit, but leaves the working directory unchanged.
Returning to our previous example, if you execute `git reset --mixed B` after having made commit C, you will find yourself with the changes introduced in commit C present in your working directory but not in your staging area. In other words, they’ll appear as untracked changes. This can be useful if you want to re-stage certain changes or break them up into multiple commits.
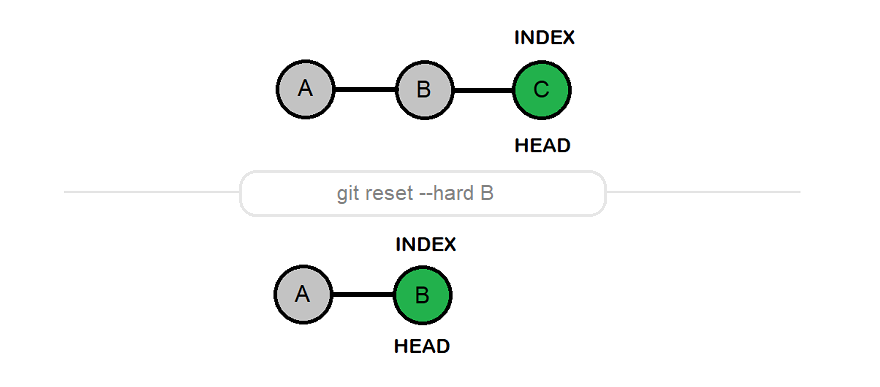
Git Reset --hard
The `git reset --hard <commit>` command is the most destructive option. It moves the HEAD pointer, resets the staging area, and the working directory to match the specified commit. Essentially, it completely discards all commits after the specified commit.
If you follow our ongoing example, `git reset --hard B` would completely discard commit C, including both its commit entry and changes to the files. Be careful when using this option, as you will lose all uncommitted changes in your working directory. This command is typically used when you want to completely discard recent commits and changes.
Wrapping Up
In summary, here is a concise description of what each flag does:
git reset --soft <commit>: Moves HEAD to <commit>, keeps the staging area and the working directory as is.git reset --mixed <commit>(default): Moves HEAD to <commit>, resets the staging area, but keeps the working directory as is.git reset --hard <commit>: Moves HEAD to <commit>, and resets both the staging area and the working directory.
The git reset command, with its --soft, --mixed, and --hard flags, is a powerful tool for manipulating commit history in a Git repository. However, its power comes with the potential for destruction, so it’s important to understand these flags before using them. Always remember to keep your work saved elsewhere or be sure about your command before executing a git reset, especially with the --hard flag.
1 Comment
Nicely explained. Thanks a lot