
In the current software development landscape, Docker and Spring Boot stand out as powerful tools for creating and deploying applications efficiently. Docker simplifies the deployment process by containerizing applications, ensuring consistency across different environments, while Spring Boot offers a streamlined approach for building stand-alone, production-grade Spring-based Applications that you can “just run”. This article provides a practical guide to getting started with Dockerizing a Spring Boot application, including a simple example to illustrate the process.
Introduction to Docker and Spring Boot
Docker is a platform for developing, shipping, and running applications inside containers. Containers allow a developer to package an application with all of its dependencies into a single unit, which can then be run on any system that supports Docker, ensuring consistency across development, testing, and production environments.
Spring Boot simplifies the development of new Spring applications through convention over configuration. It provides a range of out-of-the-box features for application development such as embedded servers, metrics, health checks, and externalized configuration.
Prerequisites
Before we start, ensure you have the following installed on your machine:
- Docker engine
- Shell access to system
Step 1: Create a Spring Boot Application
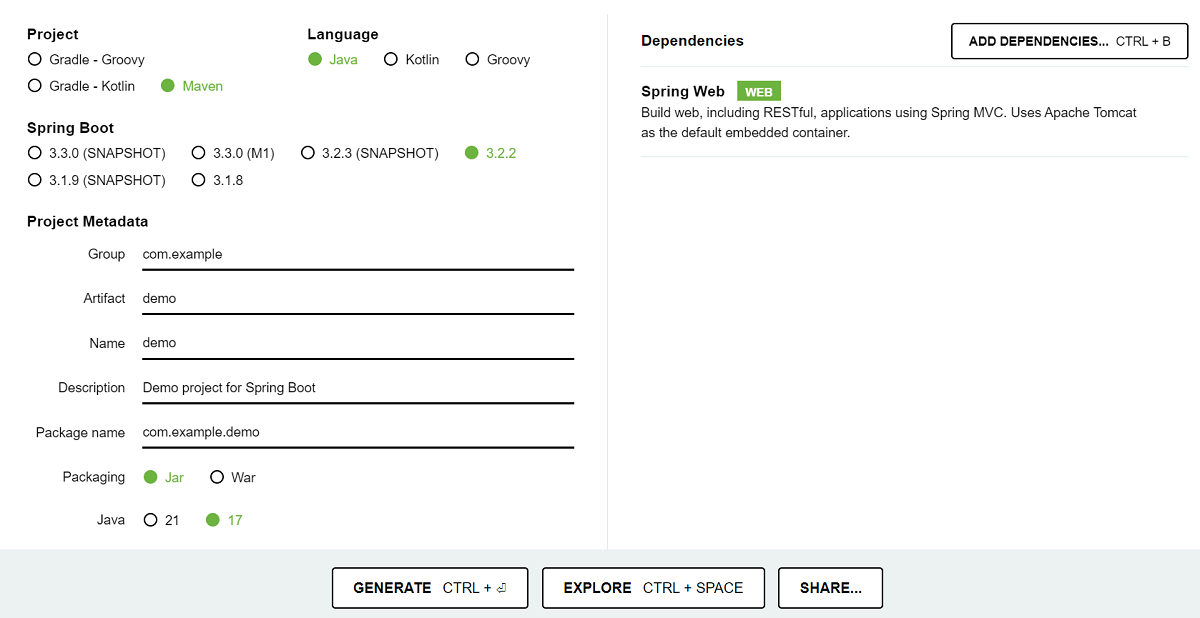
First, we’ll create a simple Spring Boot application. You can use Spring Initializer (https://start.spring.io/) to generate a basic project structure. For this example, let’s create a simple web application.
- Group: com.example
- Artifact: demo
- Dependencies: Spring Web
- Download the generated project and extract it to your working directory.

Step 2: Creating a Dockerfile
Next, create a Dockerfile in the root of your project. This file defines how your Docker image should be built.
We adopted a multi-stage build process, allowing us to separate the build environment from the runtime environment. This significantly reduced the image size and build time. Our Dockerfile first built the application using a Maven base image and then copied the compiled jar to a lightweight Java runtime image.
# Use a Maven image as the base for the build stage to leverage caching of Maven dependencies
# Stage 1: Build the Spring Boot application
FROM maven:3.8.5-openjdk-17 as builder
# Set the working directory inside the container to /app
WORKDIR /app

# Copy only the pom.xml initially to cache Maven dependencies
COPY pom.xml .
# Copy the project source code into the container
COPY src ./src

# Package the application without running tests to speed up the build process
RUN mvn package -DskipTests

# Start a new stage from a slim version of the OpenJDK 11 image to reduce the final image size
# Stage 2: Create the runtime image
FROM openjdk:17-jre-slim

# Copy the built jar file from the build stage to the root directory of the runtime container
COPY --from=builder /app/target/*.jar app.jar

# Set the container to run the application when it starts
ENTRYPOINT ["java","-jar","/app.jar"]
Step 3: Build and Run Dockerfile
With the Dockerfile in place, build the Docker image using the following command:
docker build -t bootspring:latest .
This command builds an image from the Dockerfile and tags it as bootspring:latest.
Next, Run your Docker container using:
docker run -p 8080:8080 demo
This command runs your Docker container and maps the container’s port 8080 to the host’s port 8080. You can now access your Spring Boot application at http://localhost:8080.
Step 4: Simplifying Build with Docker Compose
Next, create a docker-compose.yaml file in the root directory of your project. This file defines the services, networks, and volumes for your Docker Compose application. For a simple Spring Boot application, the Docker Compose file might look something like this:
version: '3.8'
services:
  app:
    build: .
    ports:
      - "8080:8080"
This configuration tells Docker Compose to:
- Build the Docker image for your application using the Dockerfile in the current directory.
- Map port 8080 on the host to port 8080 in the container, allowing you to access your application at http://localhost:8080.
Step 5: Running Application with Docker Compose
With your docker-compose.yml file in place, you can now build and run your application using Docker Compose. Open a terminal, navigate to the directory containing your Docker Compose file, and run:
docker-compose build
This command builds the Docker image for your application (if it hasn’t been built already). Docker Compose pulls the necessary base image, builds your application image according to the Dockerfile
Next use command to starts the containers
docker-compose up -d
This will start the application container. The `-d` option, which tells Docker to run the container in detached mode, freeing up the terminal.
Conclusion
Congratulations! You’ve successfully dockerized a simple Spring Boot application. This setup is a starting point for developing more complex applications and deploying them with Docker. The combination of Docker and Spring Boot simplifies development and deployment processes, allowing developers to focus more on building the application itself rather than worrying about environmental inconsistencies. As you become more familiar with Docker and Spring Boot, you’ll discover even more benefits and capabilities that can help streamline your development workflow.