
Securing access to your web applications is essential, and one of the simplest methods to do so is by using HTTP authentication. NGINX, a popular web server and reverse proxy server, provides an easy way to enable HTTP authentication using the Basic authentication scheme. This article will walk you through the process of implementing HTTP Basic authentication on NGINX in a step-by-step manner.
HTTP Basic authentication is a simple authentication method that requires a user to provide a username and password to access the protected resources. The credentials are sent as a base64-encoded string in the HTTP header. While this method is not the most secure option, it can provide a basic level of access control when more advanced authentication mechanisms are not required.
Prerequisites
Before starting, ensure that you have the following:
- A running instance of the NGINX web server
- Root or sudo access to the server
- A domain name or IP address pointing to your server
- A basic understanding of NGINX configuration
Step 1: Installing the htpasswd Utility
The `htpasswd` utility is a command-line tool for creating and managing password files used in HTTP Basic authentication. It is part of the Apache HTTP Server package but can be used with NGINX as well.
To install the htpasswd utility, run the following command on your server:
- For Debian-based systems (Ubuntu, Debian):
sudo apt-get updatesudo apt-get install apache2-utils - For RHEL-based systems (CentOS, RHEL, Fedora):
sudo yum install httpd-tools
Step 2: Creating a Password File
Once the htpasswd utility is installed, create a new password file with an initial user:
sudo htpasswd -c /etc/nginx/.htpasswd username
Replace “username” with the desired username. You will be prompted to enter and confirm a password for the user. The password file will be saved in the /etc/nginx directory as .htpasswd.
To add additional users or modify existing users’ passwords, run the following command without the `-c` flag:
sudo htpasswd /etc/nginx/.htpasswd another_username
Step 3: Configuring NGINX Basic Authentication
Open your NGINX configuration file, usually located at /etc/nginx/nginx.conf or the specific server blog configuration like /etc/nginx/sites-available/example.com, and add the following lines within the location block you want to protect:
auth_basic "Restricted Access";
auth_basic_user_file /etc/nginx/.htpasswd;
For example, to protect the entire website, your configuration should look like this:
server {
    listen 80;
    server_name example.com;

    location / {
        auth_basic "Restricted Access";
        auth_basic_user_file /etc/nginx/.htpasswd;

        root /var/www/html;
        index index.html index.htm;
    }
}
Save the configuration file and restart the NGINX service:
sudo systemctl restart nginx
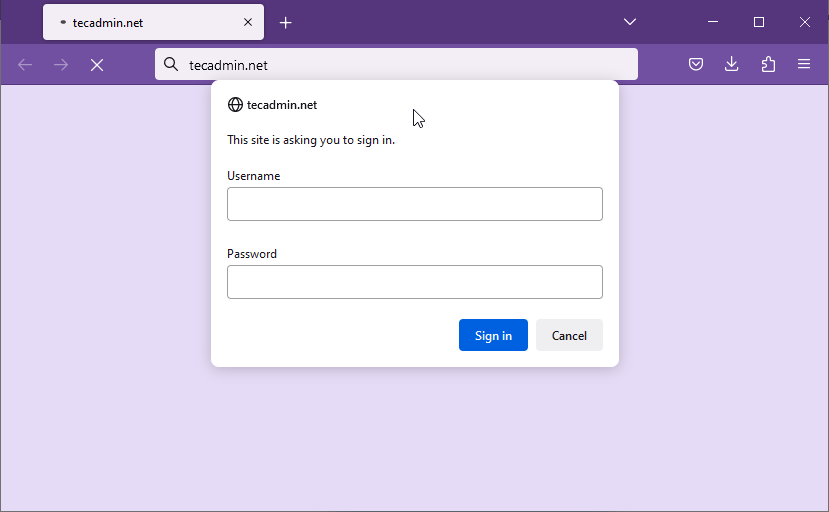
Step 4: Testing HTTP Basic Authentication
To test the HTTP Basic authentication, open your browser and visit the protected location on your server using your domain name or IP address. You should be prompted to enter the username and password you created earlier. If the credentials are correct, you will be granted access to the protected resource.

Step 5: Enhancing Security with HTTPS (Optional but Recommended)
While HTTP Basic authentication provides a simple way to restrict access to your web resources, it has a significant security limitation: credentials are transmitted in plain text (base64-encoded) over the network. To mitigate this risk, you should use HTTPS to encrypt the data transmitted between the client and server.
To enable HTTPS on NGINX, you need to obtain an SSL/TLS certificate from a Certificate Authority (CA) like Let’s Encrypt. The following steps outline the process for obtaining a free Let’s Encrypt certificate and configuring NGINX to use HTTPS:
- Install Certbot:
- For Debian-based systems (Ubuntu, Debian):
sudo apt-get updatesudo apt-get install certbot - For RHEL-based systems (CentOS, RHEL, Fedora):
sudo yum install certbot
- For Debian-based systems (Ubuntu, Debian):
- Obtain an SSL/TLS certificate:
Run the following command, replacing “example.com” with your domain name:
sudo certbot certonly --standalone -d example.comThe obtained certificate files will be stored in the /etc/letsencrypt/live/example.com directory.
- Configure NGINX to use HTTPS:
Open your NGINX configuration file and add a new server block to listen on port 443 for HTTPS connections:
server { listen 443 ssl; server_name example.com; ssl_certificate /etc/letsencrypt/live/example.com/fullchain.pem; ssl_certificate_key /etc/letsencrypt/live/example.com/privkey.pem; location / { auth_basic "Restricted Access"; auth_basic_user_file /etc/nginx/.htpasswd; root /var/www/html; index index.html index.htm; } location ^~ /.well-known/acme-challenge/ { allow all; auth_basic off; } } server { listen 80; server_name example.com; return 301 https://$host$request_uri; } - Save the configuration file and restart the NGINX service:
sudo systemctl restart nginx
Now, when you visit the protected location on your server, the connection will be encrypted using HTTPS, providing an additional layer of security for your HTTP Basic authentication credentials.
Conclusion
In this article, we covered the step-by-step process of implementing HTTP Basic authentication on an NGINX server. By using the htpasswd utility to create and manage password files, you can secure your web resources with simple username and password authentication. Additionally, we discussed how to enhance security by enabling HTTPS to encrypt data transmission between the client and server. While HTTP Basic authentication is not the most secure option, it can provide a basic level of access control when more advanced authentication mechanisms are not required.
2 Comments
how will “sudo certbot certonly –standalone -d example.com” do while nginx is running?
how will updating certificates work as the webdirectory is secured with basic-auth?
this document will not work at all regarding letsencrypt
I have updated article to fixed this issue.