
HTTP/2, often touted as the future of web protocols, brings a multitude of benefits, including multiplexing, server push, and header compression. These advancements not only enhance the speed of web page loading but also improve overall server performance, making HTTP/2 a must-have for any competitive website.
However, running HTTP/2 on Apache, especially on an Ubuntu server, involves more than just a simple switch. It requires an environment that supports this protocol. Notably, HTTP/2 operates exclusively over TLS (HTTPS), making it mandatory to have an SSL/TLS certificate. Additionally, Apache’s default Multi-Processing Module (MPM), mpm_prefork, is not compatible with HTTP/2. This necessitates a switch to a more suitable MPM like mpm_event, which is designed for high-performance, scalable network applications.
This article provides a comprehensive guide on how to enable HTTP/2 on Apache in Ubuntu, focusing on key steps like updating your server, verifying Apache versions, switching from mpm_prefork to mpm_event, enabling necessary modules, and configuring your server to fully leverage the benefits of HTTP/2. Whether you’re managing a small blog or a large e-commerce site, these insights will help you boost your site’s performance and user experience, keeping you at the forefront of web technology advancements.
Prerequisites
- Ubuntu server (18.04 or newer)
- Apache 2.4.17 or later
- Root or sudo privileges
- A valid SSL certificate (as HTTP/2 requires HTTPS)
Step by Step Guide
- Update Your System
Before proceeding, ensure your Ubuntu server is up-to-date. Run the following commands:sudo apt update && sudo apt upgrade - Verify Apache Version
HTTP/2 support is available in Apache 2.4.17 and later. Verify your Apache version with:apache2 -vIf your version is older, update Apache:
sudo apt install apache2 - Disable mpm_prefork Module
The mpm_prefork module is not compatible with HTTP/2. Disable it:sudo a2dismod mpm_prefork - Enable mpm_event Module
The mpm_event module is more efficient and compatible with HTTP/2. Enable it:sudo a2enmod mpm_event - Enable Apache HTTP/2 Module
Apache comes with an HTTP/2 module (mod_http2) that needs to be enabled. Execute:sudo a2enmod http2 - Configure Apache to Use HTTP/2
Edit the Apache configuration file to enable HTTP/2. For each virtual host that should use HTTP/2, add Protocols h2 http/1.1 to the configuration. An example for default SSL configuration:sudo nano /etc/apache2/sites-available/000-default-le-ssl.confAdd
Protocols h2 http/1.1under the<VirtualHost *:443>section.<VirtualHost *:443> ... Protocols h2 http/1.1 ... </VirtualHost> - Test Configuration
After editing the configuration file, check for syntax errors with:sudo apache2ctl configtestIf the output is
Syntax OK, restart Apache to apply changes:sudo systemctl restart apache2 - Verify HTTP/2 and mpm_event Activation
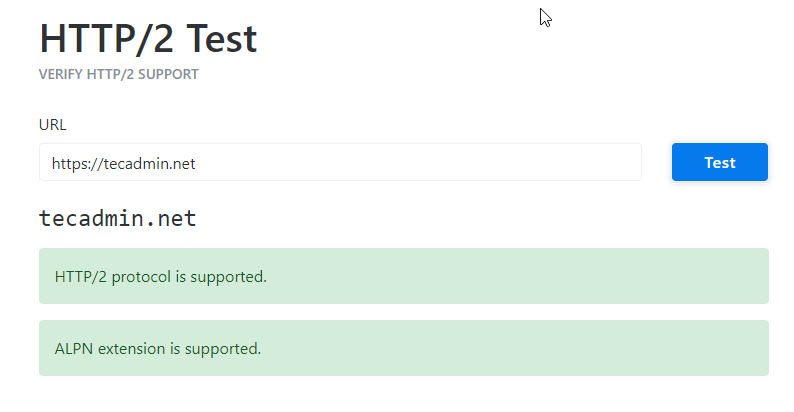
Ensure HTTP/2 is active using browser tools or online services. Confirm mpm_event is running with:apachectl -M | grep mpmTo confirm that HTTP/2 is enabled, you can use browser developer tools or online tools like HTTP/2 Test.
Step-by-Step Guide to Enable HTTP/2.0 in Apache

Conclusion
Enabling HTTP/2 in Apache on Ubuntu can greatly improve the loading times and efficiency of your website. By following these steps, you can leverage the benefits of the latest web protocol standards.
4 Comments
Incomplete guide. You need to edit the virtual host file and then restart apache2.
Now edit your website VirtualHost and add http2 keyword in listen section.
What kind of instruction is this? it’s useless
Hi, Where we can write listen in Apache VirtualHost? I think listen is related to Nginx.
Thanks for the info….