
In the realm of web development and server management, the capability to manipulate and manage URLs efficiently can dramatically improve site navigation, user experience, and SEO performance. Microsoft’s Internet Information Services (IIS) provides a robust platform for hosting web applications on Windows servers, and with the URL Rewrite Module, administrators have a powerful tool at their disposal to create highly customizable and dynamic URL structures. This guide offers a step-by-step approach to enabling the URL Rewrite Module in IIS, setting the stage for enhanced website management.
Understanding the URL Rewrite Module
The URL Rewrite Module in IIS is an extension that enables web administrators to define rules that modify request URLs on the fly. With this module, you can achieve cleaner URLs for SEO, redirect URLs for site restructuring, enforce HTTPS, and more, all of which contribute to an optimized web presence.
Prerequisites
Before proceeding, ensure you have administrative access to the IIS web server where you intend to enable the URL Rewrite Module. Additionally, verify that your system is running IIS 7.0 or later, as earlier versions do not support this feature.
Step 1: Installing the URL Rewrite Module
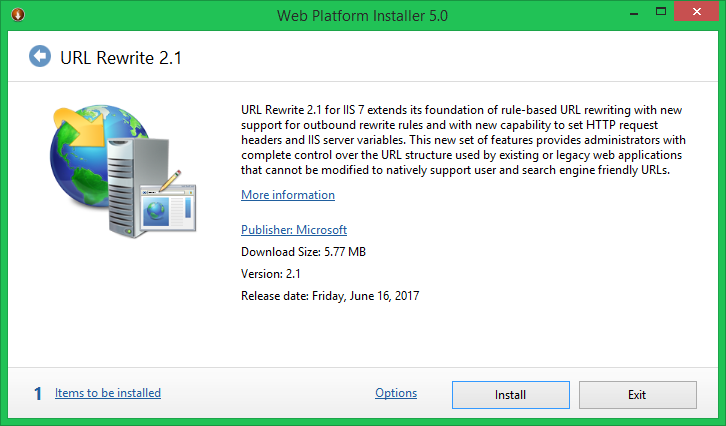
- Method 1: Use Microsoft Web Platform Installer:
The easiest way to install the URL Rewrite Module is through the Microsoft Web Platform Installer. This tool simplifies the installation of Microsoft web technologies including IIS, SQL Server, .NET Framework, and more. Simply search for “URL Rewrite” within the installer’s interface and click “Add” followed by “Install”.
- Method 2: Manual Download and Installation:
Alternatively, if you prefer a manual approach, visit the IIS official website at http://www.iis.net/downloads/microsoft/url-rewrite to download the URL Rewrite Module installer. Run the installer and follow the prompts to complete the installation process.

Step 2: Accessing the URL Rewrite Interface
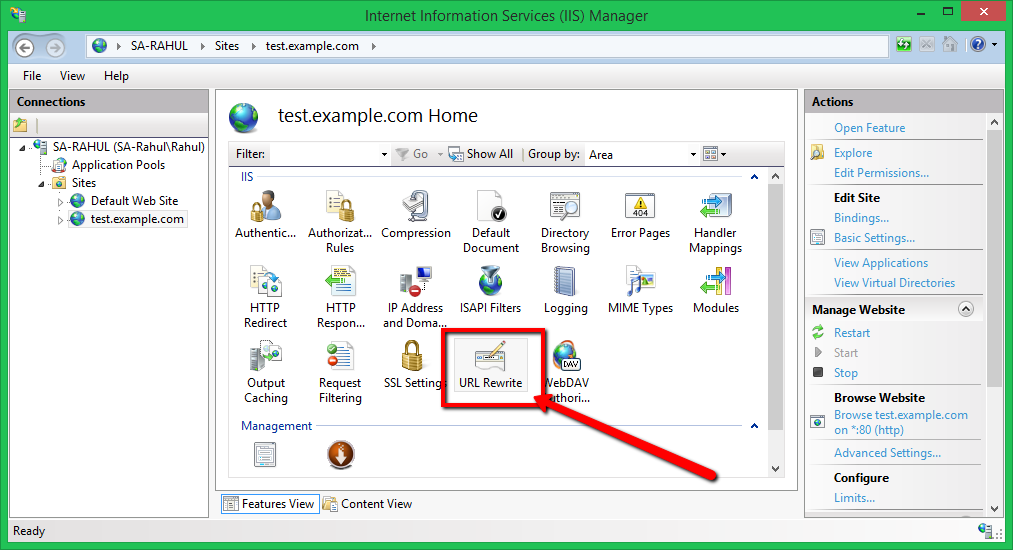
Once installed, the URL Rewrite Module is integrated into the IIS Manager. To access it:
- Open the IIS Manager.
- Select your website from the list in the Connections panel.
- In the Features View, you will find the URL Rewrite option under the IIS section.

Step 3: Creating URL Rewrite Rules
To create a new rewrite rule:
- Open the URL Rewrite interface by double-clicking the URL Rewrite feature icon.
- Click “Add Rule(s)…” to open the Add Rule dialog.
- Choose the template that best fits your needs. For beginners, the “Blank rule” option provides a good starting point for custom rules.
- Configure your rule settings, specifying the match conditions, URL pattern, and action to take when the pattern is matched.
- After configuring your rule, click “Apply” in the Actions pane to save your changes.
Step 4: Testing and Verifying Your Rewrite Rules
It’s crucial to test your rewrite rules to ensure they behave as expected. You can do this by navigating to the URLs affected by your rules and observing the server’s response. Additionally, the IIS Manager’s URL Rewrite module offers a “Test Pattern” feature, allowing you to test your regular expressions against various URL inputs.
Suggestion: Enable Application Request Routing
Beyond basic URL rewriting, enhancing your server with Application Request Routing (ARR) might be necessary. The ARR extension for IIS elevates your server’s capabilities, enabling sophisticated routing rules that consider URL structures, HTTP headers, and server variables. This functionality is crucial for efficiently directing traffic to the most suitable web application server, optimizing load balancing and overall server responsiveness.
For enabling ARR on your IIS server, visit the following link to download and install the necessary extension:
https://www.iis.net/downloads/microsoft/application-request-routing
Conclusion
Enabling and configuring the URL Rewrite Module in IIS can significantly enhance your website’s management by allowing for cleaner URLs, improved SEO, and more efficient navigation. By following the steps outlined in this guide, web administrators can leverage this powerful tool to create a more robust and user-friendly web experience. Remember, while the URL Rewrite Module is potent, it requires careful configuration to ensure it serves your site’s goals without unintended consequences.
1 Comment
Does not work with IIS 10 on Server 2019 STD