
Transport Layer Security (TLS) 1.3 represents a significant advancement in the security protocols used for internet communication. With its introduction in Windows Server 2022 and Windows 11, administrators now have access to enhanced security features and improved connection speeds. This guide provides a detailed walkthrough on enabling TLS 1.3 in Windows Server 2022, ensuring that your server benefits from the latest in security technology.
Prerequisites
- Operating System: Ensure that you are running Windows Server 2022 or Windows 11, as these are the versions that support TLS 1.3.
- Administrator Access: You will need administrator privileges to make the required changes.
Here is the step by step guide to enable TLS 1.3 on Windows systems:
Step 1: Verify System Compatibility
- Check OS Version: Confirm that your system is running Windows Server 2022 or Windows 11. This can be done through the ‘System Information’ screen.
Step 2: Update Windows Server
- Windows Update: Access ‘Windows Update’ through the Control Panel or Settings app and check for any pending updates, particularly those related to security.
- Install Updates: Download and install any available updates to ensure your system is up to date.
Step 3: Enable TLS 1.3
In Windows Server 2022, TLS 1.3 is enabled by default. However, you can use one of the following method to enable it:
Using Registry Editor
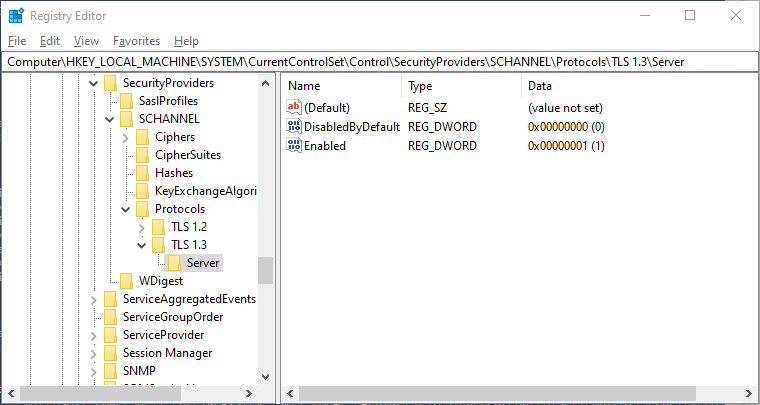
- Open Registry Editor: Press Win + R, type regedit, and hit Enter.
- Navigate to TLS Registry Key: Go to
HKEY_LOCAL_MACHINE\SYSTEM\CurrentControlSet\Control\SecurityProviders\SCHANNEL\Protocols - Add TLS 1.2 Keys: Right-click on ‘Protocols’, select New > Key, and name it TLS 1.3.
- Add Server and Client Keys: Inside TLS 1.3, create two new keys named Server and Client.
- Configure Keys: For each, create a new DWORD (32-bit) Value named Enabled with a value of 1 and a DWORD (32-bit) Value named DisabledByDefault with a value of 0.
Using PowerShell
- Open PowerShell: Run as Administrator.
- Run Configuration Script: Execute a PowerShell script to modify the registry settings for enabling TLS 1.3. Example script:
New-Item 'HKLM:\SYSTEM\CurrentControlSet\Control\SecurityProviders\SCHANNEL\Protocols\TLS 1.3\Server' -Force
New-ItemProperty -Path 'HKLM:\SYSTEM\CurrentControlSet\Control\SecurityProviders\SCHANNEL\Protocols\TLS 1.3\Server' -Name 'Enabled' -Value '1' -PropertyType 'DWord'
New-ItemProperty -Path 'HKLM:\SYSTEM\CurrentControlSet\Control\SecurityProviders\SCHANNEL\Protocols\TLS 1.3\Server' -Name 'DisabledByDefault' -Value '0' -PropertyType 'DWord'

Step 4: Configure Cipher Suites (Optional)
- Group Policy Editor: Press Win + R, type gpedit.msc, and press Enter.
- Cipher Suite Settings: Navigate to Computer Configuration >> Administrative Templates >> Network >> SSL Configuration Settings.
- Prioritize TLS 1.3 Suites: In the “SSL Cipher Suite Order” setting, ensure TLS 1.3 cipher suites are prioritized at the top of the list for optimal security.
Step 5: Test and Verify
- Restart the Server: After making changes, reboot your server.
- Testing TLS 1.3: Use a network protocol analyzer like Wireshark or an online TLS checker to ensure that TLS 1.3 is operational.
Conclusion
Enabling TLS 1.3 on Windows Server 2022 is a straightforward process that significantly boosts your network’s security and performance. It is crucial for administrators to keep their systems updated and verify that the latest security protocols are in use. Regularly check for updates and stay informed about new security features and best practices.
Staying updated and knowledgeable about your server’s security settings is essential for maintaining a secure and efficient network environment.