
Imagine you and a friend are working together to build a website for a bakery. You want to keep the main version of the website running smoothly while you try out new features like adding a gallery of cakes or an online order form. This is where Git branches come in handy. They help you manage different versions of the website without affecting the live version that your customers see.
The popular Git Flow model recommends naming branches like this:
- main
- develop
- feature
- release
- hotfix
In this model, ‘main’ and ‘develop’ are the main branches. The other branches, ‘feature’, ‘release’, and ‘hotfix’, are used for specific tasks.
In this tutorial, we’ll show you how to create, list, switch, merge, push, and delete branches in your Git repository.
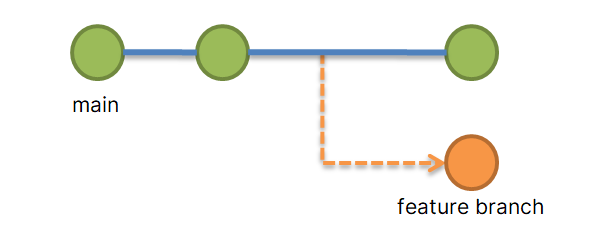
1. Creating a Branch
The first step in adding a new feature, like an online order form or a cake gallery, is to create a new branch. This keeps your experimental work separate from the main project. To create a branch, use the command:
git branch new-feature-name
For example, if you’re adding an online order form, you might name your branch “add-order-form”. Similarly to add cake gallery create branch name like “add-cake-gallery”.

2. Listing Branches
To see all the branches you have in your repository and determine which one you’re currently on, use:
git branch
This command will display all branches and mark the active branch with an asterisk (*).
3. Switching Branches
Before you start working on your new feature, you need to switch to the appropriate branch:
git checkout add-order-form
This command changes your current working branch to “add-order-form”. Which you can verify by running “git branch” command again.
4. Fetching Latest Changes
Before you begin your workday, it’s good practice to fetch the latest changes from the remote repository. This is crucial when working in a team to ensure you have the latest updates:
git fetch origin
This command downloads all the recent changes but doesn’t merge them.
5. Checking Updates
After fetching, you can examine the updates with:
git log --oneline --decorate --graph --all
This helps you see what others have been working on, represented in a neat, graphical format.
6. Merging Branches
Once your feature is ready and tested, you’ll want to merge it back into the main project. First, switch back to the branch you want to merge your changes into. Assuming you want to merge your changes to main branch:
git checkout main
Then, merge your feature branch:
git merge add-order-form
This command integrates your new feature into the main branch.
7. Pushing Branches to a Remote Repository
After merging your changes locally, push them to the remote repository to make them available to your teammate and update the live version of the website:
git push origin main
8. Deleting Branches
Once your changes are successfully merged and pushed, either you can keep it for more work or you can delete the feature branch to keep your project clean:
git branch -d add-order-form
To remove the branch from the remote repository as well, use:
git push origin --delete add-order-form
Summary
Throughout the project, you and your teammate might be working on different features. Regularly fetching updates and checking them ensures that both of you are aware of each other’s progress and can plan merges without conflicts. For example, if you’re working on the order form while your partner works on the cake gallery, both of you can integrate your work into the main project without disrupting the live website, ensuring a smooth experience for your customers.
Using Git branches, fetch, and merge tools effectively allows both of you to maintain an organized and up-to-date workflow, critical for the successful development of your bakery website. Hope this tutorial helps you to understand the uses of branches in a Git project.