
Git rebase is a powerful command that allows you to change your project history in many ways, such as editing, deleting, and squashing commits. It’s very useful for keeping a clean and readable history.
However, `git rebase` can be quite complex and can have significant consequences if not used correctly. Therefore, it’s crucial to understand what each step does.
This tutorial will cover the basics of `git rebase`, with the help of examples, and will show how it can be used in a workflow.
What is Git Rebase?
Git rebase is a command in Git, a distributed version control system. This command allows developers to integrate changes from one branch into another.
Rebase is often used to make a clean, linear project history. It’s a way to “replay” changes from one line of work (branch) onto another in a way that results in a smooth, conflict-free integration.
Here’s how it works:
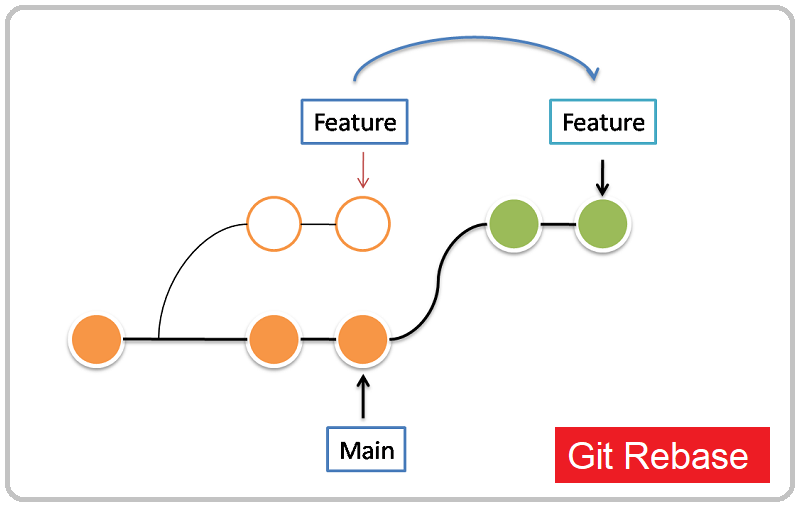
- You start by having a branch where you have committed some work.
- Meanwhile, the main (or any other) branch has received new commits.
- To include these new commits in your feature branch, you can use git rebase.
Rebasing effectively saves the changes in your current branch, temporarily “removes” the commits you’ve made on your branch, applies the new commits from the other branch, and then reapplies your changes one commit at a time on top of these.
It is important to note that rebasing rewrites the commit history by creating new commits for each commit in the original branch. This can make the project history cleaner and easier to understand.

Here are the step by step guide to learn and understand the process of Git Rebase with a practical example:
Step 1: Understand the Basics of Git
Firstly, you should already have a good understanding of the basics of Git, including concepts like repositories, commits, branches, the working directory, staging area, etc. If you’re not familiar with these, it would be beneficial to take a step back and understand these concepts before diving into `git rebase`.
Step 2: Setup a Repository for Practice
Next, we’ll setup a simple repository for practice:
1 2 3 4 5 6 7 8 9 10 11 12 13 14 15 16 17 18 | # Create a new directory for your repository $ mkdir git-rebase-tutorial $ cd git-rebase-tutorial # Initialize a new Git repository $ git init # Create a file and make your first commit $ echo "First Line" > example.txt $ git add example.txt $ git commit -m "Initial commit" # Make a few more commits $ echo "Second Line" >> example.txt $ git commit -am "Second commit" $ echo "Third Line" >> example.txt $ git commit -am "Third commit" |
This creates a new repository and adds three commits to it. You can view the history using `git log`.
Step 3: Create a New Branch
Now, let’s create a new branch and make a few more commits:
1 2 3 4 5 6 7 8 9 10 11 | # Create a new branch $ git checkout -b feature-branch # Make more commits $ echo "Feature Line 1" >> feature.txt $ git add feature.txt $ git commit -m "Feature commit 1" $ echo "Feature Line 2" >> feature.txt $ git commit -am "Feature commit 2" |
We’ve now created a branch named `feature-branch` and added two commits to it.
Step 4: Understanding the Concept of Rebase
Now, let’s say that while you were working on your `feature-branch`, someone else made a change to `main` that you need to incorporate into your branch. This is where `git rebase` comes in handy.
1 2 3 4 5 6 7 8 9 10 | # Checkout main branch $ git checkout main # Make a change that feature-branch will need $ echo "Another Line" >> example.txt $ git commit -am "Main branch commit" # Now, checkout the feature branch and rebase onto main $ git checkout feature-branch $ git rebase main |
When you run git rebase main, Git will:
- Find the common ancestor of the `main` and `feature-branch`.
- Temporarily save the changes made in `feature-branch` since that ancestor.
- Switch to the `main` branch.
- Apply the changes.
The result is that your feature branch now includes the latest commit in `main` .
Step 5: Resolving Conflicts
If changes made on the branch you’re rebasing onto conflict with your branch’s changes, Git will pause the rebase at those commits to allow you to resolve the conflicts.
If a conflict arises, Git will show you which files are conflicting. You’ll have to open these files, resolve the conflicts, and then continue the rebase like so:
1 2 3 | # After resolving conflicts $ git add . $ git rebase --continue |
If you want to abort the rebase for any reason, you can do so with the following command:
1 | $ git rebase --abort |
Step 6: Interactive Rebase
One of the most powerful features of rebase is interactive rebase (-i), which allows you to modify commits as they are moved to the new base. This is often used to clean up a messy history before merging a feature branch into `main`.
Let’s create a messy history to see how this works:
1 2 3 4 5 6 7 8 9 | # Make several small commits $ echo "Another Line" >> feature.txt $ git commit -am "Another commit" $ echo "Another Line" >> feature.txt $ git commit -am "Yet another commit" $ echo "Another Line" >> feature.txt $ git commit -am "Still more commits" |
You can now interactively rebase the last four commits with `git rebase -i HEAD~4`. This will open a text editor with a list of the last four commits and options for each commit:
1 2 3 | pick 1d1b6fd Another commit pick 6c0f848 Yet another commit pick cbf6f7d Still more commits |
Here, `pick` means that the commit will be included in the rebase. You can replace `pick` with:
- reword: Include the commit but alter the commit message.
- edit: Include the commit but stop for amending.
- squash: Include the commit but meld into the previous commit.
- fixup: Like “squash”, but discard this commit’s log message.
- exec: Run some command (the rest of the line) using shell.
- drop: Remove the commit.
For example, if you want to squash the last three commits into one, you can replace `pick` with `squash` (or s for short) for the last two commits:
1 2 3 | pick 1d1b6fd Another commit squash 6c0f848 Yet another commit squash cbf6f7d Still more commits |
After you save and close the file, an editor will open for you to change the commit message of the new squashed commit.
Step 7: Understanding When to Use Merge vs. Rebase
This is subjective and depends on the workflow you or your team prefers. Generally, `merge` is a good option when you want to combine code from two different branches and want to preserve the history of both branches as-is.
Rebase is a good option when you want to make your feature branch up-to-date with the latest code from another branch, and you want a linear history.
Step 8: Clean Up
Remember, `git rebase` can alter the commit history. This can be dangerous if not done properly, especially with branches that others are working on. If you’re working on a team, it’s a good idea to avoid rebasing branches that others are using unless you’re certain everyone understands what’s happening.
I hope this helps you get started with `git rebase`! Practice makes perfect, so keep practicing these concepts and commands until you’re comfortable with them. Remember that you can always check the git rebase documentation by typing git help rebase into your command line.