
Git, the popular distributed version control system, introduces a unique feature in its workflow known as the “staging area” or “index”. This intermediate space acts as a preparatory area for commits, providing developers with fine-grained control over their version history. To leverage Git to its full potential, it’s essential to grasp the concept and purpose of the staging area.
1. The Three-Tiered Architecture of Git
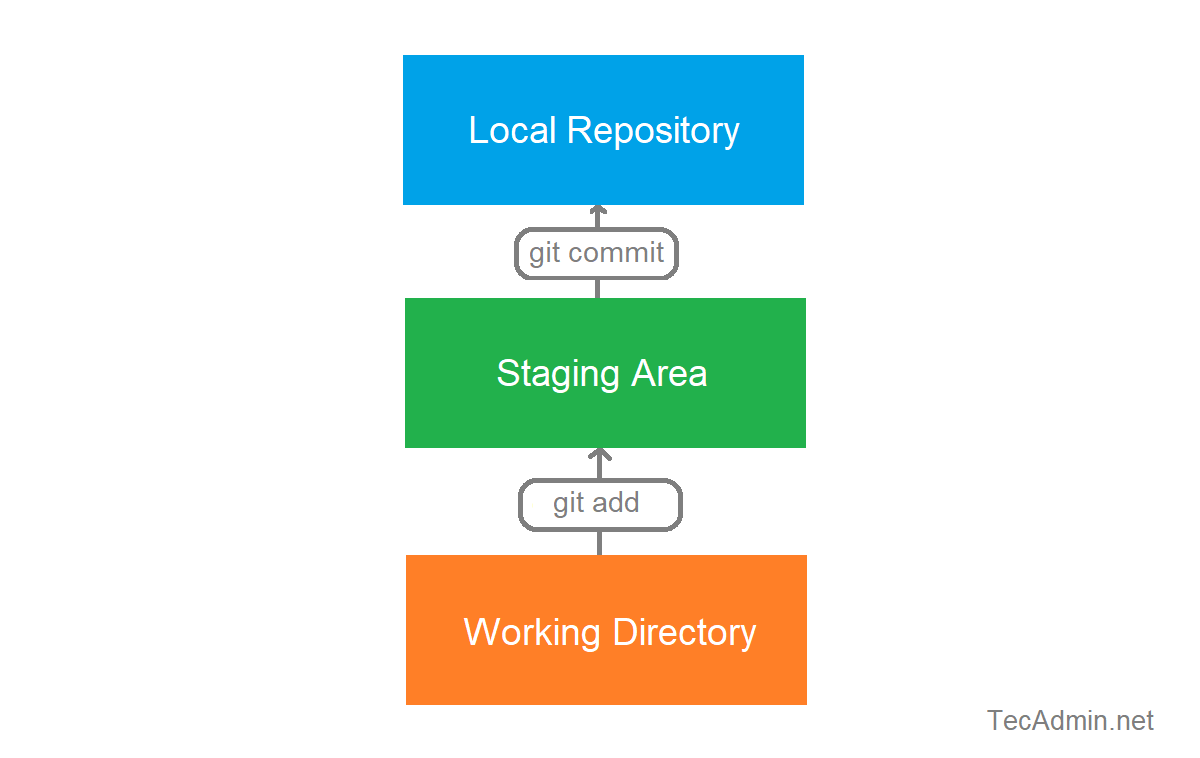
Before delving into the specifics of the staging area, it’s crucial to understand the three-tiered architecture of Git: the Working Directory, the Staging Area, and the Git Repository.
- Working Directory: The working directory is where you perform all your edits and create new files. It holds the current state of your project.
- Staging Area: After making changes in your working directory that you want to commit, you first “add” these changes to the staging area. It takes a snapshot of the changes, preparing them for a commit.
- Repository: When you’re ready, you “commit” the changes that have been added to your staging area. This makes a permanent snapshot of the staging area’s state, storing it in your Git repository as a commit. This commit records who made it, when, and other relevant metadata.

2. The Staging Area: A Closer Look
The staging area is an integral part of Git’s commit process. By acting as an intermediary step between the working directory and the repository, the staging area allows you to craft your commits carefully.
When you execute the git add command, Git takes a snapshot of the changes you’ve made in your files, adding this snapshot to the staging area. This snapshot only includes the specific changes you’ve added, not the entire current state of your working directory. This allows you to break down your work into meaningful, manageable chunks, each of which becomes a separate commit.
3. Why is the Staging Area Useful?
The staging area’s primary advantage is the level of control it offers. Here’s why it’s useful:
- Logical Organization: By grouping related changes into a single commit, you can create a clear and logical history for your project.
- Code Review: Before committing changes, you can review them in the staging area. This can help catch bugs or other issues.
- Partial Commits: If you’ve made several changes but aren’t ready to commit them all, you can add only certain changes to the staging area, leaving the rest in your working directory.
- Commit Amends: If you realize you’ve forgotten something after making a commit, you can add the forgotten changes to the staging area and amend the previous commit, instead of making a new one.
4. Using the Staging Area
Here are the main commands associated with the staging area:
git add <file>: Adds changes in <file> to the staging area.git status: Shows which changes are in the working directory and which are in the staging area.git diff: Shows unstaged changes in the working directory.git diff --staged: Shows changes that are staged for the next commit.git commit: Commits the staged changes.git reset <file>: Removes <file> from the staging area.
Understanding the purpose and utility of the staging area is fundamental to mastering Git. By offering a way to organize, review, and selectively commit changes, the staging area becomes a powerful tool for managing your project’s version history in a clean and structured manner.