
Glances is a cross-platform system monitoring tool written in Python. This is a better alternative to the top and htop monitoring tools. This tool provides most of the information on the single screen. And the best thing is, it’s accessible over the browser. Also, it can be used as client-server architecture where we can watch any server from our system without login to remote server. This Glances installation tutorial will help you to install and use Glances on Linux system.
Recommended:
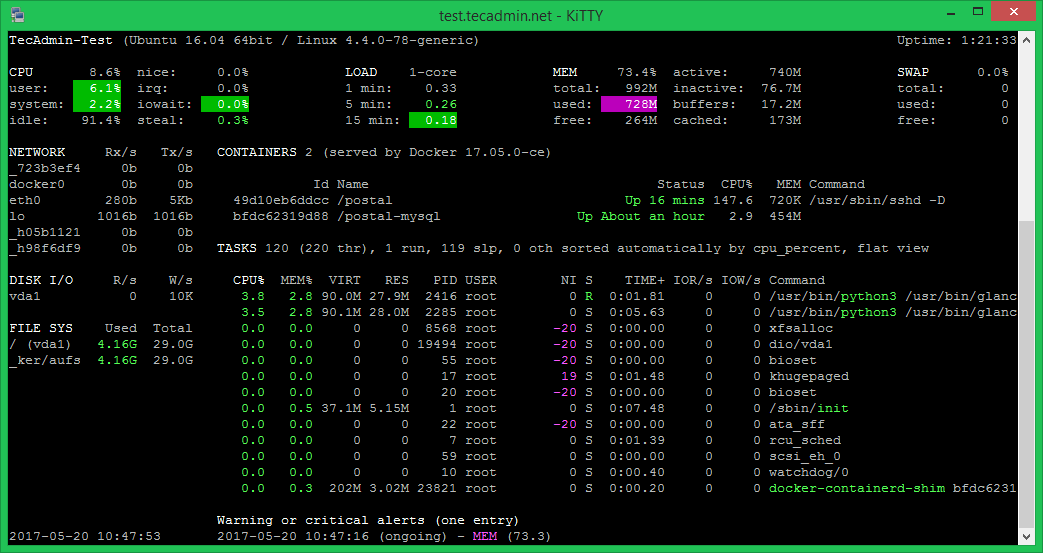
Glances monitoros following things on system.
- CPU, Memory and LOAD
- Process list
- Network interface
- Disk I/O, IRQ / Raid
- Sensors
- Filesystem (and folders)
- Docker
- Alert
- System info
- Uptime
Step 1 – Glances Installation
Glances provide installation scripts for Linux system. You can use one of the following methods to install Glances on your system.
Using Package Manager:
sudo apt install glances # On Debian Based Systemssudo yum install glances # On RedHat Based Systems
If Glances is not available under package manager for your operating system, Use following installation script provided by Glances official team.
Using curl:
curl -L https://bit.ly/glances | /bin/bash
Using wget:
wget -O- http://bit.ly/glances | /bin/bash
After installing Glances you can use this tool in 3 modes.
- Standalone – To monitor single system and view results in termial.
- Web – To monitor single system and view results in web ui.
- Client Server – To monitor multiple systems
Step 2 – Run Glances in Standalone Mode
After installation completed, You will get glances command available on your system. You can run glances in standalone mode using command line access. This will show all the details in current terminal. Let’s watch the output of glances command:
glances
You will see the output something like below:
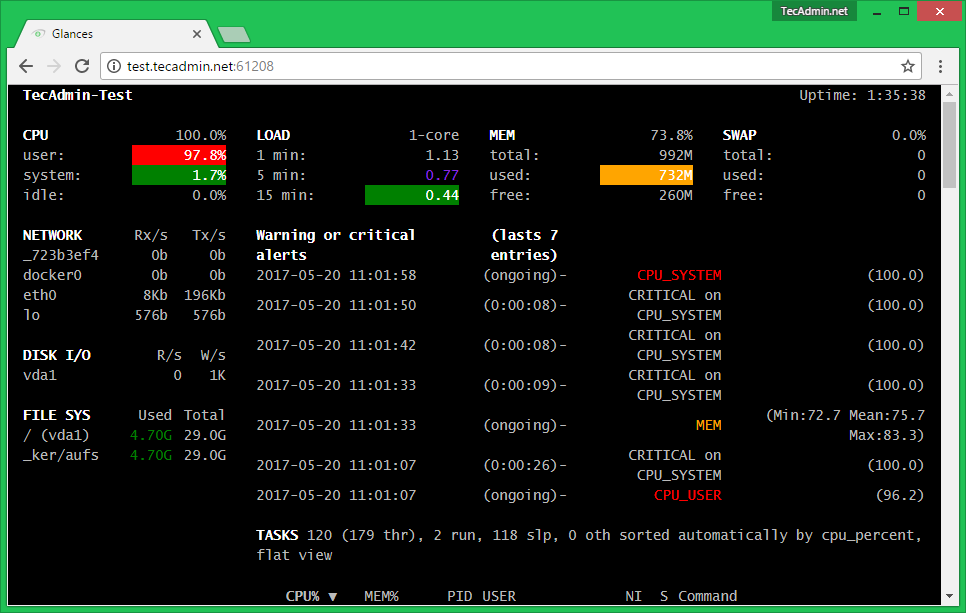
Step 3 – Run Glances in Web Mode
Instead of standalone version Glances also provide web mode, where you can see the results in a web browser. Following command start glances web server on default port 61208 . You can simply access your server using IP and port in any web browser.
glances -w
Now your system in webbrowser using IP or FQDN on port 61208.
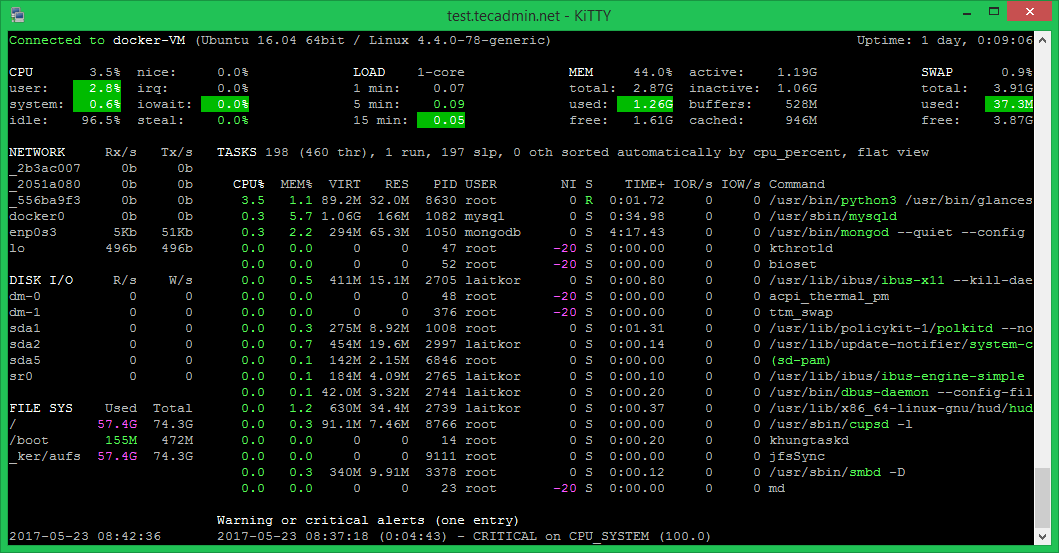
Step 4 – Run Glances in Client-Server Mode
Finally, Glances also provides client-server architecture. Where you can run glances in server more on your remote Linux systems and access each server data from your local system by connecting this to its client. You must have Glances installed on each system you need to monitor and also on the client system.
Now login to each remote system asn start Glances in server mode.
glances -s
After start Glances in server mode on each Linux system. Go to your client system and connect to Glances system with IP address. Use the following command to access Glances on the client. Change 192.168.10.100 with remote system IP. Also, make sure to open Glances port on remote system.
glances -c 192.168.10.100
This will show you the resource utilization of the remote system.
References:
4 Comments
Detected system: Ubuntu
Reading package lists… Done
Building dependency tree
Reading state information… Done
Package lm-sensors is not available, but is referred to by another package.
This may mean that the package is missing, has been obsoleted, or
is only available from another source
Package python-dev is not available, but is referred to by another package.
This may mean that the package is missing, has been obsoleted, or
is only available from another source
However the following packages replace it:
python-dev-is-python3
E: Unable to locate package python-pip
E: Package ‘python-dev’ has no installation candidate
E: Unable to locate package python-docker
E: Package ‘lm-sensors’ has no installation candidate
getting these errors while instaling on ubuntu 20.04 LTS installed on windows
can this glances be installed om ubuntu 20.04 which supports python 3
Yes, You can install Glances on Ubuntu 20.04 LTS system. The command will automatically install required Python packages.
Thanks It works before this I tried many other online guides but no success.