Virtual memory is physical memory that has been marked as available for new data. This is used to increase the amount of data that can be stored in a computer system by temporarily storing data on a storage device, such as a hard drive, rather than in physical memory. For example, if a computer has 4 GB of physical memory and the computer is running three applications that each require 2 GB of memory, the computer will not be able to run all three applications at the same time. However, if the computer has 8 GB of virtual memory, it can divide the 8 GB of virtual memory into 4 GB for each application and 2 GB will remain as free physical memory. There is just one very good reason to add a swap on CentOS. And that’s when you’ve run out of physical memory and can’t service any new requests. When this happens, the OS swaps out the least recently used (LRU) processes and pages their data to the disk. With enough swap space, you can avoid reaching this situation.
This article will help you to create swap space on your ubuntu system after installation.
How to Add Swap in Ubuntu
Follow the below steps to create and enable Swap memory on your Ubuntu system.
1. Check Current Swap
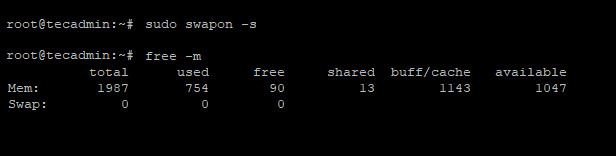
Before working make sure that the system has already swap enabled. If there is no swap, you will get the output header only.
sudo swapon -s
2. Create Swap File
Let’s create a file to use for swapping in the system of the required size. Before making a file make sure you have enough free space on the disk. Generally, it recommends that the swap should be equal to double of installed physical memory.
My Digital Ocean droplet has 2GB of memory. So creating the swapfile of 4GB in size.
sudo fallocate -l 4G /swapfilechmod 600 /swapfile
Then, make it to swap format and activate it on your system by running the following commands:
sudo mkswap /swapfilesudo swapon /swapfile
3. Make Swap Permanent
After running the above commands, Swap memory is added to your system and the operating system can use it when required. But after a reboot of the system swap will deactivate again.
You can make it permanent by appending the following entry in /etc/fstab file. Edit /etc/fstab file in the editor:
sudo vim /etc/fstab
Append the below entry to the end of the file:
/swapfile none swap sw 0 0
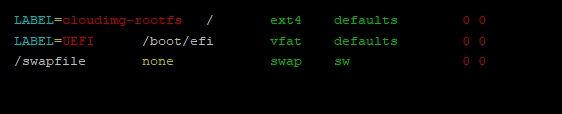
Save the file and close. Now Swap memory will remain activated after the system reboots.
4. Check System Swap Memory
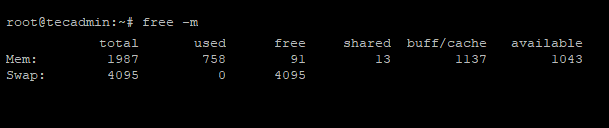
You have successfully added swap memory to your system. Execute one of the below commands to view the current active swap memory on your system:
sudo swapon -sfree -m
5. Update Swappiness Parameter
Now change the swappiness kernel parameter as per your requirement. It tells the system how often the system utilizes this swap area.
Edit /etc/sysctl.conf file:
sudo vim /etc/sysctl.conf
Append the following configuration to the end of the file
vm.swappiness=10
Now reload the sysctl configuration file
sudo sysctl -p
Conclusion
When a system runs out of memory, the operating system will begin to swap or page out memory pages to persistent storage such as a disk drive. When you have more free disk space, you can add additional swap space so your OS has an additional location to store temporary data when necessary. In this tutorial, you have learned to add Swap space on the Ubuntu systems.