
After installing Ubuntu 22.04 the default network interface assigns an IP address using the DHCP server. Also, the wireless network will be active and enable networking over the wifi network.
You can also configure the network interface with static IPv4 addresses. Ubuntu 22.04 uses the Netplan as a network manager.
This tutorial helps you to configure network interfaces on Ubuntu 22.04 Desktop and Ubuntu 22.04 Server editions. The desktop users can use any one of the below methods but the server users that have CLI only access use the second method to edit network interface configuration files.
Method 1: Configuring Static IPv4 Address on Ubuntu 22.04 Desktop
The Ubuntu Desktop editions have a graphical interface for configuring the network interfaces. Follow the below steps to configure a static IP address on Ubuntu 22.04 Desktop system.
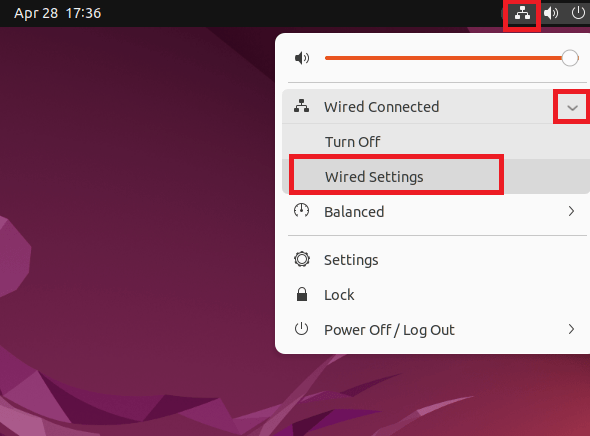
- Click the network icon in the upper-right corner.
- Then expand the Wired Connected dropdown.
- Now, click on Wired Setting as shown below image.
Edit Wired Interface Settings - A network settings dialog box will appear.
- Now, click “Network” in left sidebar.
- Under the Wired section, click the Gear icon as showing in below image
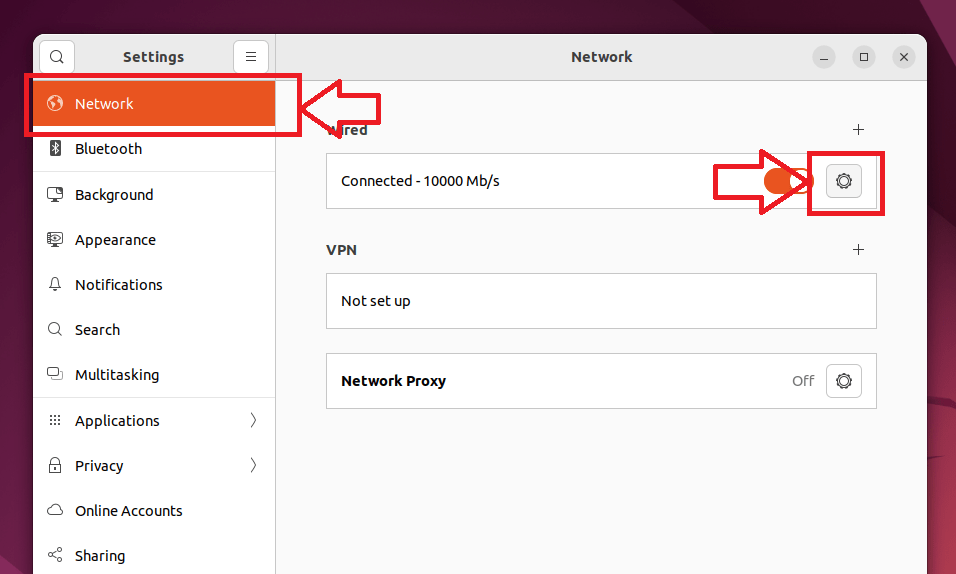
Edit Network Interface - A new Wired dialog box will appear.
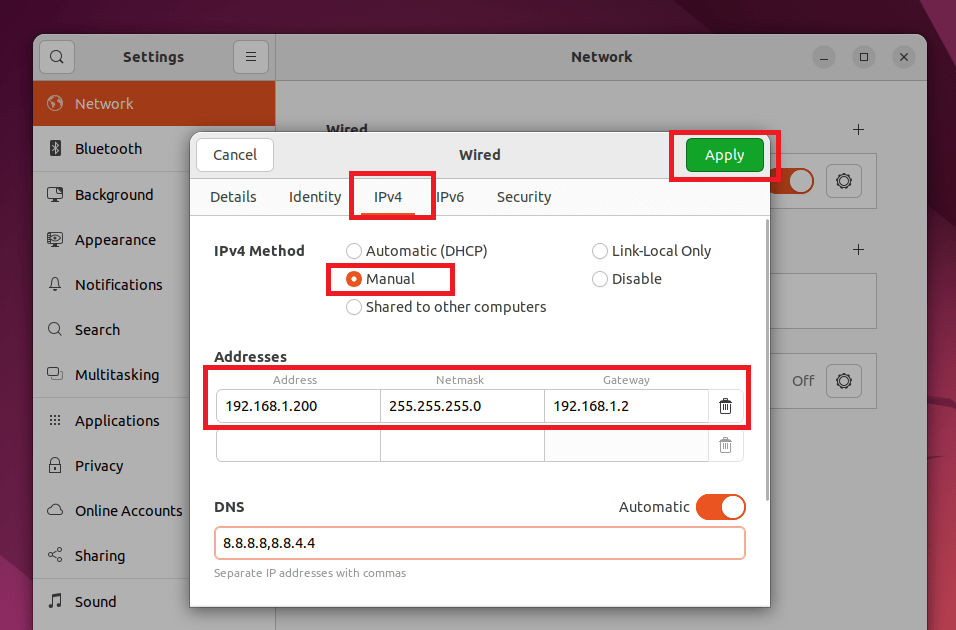
- Now, click on “IPv4” tab.
- Set IPv4 Method to Manual
- Input a valid IP address, Netmark and Gateway address
- Set the DNS server (optional)
- Click Apply button to save changes
Configuring Static IP on Ubuntu - Finally disable and then again enable networking to apply changes.
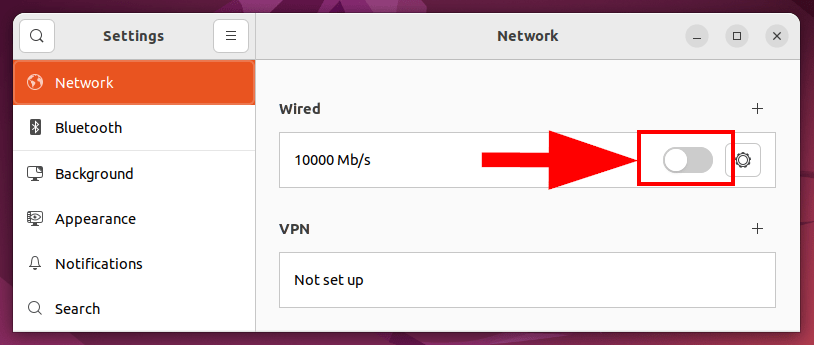
Disable and Enable Networking - All done. Ubuntu Desktop system IP address is now changed.

Method 2: Configuring Static IPv4 Address on Ubuntu 22.04 Server with CLI
Server editions are installed without any graphical interface. In that case, you need to configure the IP address using the command line.
Ubuntu uses the Netplan as a network manager that is responsible for configuring the network interfaces. Follow the below steps:
- First, find out the network interface name in your system. The interface name can differ based on the installation type and system hardware. To find the interface name type:
sudo ip a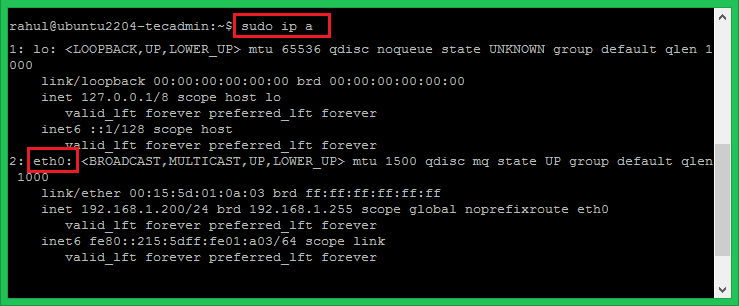
Checking the network interface name The above output shows that the system is configured with the network interface name eth0. This can be different on your system.
- Now, create or edit the network configuration file under the /etc/netplan directory. Create a configuration file and edit it in an editor:
sudo vi /etc/netplan/01-netcfg.yamlAdd the network configuration in YAML format as below:
network:
    version: 2
    renderer: networkd
    ethernets:
        eth0:
            addresses:
                - 192.168.1.212/24
            nameservers:
                addresses: [8.8.8.8, 8.8.4.4]
            routes:
                - to: default
                  via: 192.168.1.2
In the above configuration:
eth0– is the network interface nameaddresses– is used to configure IPv4 address on an interface. Make sure to define CIDR. You can add multiple addresses herenameservers– Set the name servers here. 8.8.8.8 and 8.8.4.4 are Google’s name serversroutes– This is used to set gateway on your system.
Make sure the IPv4 address belongs to the system network and has the correct gateway Ip address. Once confirmed, save file content and close it.
- Apply the changes by running the following commands.Now, execute the following command to apply the changes:
sudo netplan applyThat’s it. The static IP address is configured on your Ubuntu system.
Conclusion
In this tutorial, you have learned 2 methods of configuring network interface on Ubuntu 22.04 systems. The first method uses the GUI interface to set up a static IP address. The second method provides you with the instructions to configure the network interface via the command line using Netplan.
You can also configure multiple IP addresses on a single network interface.
10 Comments
**networkctl list**
IDX LINK TYPE OPERATIONAL SETUP
1 Io loopback carrier unmanaged
2 eth0 ether routable configured
**route**
Destination Gateway Genmask ….. iface
default 192.168.178.1 0.0.0.0 …… eth0
192.168.178.0 0.0.0.0 255.255.255.0 …… eth0
**/etc/netplan/000-installer-config.yaml**
network:
version: 2
renderer: networkd
ethernets:
eth0:
addresses:
– 192.168.178.43/24
nameservers:
addresses: [8.8.8.8]
routes:
– to: default
via: 192.168.178.1
After this `ip-a` confirms i have ip address 192.168.178.43, but `ping -4 192.168.178.1` says: Destination Host Unreachable
Any ideas on how to change? I only have CLI, no GUI running
Oh man bring back /etc/network/interfaces
If you use the GUI, you need to disable and then enable the connection. Just clicking on ‘Apply’ doesn’t change anything.
I am getting an error:
Error in network definition expected mapping (check indentation) network:
Any help would be great!
When I set
– to: default
via: 192.168.1.1
I get an error : could not find expected ‘-‘ before via
and when I add this ‘-‘ before via, then I get : error in network definition: global unicst route must include both ‘to’ and ‘via’ IP.
That’s a nightmarre to configure a simple eth0 using CLI.
Hi ELM,
I have again verified the configuration file and it works fine for me. Make sure that JSON is properly formatted and any extra or less space may cause syntax issues.
It is warning that gateway4 is depracated and default routes should be used instead.
Thanks, Ken, article is updated accordingly.
gateway4: is no longer allowed as an option in Ubuntu 22.04
Now requires
routes:
– to: default
via: 192.168.1.1
Thanks, Passerby, gateway4 works but as its deprecated, I have updated the article to routes.