The ASPState database is used by Microsoft’s ASP.NET Session State Service to store session data. By default, session state service stores its data in an in-memory cache. If you want to persist session data across multiple web servers in a web farm or you want to recover session data in case of application crashes or restarts, you should consider storing your session state in an ASPState database in SQL Server.
Prerequisites
- A version of SQL Server (2008 or later).
- The ASP.NET Session State Service should be installed on your server. This service comes with ASP.NET and is installed automatically when ASP.NET is installed.
- Administrative rights to the SQL Server instance.
Steps To Create ASPState Database
Step 1: Enable SQL Server Session State on Your Website
Before you can create the ASPState database, you need to configure your website to use SQL Server Session State. Open your website’s web.config file and add the following code in the
1 | <sessionState mode="SQLServer" sqlConnectionString="data source=YourSQLServer;user id=YourUserID;password=YourPassword" cookieless="false" timeout="20" /> |
Replace `YourSQLServer`, `YourUserID`, and `YourPassword` with the appropriate values for your SQL Server instance.
Step 2: Create ASPState Database
ASP.NET provides a utility, `aspnet_regsql.exe`, which helps in creating a session state database. You can find this utility in the .NET Framework directory.
- Open the Command Prompt as Administrator.
- Navigate to the .NET Framework directory. The exact path will depend on your .NET Framework version and the architecture (32-bit or 64-bit) of your server. For .NET Framework 4.8 on a 64-bit server, the directory is C:\Windows\Microsoft.NET\Framework64\v4.0.30319.1cd C:\Windows\Microsoft.NET\Framework64\v4.0.30319
- Run the following command to create the `ASPState` database:1aspnet_regsql.exe -S YourSQLServer -U YourUserID -P YourPassword -ssadd -sstype p
Replace `YourSQLServer`, `YourUserID`, and `YourPassword` with the appropriate values for your SQL Server instance.
The `-ssadd` switch tells `aspnet_regsql.exe` to add session state support, and the `-sstype p` switch sets the session state mode to “In SQL Server”.
Step 3: Verify the ASPState Database Creation
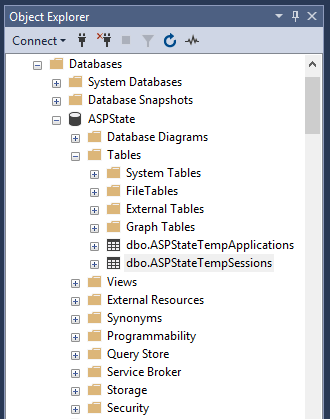
You can verify the creation of the `ASPState` database by using SQL Server Management Studio (SSMS) to connect to your SQL Server instance. In the list of databases, you should see a database named ASPState.

By default, the ASPState database contains two tables: `ASPStateTempApplications` and `ASPStateTempSessions`. ASPStateTempApplications stores application IDs and ASPStateTempSessions stores session data.
Conclusion
By following the above steps, you can successfully create an ASPState database in SQL Server to store ASP.NET Session State data. By doing this, your web application can become more resilient and scalable, especially in web farm scenarios. As always, remember to properly secure your ASPState database and backup regularly to avoid data loss.


2 Comments
Thanks! it’s helpful to us
Thanks Rahul.. nice post