SFTP (SSH File Transfer Protocol) is a secure file protocol used to access, manage, and transfer files over an encrypted SSH transport session. Security first is a thumb rule for the system administrators. In some cases, we need to allow remote users to access the filesystem on our system, but you don’t want to allow them to get a shell. This will allow you a secure channel to provide limited access to specific files and directories.
This tutorial will help you to setup SFTP only access (without shell access) on Debian 11 system. It will create a chroot environment on your system to limit the SFTP user to a specific directory only. Also, it will allow SFTP only access without SSH access to the user.
Prerequisites
- A running Debian 11 Bullseye Linux system
- You must have sudo privileged account with shell access
Step 1 – Create a New User
First of all, create a new user to connect with the sftp server. The following command will create a new account named sftpuser with no shell access. You can use any name of your choice or requirement.
sudo adduser --shell /bin/false sftpuser
Step 2 – Create a Directory for SFTP Access
You have created a user for sftp. Now, create a directory to configure as chroot for the sftp. For this example, I will create a /var/sftp directory. The directory must have root ownership to configure as chroot directory. So we will create a subdirectory under /var/sftp with write access to sftp account.
Create the directory structure with the following command:
sudo mkdir -p /var/sftp/files
Next, we have to set proper permission on directories to configure as chroot access with write access to the user. Here /var/sftp must have the root ownership and group with proper permission. To set that permission, type:
sudo chown root:root /var/sftpsudo chmod 755 /var/sftp
Now, change the permission for the "files" directory to allow write access to sftpuser. To set that permissions, type:
sudo chown sftpuser:sftpuser /var/sftp/files
Once the sftpuser connects to the server, will get /var/sftp as the root directory. He can’t access the filesystem outside it. Also, the user can read/write files under the “files” directory only.
Step 3 – Configure sshd for SFTP Only
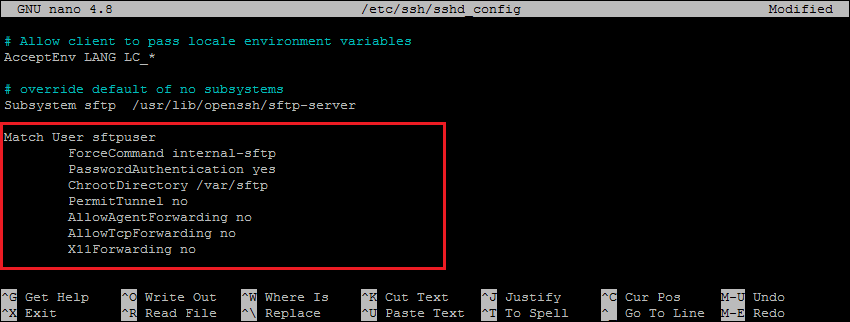
Next, you need to configure the SSH server to allow the “sftpuser” to connect the server with sFTP only without shell access. To make necessary changes, edit the SSH configuration file.
sudo nano /etc/ssh/sshd_config
and add the following settings at end of file.
Match User sftpuser
	ForceCommand internal-sftp
	PasswordAuthentication yes
	ChrootDirectory /var/sftp
	PermitTunnel no
	AllowAgentForwarding no
	AllowTcpForwarding no
	X11Forwarding no

Double-check that all the settings are correct. Then save the changes and restart the SSH service to apply changes.
sudo systemctl restart ssh
All done, SFTP only use is successfully created on your Debian system. Now try logging into the remote system with the new user’s credentials, and check if everything is working correctly.
Step 4 – Connect to SFTP
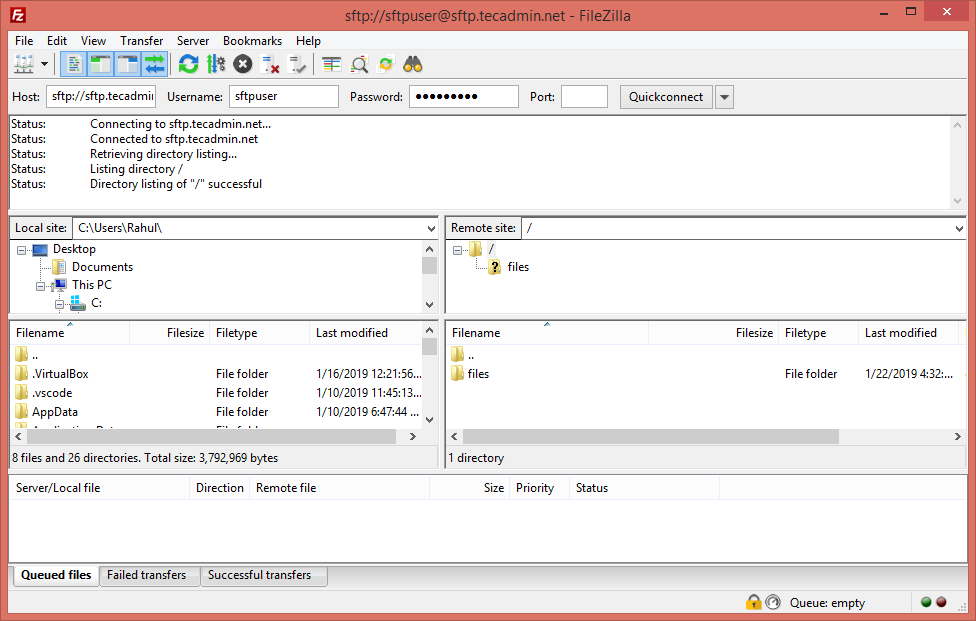
One can connect to a remote SFTP server using a command line or graphical applications like Filezilla or WinSCP. In this tutorial, I will show you both ways to connect SFTP server.
Linux users can use sftp command-line utility to connect to remote sftp instances.
sftp [email protected]

[email protected]'s password:
sftp>
GUI interface or Windows users can use graphical sftp clients. For example, use Filezilla client to connect remote sftp only account on the remote system.
Verify no shell access:
As this account is configured for SFTP only connection. So if any user tried to connect via SSH will be disconnected immediately after successful authentication. User will get below message:
ssh [email protected]

[email protected]'s password:
This service allows sftp connections only.
Connection to sftp.tecadmin.net closed.
Conclusion
In this how-to guide, you have learned to create chroot jail environment for SFTP users without shell access to the server. The Chroot environment secures the filesystem by preventing users to access files outside of the defined directory. This tutorial is created and tested with Debian 11 Bullseye system but this will work on other Debian versions.


