
Amazon Cognito is a user identity and access management solution that makes it easy for developers to create and manage user authentication, user data, and authorization for their mobile and web apps. In this article, we are going to see how you can create users in AWS Cognito using AWS CLI. Different services have different APIs so the syntax may be different than what you’re used to but don’t worry! We’ve got you covered with some great examples that are sure to get you up and running in no time. It’s super easy to get started with the AWS SDKs. Each service has its own unique commands – so let’s get started!
Prerequisites
Before diving into the article, let’s make sure we have everything ready.
- You will need aws cli installed and configured on your machine.
- You already have created a User Pool in your AWS account
- Find out the App client id at User Pool >> App integration >> App clients and analytics
Steps to Create Cognito User in AWS
Let’s say we want to create a user named “Rahul”. Let’s also say that John is from India, and wants to be identified by his “rahul@example.com” email address. To create a user for Rahul, we will need to provide some details about Rahul. We will need his name, email address, and some attributes. Attributes are basically values that describe who the user is and what the user should be allowed to do.
The user creation process in Cognito will complete in three steps:
- Create New User: First of all, add a new user in AWS Cognito with
- Confirm User as Admin: The confirm the newly added user with the below command.
aws cognito-idp admin-confirm-sign-up \ --user-pool-id us-west-1_XXXXXXXX \ --username john.kerry@example.com \ --region us-west-1 \ --profile geoff - Verify Email Address: Finally, verify the email address of the newly added user with the below command.
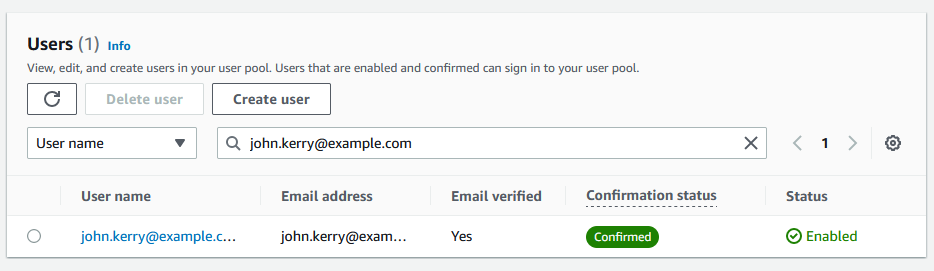
aws cognito-idp admin-update-user-attributes \ --user-pool-id us-west-1_XXXXXXXX \ --username john.kerry@example.com \ --user-attributes Name=email_verified,Value=true \ --region us-west-1 \ --profile geoff - That’s it. A new user has been created in User Pool with the “CONFIRMED” status. You can visit the AWS Cognito service and check for the user
aws cognito-idp sign-up command line.
aws cognito-idp sign-up \
    --client-id XXXXXXXXXXXXXXXXXXXXX \
    --username john.kerry@example.com \
    --password Passw0rd! \
    --user-attributes Name="email",Value="john.kerry@example.com" Name="name",Value="John Kerry" \
    --region us-west-1 \
    --profile default
Output{ "UserConfirmed": false, "CodeDeliveryDetails": { "Destination": "j***@e***", "DeliveryMedium": "EMAIL", "AttributeName": "email" }, "UserSub": "00b84ce0-c04b-42a9-a61b-e705bf094353" }

Conclusion
In this article, we discussed how to create users in AWS Cognito via AWS CLI. You can create users by creating a user pool and user or by creating a user directly. Once you have users in your Cognito user pool, you can do many things with them. You can send push notifications to your users, create user flows, etc. At the end of the day, creating users in AWS Cognito via AWS CLI is easy once you know what you are doing. Now, it’s time to get hacking!