Amazon Web Services (AWS) is a powerful and versatile platform that allows developers to harness the power of Amazon’s robust and scalable infrastructure. One common use-case is running an Ubuntu server instance on AWS.
SSH (Secure Shell) is a network protocol that provides a secure way to access a computer over an unsecured network. SSH provides a secure channel over any network in a client-server architecture.
The ‘root’ user in Ubuntu is the superuser who can perform administrative tasks. However, due to security concerns, SSH access is usually disabled for the root user in AWS Ubuntu instances.
This guide will take you through the process of enabling SSH as root on your AWS Ubuntu instance.
Prerequisites
- An AWS account.
- A running EC2 instance with Ubuntu.
- SSH access to your EC2 instance.
Step 1: Access Your AWS Ubuntu Instance
Firstly, connect to your AWS instance using SSH. This is usually done using the default user given by AWS for your Ubuntu instance (often ‘ubuntu’ or ‘ec2-user’). The command to do so would look something like:
ssh -i /path/my-key-pair.pem ubuntu@ec2-remote-server.amazonaws.com
Replace /path/my-key-pair.pem with the path to your private key file and ec2-remote-server.amazonaws.com with the Public DNS of your EC2 instance.
Step 2: Switch to the Root User
Once logged into your Ubuntu instance, switch to the root user with the following command:
sudo -i
Step 3: Backup SSH Configuration File
Before making changes, it’s a good practice to take a backup of the SSH configuration file. Use the following command to do so:
cp /etc/ssh/sshd_config /etc/ssh/sshd_config.bak
Step 4: Edit the SSH Configuration File
Next, we need to modify the SSH configuration to permit the root login. Open the SSH configuration file in a text editor. Here, we’ll use nano:
nano /etc/ssh/sshd_config
Scroll down the file until you find the line #PermitRootLogin. Uncomment this line (remove the ‘#’) and change its value to ‘yes’. The modified line should look like this:
PermitRootLogin yes
Save and exit the file. In nano, you can do this by pressing Ctrl+X, then Y to confirm the save, and then Enter to confirm the file name.
Step 5: Update ~/.ssh/authorized_keys File
Amazon EC2 instances modifid the ~/.ssh/authorized_keys to disallow users to SSH as root user. Edit the ~/.ssh/authorized_keys configuration file in favorite text editor:
nano ~/.ssh/authorized_keys
You will see the file similar to below screenshot:
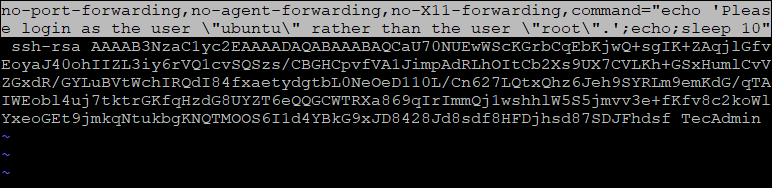
Remove the highlighted part from the configured key. After changes the file will look like below:

Save the file and close it.
Step 6: Set a Password for the Root User
For security purposes, we’ll need to set a password for the root user. You can do this with the following command:
passwd root
Enter your chosen password and confirm it.
Step 7: Restart the SSH Service
After modifying the configuration and setting the root password, you need to restart the SSH service for the changes to take effect:
systemctl restart ssh
Step 8: Test Root SSH Access
Log out of the current SSH session and attempt to log in again, this time as root:
ssh -i /path/my-key-pair.pem root@ec2-remote-server.amazonaws.com
You should be able to log in as root.
Caution: Root Access Security Implications
While this guide explains how to enable SSH as root on an AWS Ubuntu instance, it’s essential to understand the security implications. Having SSH access enabled for the root user can be a significant security risk. If you must use SSH as root, ensure to take all necessary precautions to secure your instance. Using key-based authentication instead of password-based, changing the default SSH port, and setting up a firewall are just a few methods of enhancing security.
This guide was meant to help you understand how to enable SSH as root on AWS Ubuntu Instances. The steps, when followed correctly, should lead you to a successful setup. However, always prioritize the security of your instances in any configuration changes you make.


6 Comments
Thanks bro
when I used this article , then I can loggin to server without password 🙂
Thank you for this…it helped me
Great article, you just saved a lot of time and problems to other developers of my company. Thank you so much !
This is awesome. Worked for my Ubuntu instance as well, Thank you.
Hi
In the first part of your article, you state that allowing authentication as root over SSH creates a security risk. I’m inclined to call FUD on this. Could you elaborate on how this will lower the security of the system? In the setup you present, privilege escalation from the ubuntu to the root user is already possible without any further authentication.
I would argue that enabling unrestricted sudo for an unprivileged user effectively grants root privileges to any process running as that user. Even an enabled password prompt from sudo can be trivially circumvented by placing a binary called `sudo` into the user’s ~/bin directory.
Regards
Michael