Getting an SSL certificate for your website is important to keep your data safe and make visitors trust your site. Let’s Encrypt offers a free and easy way to get these certificates. Certbot is a tool that helps you get an SSL certificate from Let’s Encrypt without much hassle.
In this guide, we’ll show you, step-by-step, how to use Certbot to get an SSL certificate. This guide is for everyone, even if you’re not very tech-savvy. By following these easy steps, you can secure your website and make it more trustworthy for your visitors.
Step 1: Installing Certbot
Most Linux systems have the certbot package under default package repositories. is a tool to obtain certificates from Let’s Encrypt and configure them on your web server. The Snap package is the easiest way for installing the certbot on the Ubuntu system.
Open a terminal and execute the below command to install certbot:
sudo snap install --classic certbot
Once a new certbot version is available, Snap will auto-update the package.
Step 2: Generate SSL Certificate with Certbot
Now, You can request SSL certificates from Let’s encrypt based on the web server. We have discussed 4 methods to get a new SSL certificate, that depend on which web server running on your system. Might be there is no web server running on the system.
So choose the correct method as per the environment:
- No Web Server Running
In case, you don’t have any web server running on your system. You can
--standaloneoption to complete the domain validation by stating a dummy web server. This option needs to bind to port 80 in order to perform domain validation.sudo certbot certonly --standalone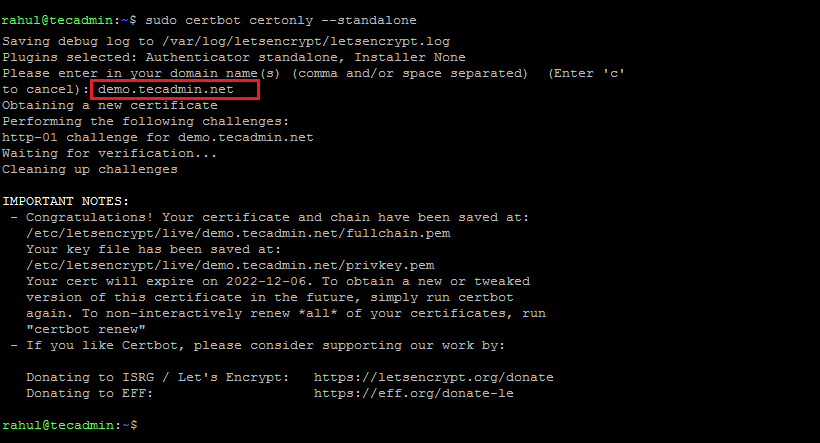
Get a new SSL using standalone If you are running the certbot for the first time, it will prompt you to accept terms and provide an email address for sending notifications.
You can also provide the inputs at the command line, For example:
sudo certbot certonly --standalone -d example.com --staple-ocsp -m me@example.com --agree-tos - Certbot with Apache
The systems running the Apache web server, execute the following command. This will list all the domains/sub-domains configured on your web server. Select appropriate numbers to request a certificate.
sudo certbot --apache - Certbot with Nginx
For the systems running the Nginx web server, use the below command to request the SSL certificates.
sudo certbot --nginx -d example.com -d www.example.com - Some Other Web Server Running
For the system having any other web servers running except Apache or Nginx. Then you can get the certificate only and configure them manually.
This command will ask you for the domain name and document root for the domain.
sudo certbot certonly --webrootYou can also pass the domain name and/or document root on the command line.
sudo certbot certonly --webroot -w /var/www/html -d example.com -d www.example.com
This will read the Apache configuration files and list all the configured domain names. Enter the number of the domain you want to issue a certificate. You can input multiple comma-separated numbers.
Once the domain ownership is verified, the certificate will be issued and the Apache configuration file will be created with SSL settings.
While using the above commands, the domain must be pointed to the server in DNS. Also, ensure that /.well-known/acme-challenge is served by the web server.
Step 3: View Certificate Files
Once a certificate is issued by the Lets Encrypt authority. All the certificate files are created under the /etc/letsencrypt directory. If your domain name is example.com, then the files will be created at the below location.
ls -l /etc/letsencrypt/live/example.com/
Output:-rw-r--r-- 1 root root 692 Mar 9 06:59 README lrwxrwxrwx 1 root root 37 Sep 6 09:56 cert.pem -> ../../archive/example.com/cert1.pem lrwxrwxrwx 1 root root 38 Sep 6 09:56 chain.pem -> ../../archive/example.com/chain1.pem lrwxrwxrwx 1 root root 42 Sep 6 09:56 fullchain.pem -> ../../archive/example.com/fullchain1.pem lrwxrwxrwx 1 root root 40 Sep 6 09:56 privkey.pem -> ../../archive/example.com/privkey1.pem
Change example.com with your domain name to get correct files.
Conclusion
Let’s Encrypt is a certificate authority that provides free SSL certificates for public websites. We can issue certificates for any number of domains. The SSL certificates are issued for 3 months only, then you need to renew it. Certbot is a command line utility that helps to manage Let’s Encrypt SSL certificates. With the help of certbot we can issue a new certificate, and renew and delete it.
Hope this tutorial helps you to work with Certbot for managing the SSL certificate on your system.