Apache Kafka is an open-source, distributed event streaming platform developed by the Apache Software Foundation. This is written in Scala and Java programming languages. You can install Kafka on any platform that supports Java programming language.
This tutorial provides you with step-by-step instructions to install Apache Kafka on Ubuntu 22.04 LTS Linux system. You will also learn to create topics in Kafka and run producer and consumer nodes.
Prerequisites
You must have sudo privileged account access to the Ubuntu 22.04 Linux system.
Step 1 – Installing Java
We can run the Apache Kafka server on systems that support Java. So make sure, you have Java installed on your Ubuntu system.
Use the following commands to install OpenJDK on your Ubuntu system from the official repositories.
sudo apt updatesudo apt install default-jdk
Verify the current active Java version.
java --version
Output:openjdk version "11.0.15" 2022-04-19 OpenJDK Runtime Environment (build 11.0.15+10-Ubuntu-0ubuntu0.22.04.1) OpenJDK 64-Bit Server VM (build 11.0.15+10-Ubuntu-0ubuntu0.22.04.1, mixed mode, sharing)
Step 2 – Download Latest Apache Kafka
You can download the latest Apache Kafka binary files from its official download page. Alternativaly you can download Kafka 3.2.0 with the below command.
wget https://dlcdn.apache.org/kafka/3.2.0/kafka_2.13-3.2.0.tgz
Then extract the downloaded archive file and place them under /usr/local/kafka directory.
tar xzf kafka_2.13-3.2.0.tgzsudo mv kafka_2.13-3.2.0 /usr/local/kafka
Step 3 – Create Systemd Startup Scripts
Now, create systemd unit files for the Zookeeper and Kafka services. That will help you to start/stop the Kafka service in an easy way.
First, create a systemd unit file for Zookeeper:
sudo nano /etc/systemd/system/zookeeper.service
And add the following content:
[Unit]
Description=Apache Zookeeper server
Documentation=http://zookeeper.apache.org
Requires=network.target remote-fs.target
After=network.target remote-fs.target

[Service]
Type=simple
ExecStart=/usr/local/kafka/bin/zookeeper-server-start.sh /usr/local/kafka/config/zookeeper.properties
ExecStop=/usr/local/kafka/bin/zookeeper-server-stop.sh
Restart=on-abnormal

[Install]
WantedBy=multi-user.target
Save the file and close it.
Next, create a systemd unit file for the Kafka service:
sudo nano /etc/systemd/system/kafka.service
Add the below content. Make sure to set the correct JAVA_HOME path as per the Java installed on your system.
[Unit]
Description=Apache Kafka Server
Documentation=http://kafka.apache.org/documentation.html
Requires=zookeeper.service

[Service]
Type=simple
Environment="JAVA_HOME=/usr/lib/jvm/java-11-openjdk-amd64"
ExecStart=/usr/local/kafka/bin/kafka-server-start.sh /usr/local/kafka/config/server.properties
ExecStop=/usr/local/kafka/bin/kafka-server-stop.sh

[Install]
WantedBy=multi-user.target
Save the file and close.
Reload the systemd daemon to apply new changes.
sudo systemctl daemon-reload
This will reload all the systemd files in the system environment.
Step 4 – Start Zookeeper and Kafka Services
Let’s start both services one by one. First, you need to start the ZooKeeper service and then start Kafka. Use the systemctl command to start a single-node ZooKeeper instance.
sudo systemctl start zookeepersudo systemctl start kafka
Verify both of the services status:
sudo systemctl status zookeepersudo systemctl status kafka
That’s it. You have successfully installed the Apache Kafka server on Ubuntu 22.04 system. Next, we will create topics in the Kafka server.
Step 5 – Create a Topic in Kafka
Kafka provides multiple pre-built shell script to work on it. First, create a topic named “testTopic” with a single partition with single replica:
cd /usr/local/kafkabin/kafka-topics.sh --create --bootstrap-server localhost:9092 --replication-factor 1 --partitions 1 --topic testTopic
OutputCreated topic testTopic.
Here:
- Use
--createoption to create a new topic - The
--replication-factordescribes how many copies of data will be created. As we are running with a single instance keep this value 1. - Set the
--partitionsoptions as the number of brokers you want your data to be split between. As we are running with a single broker keep this value 1. - The
--topicdefine the name of the topic
You can create multiple topics by running the same command as above. After that, you can see the created topics on Kafka by the running below command:
bin/kafka-topics.sh --list --bootstrap-server localhost:9092
The output looks like the below screenshot:

Alternatively, instead of manually creating topics you can also configure your brokers to auto-create topics when a non-existent topic is published to.
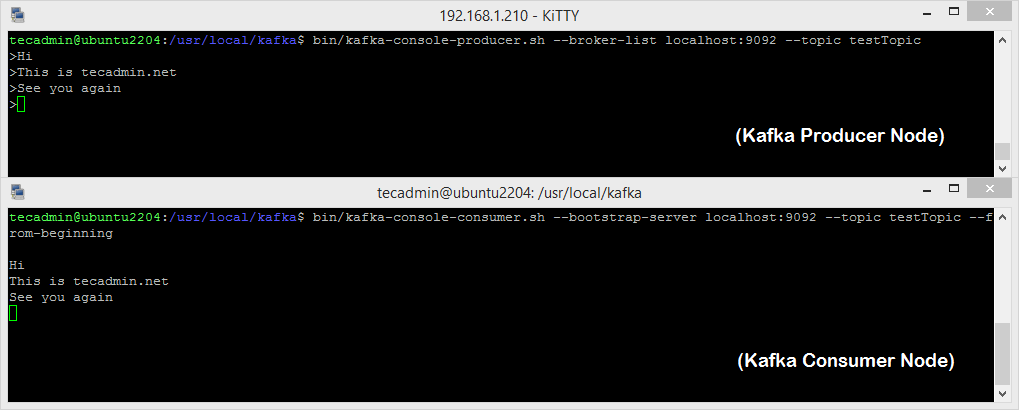
Step 6 – Send and Receive Messages in Kafka
The “producer” is the process responsible for put data into our Kafka. The Kafka comes with a command-line client that will take input from a file or from standard input and send it out as messages to the Kafka cluster. The default Kafka sends each line as a separate message.
Let’s run the producer and then type a few messages into the console to send to the server.
bin/kafka-console-producer.sh --broker-list localhost:9092 --topic testTopic

>Welcome to kafka
>This is my first topic
>
You can exit this command or keep this terminal running for further testing. Now open a new terminal to the Kafka consumer process on the next step.
Kafka also has a command-line consumer to read data from the Kafka cluster and display messages to standard output.
bin/kafka-console-consumer.sh --bootstrap-server localhost:9092 --topic testTopic --from-beginning

Welcome to kafka
This is my first topic
Now, If you have still running Kafka producer in another terminal. Just type some text on that producer terminal. it will immediately be visible on the consumer terminal. See the below screenshot of Kafka producer and consumer in working:
Conclusion
This tutorial helped you to install and configure the Apache Kafka server on an Ubuntu 22.04 Linux system. Additionally, you learned to create a new topic in the Kafka server and run a sample production and consumer process with Apache Kafka.

