
In the ever-evolving realm of PHP development, dependency management has emerged as an indispensable practice. With diverse libraries and frameworks constantly being introduced, managing these assets manually can be a daunting task. Composer: a dependency management tool that has transformed PHP development. Through an intuitive interface, Composer enables developers to declare, manage, and update libraries seamlessly, ensuring projects remain scalable and up-to-date.
But how do you set it up on the latest Ubuntu 22.04? Given the nuanced steps and specific requirements, setting up Composer can often be a stumbling block for many. This article aims to demystify this process, breaking down each step meticulously, ensuring both beginners and experienced developers can get Composer up and running without a hitch. Beyond installation, we’ll also touch upon the fundamentals of Composer’s operation, guiding you through its basic usage and commands. Whether you’re kickstarting a new PHP project or looking to optimize an existing one, this guide will serve as your comprehensive companion.
This tutorial will guide you through installing Composer on Ubuntu 22.04 and provide an overview of its basic usage.
Prerequisites
- A Ubuntu 22.04 system.
- Command-line access (via a terminal).
- PHP (version 5.3.2 or newer) installed. Composer is written in PHP and requires it to run.
Step 1: Update Ubuntu Packages
Before installing any new software, it’s a good practice to update the local package cache and upgrade the system.
sudo apt update && sudo apt upgrade
Step 2: Install the Required PHP Packages
Composer requires a few PHP extensions to work correctly. Install these by running:
sudo apt install php-cli php-zip unzip curl
Step 3: Download and Install Composer
Now, we will download and install Composer.
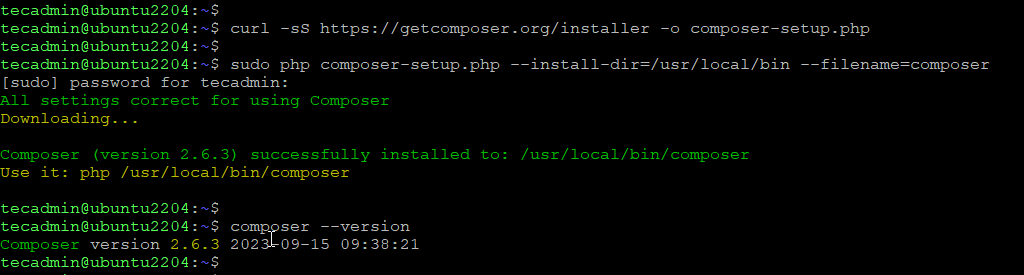
- Download the Composer installer:
curl -sS https://getcomposer.org/installer -o composer-setup.php - Install Composer globally:
sudo php composer-setup.php --install-dir=/usr/local/bin --filename=composer - Confirm the installation by checking the version:
composer --versionThis should display the version of Composer installed, indicating a successful installation.

Step 4: Basic Composer Commands and Usage
- Initialization: If you’re starting a new PHP project, navigate to the project directory and run:
composer initThis command will guide you through creating a composer.json file.
- Require a Package: To add a dependency (e.g., a library or framework) to your project:
composer require vendor/packageReplace vendor/package with the desired package name.
- Update a Package: To update a specific package:
composer update vendor/packageOr to update all packages:
composer update - Remove a Package: To remove a package from your project:
composer remove vendor/package - List Installed Packages: To see a list of all the installed packages:
composer show - Autoloading: Composer provides an autoloader to automatically include your dependencies. Include the autoloader in your PHP script:
require 'vendor/autoload.php'; - Production Deployment: When deploying your application, install the dependencies without development packages and optimize the autoloader:
composer install --no-dev --optimize-autoloader
Conclusion
Composer is an essential tool for modern PHP development, facilitating easy management of project dependencies. This guide provided a step-by-step installation of Composer on Ubuntu 22.04 and covered some basic usage. As you delve deeper into your PHP projects, you’ll discover more advanced features and benefits that Composer offers.