
Docker compose is an useful tool for managing multiple docker containers. It helps us to launch, update and build a group of docker containers with single commands. In case of multi container application, docker compose helped us to manage it easier.
This tutorial helps you to install Docker compose on a Ubuntu 20.04 LTS Linux system.
Prerequisites
- A system running Ubuntu 20.04.
- Pre-installed Docker service on Ubuntu 20.04.
- Terminal access with sudo privileged account.
Install Docker Compose on Ubuntu
Docker compose binary is available on official Github release. Use curl command line tool to download docker compose binary and place under the PATH environment to make it available globally.
First, make sure you have latest curl binary installed on your system.
sudo apt updatesudo apt install -y curl
Now, confirm the latest docker-compsoe binary version on Github releases page. At the time of this writing this tutorial, the current stable version is 1.29.2.
The following command will download the docker-compose binary version 1.29.2 and save this file at /usr/local/bin/docker-compose.
sudo curl -L "https://github.com/docker/compose/releases/download/1.29.2/docker-compose-Linux-x86_64" -o /usr/local/bin/docker-compose
Make the binary docker-compose file executable
chmod +x /usr/local/bin/docker-compose
Verify the the docker-compose version by running the followign command.
docker-compose --version
Output:
docker-compose version 1.29.2, build 5becea4c
Run a Docker Compose Example
At this stage Docker compose have been configured on your Ubuntu system.
- First of all, create a directory, which will contain all the files related to this example.
mkdir ~/myapp && cd ~/myapp - Now, create a html directory. We will map this directory as document root of web server running under the Docker container
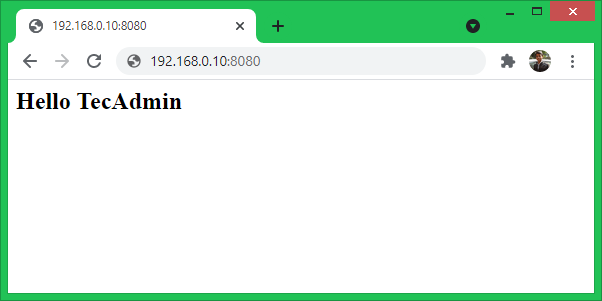
mkdir html - Now create a index.html file under html file.
echo "<h2>Hello TecAdmin</h2>" > html/index.html - Next, create the most important configuration file docker-compose.yml. This is the file contains all settings used by the docker-compose. Basis of this file docker-compose setup the images, network and containers etc.
I will discuss this in parts for the better understanding. Edit file in a text editor:
sudo nano docker-compose.ymlAdd the following content to file.
version: '3'

services:
  web:
    image: "php:8.0-apache"
    restart: 'always'
    volumes:
      - ./html:/var/www/html
    ports:
      - '8080:80'
The above content shows that we are using latest version of docker compose version 3.
Next, we defined a service “web” under sevices section. This will launch a docker container using pre-build “php:8.0-apache” AMI. The “html” directory in current folder will be mounted to containers /var/www/html directory.
Keep your file in editing mode.
-
Next add a MySQL database container in docker compose file.
version: '3'

services:
  web:
    image: "php:8.0-apache"
    restart: 'always'
    volumes:
      - ./html:/var/www/html
    ports:
      - '8080:80'
    depends_on:
      - mysql
    links:
      - mysql
  mysql:
    image: mysql:8
    container_name: mysql
    environment:
      MYSQL_ROOT_PASSWORD: my_secret_password
      MYSQL_DATABASE: app_db
      MYSQL_USER: db_user
      MYSQL_PASSWORD: db_user_pass
    ports:
      - "6033:3306"
    volumes:
      - dbdata:/var/lib/mysql
volumes:
  dbdata:
You can change the MySQL versions and access credentials. We have also updated web container configuration to link with database. This will allow web container to access database directly.
Keep your file in editing mode…
- Optional but helpful to add phpmyadmin docker container. This will will help you to access database and its users.
After adding the phpmyadmin, your docker-compose.yml look like below:
version: '3'

services:
  web:
    image: "php:8.0-apache"
    restart: 'always'
    volumes:
      - ./html:/var/www/html
    ports:
      - '8080:80'
    depends_on:
      - mysql
    links:
      - mysql

  mysql:
    image: mysql:8
    container_name: mysql
    environment:
      MYSQL_ROOT_PASSWORD: my_secret_password
      MYSQL_DATABASE: mydb
      MYSQL_USER: dbuser
      MYSQL_PASSWORD: dbuser_password
    ports:
      - "6033:3306"
    volumes:
      - dbdata:/var/lib/mysql

  phpmyadmin:
    image: phpmyadmin/phpmyadmin
    container_name: phpmyadmin
    links:
      - mysql
    environment:
      PMA_HOST: mysql
      PMA_PORT: 3306
      PMA_ARBITRARY: 1
    restart: always
    ports:
      - 8081:80

volumes:
  dbdata:
Save you file and close it.
-
Next, run the following command to pull all the images on your system.
sudo docker-composer pull
-
Next run the build command to create docker images. For this example, you can skip this command as we are using pre build images only.
sudo docker-composer build -
finally, run the docker-compose up command. Use “-d” option to deamonize container to keep running.
sudo docker-composer up -d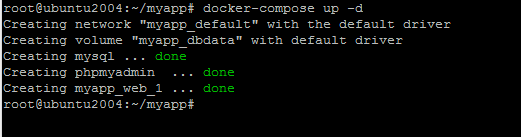
- The web server container is listening on port 8080, which we have bind with containers port 80. Access your host machine ip address on port 8080. You will see the index.html created under html directory.
To make change just update html directory content and refresh page.
Conclusion
This tutorial helped you to install and use docker-compose on Ubuntu systems. The above instructions can be used on Ubuntu 16.04 LTS and above systems.
1 Comment
Hi, Hope you are doing well thanks for your such informative post. But I have noticed that there is miss spelled please correct the following points given below.
7) sudo docker-compose pull
8) sudo docker-compose build
9) sudo docker-compose up -d
Thanking you,
Shamsi