Hey there! Ready to get Docker up and running on your Ubuntu 24.04 system? Awesome! Docker is like a magic box for your apps, making it super easy to develop, ship, and run them anywhere, including on cool ARM64 systems like AWS Graviton. Whether you’re a pro or just starting out, I’ll walk you through this step-by-step in simple English, like we’re chatting over coffee. Let’s make sure it works smoothly on both AMD64 and ARM64 systems. Here we go!
Step 1: Update Your System
First things first, let’s make sure your system is fresh and ready. Open your terminal (you know, that black window where cool stuff happens) and type these commands:
sudo apt update
sudo apt upgrade
What’s happening here? The first command grabs the latest package lists, and the second one updates all your software. It’s like giving your system a quick nap to recharge!
Step 2: Install Docker on Ubuntu 24.04
Now, let’s get Docker installed. Since we want this to work on both AMD64 and ARM64 (like those AWS Graviton machines), we’ll set up the official Docker repository to get the right version. Follow these steps carefully:
- Install some helper packages: These make sure everything runs smoothly.
sudo apt install apt-transport-https ca-certificates curl software-properties-common - Add Docker’s GPG key: This is like a security badge to trust Docker’s software.
curl -fsSL https://download.docker.com/linux/ubuntu/gpg | sudo gpg --dearmor -o /usr/share/keyrings/docker-archive-keyring.gpg - Set up the Docker repository: Here’s where we tell your system where to find Docker. Since we’re supporting ARM64 too, we’ll dynamically set the architecture.
echo "deb [arch=$(dpkg --print-architecture) signed-by=/usr/share/keyrings/docker-archive-keyring.gpg] https://download.docker.com/linux/ubuntu $(lsb_release -cs) stable" | sudo tee /etc/apt/sources.list.d/docker.list > /dev/nullQuick note: That $(dpkg –print-architecture) part automatically picks amd64 or arm64 based on your system. Neat, right?
- Update the package cache: Let’s refresh the system again to see the new Docker repository.
sudo apt update - Install Docker: Now, let’s grab the Docker engine and its buddy, containerd.
sudo apt-get install -y docker-ce docker-ce-cli containerd.io docker-compose-plugin
See? Not too bad! We’re telling Ubuntu to get the latest Docker packages, and it works whether you’re on a regular PC or an ARM64 system like AWS Graviton.
Step 3: Manage Docker Service
Docker’s installed, but it’s not running yet. Let’s wake it up and make sure it starts automatically when your system boots:
sudo systemctl start docker
sudo systemctl enable docker
The first command starts Docker right now, and the second makes sure it’s ready to go every time you turn on your machine. Think of it like setting your coffee maker to brew every morning!
Step 4: Verify Docker Installation
Let’s check if Docker is happy and working. Type this:
docker --version
You should see something like Docker version 27.0.3, build 7d4bcd8. If you see a version number, high-five! Docker’s ready to roll. (No sudo here because we’ll fix that in the next step.)

Step 5: Add Your User to the Docker Group
Typing sudo every time you run a Docker command is a bit annoying, right? Let’s fix that by adding your user to the Docker group so you can run Docker commands as a regular user:
sudo usermod -aG docker $USER
Now, to make this work without restarting, run:
newgroup docker
This command refreshes your group membership. If it doesn’t work right away, try logging out and back in. It’s like giving your system a quick stretch to recognize the new setup.
Step 6: Run Your First Docker Container
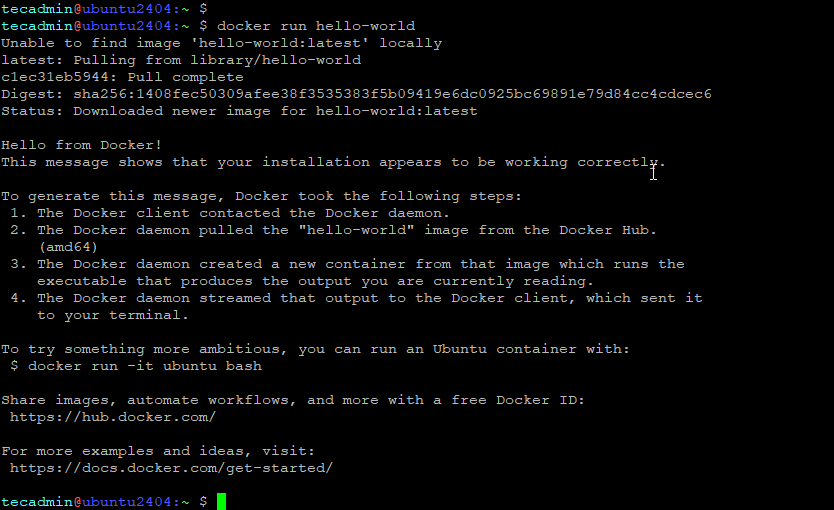
Time for the fun part! Let’s run a simple Docker container to make sure everything’s working. Type:
docker run hello-world
This pulls a tiny “hello-world” container from Docker’s servers and runs it. If everything’s set up right, you’ll see a friendly message saying “Hello from Docker!”. It’s like Docker waving at you to say, “I’m here!”
Step 6: Frequently Used Docker Commands
Now that Docker’s ready, here are some handy commands to play around with:
- List Docker images:
docker images(shows what images you’ve got) - List running containers:
docker ps(shows containers that are active) - List all containers:
docker ps -a(shows all containers, even stopped ones) - Stop a running container:
docker stop CONTAINER_ID(pauses a container) - Remove a container:
docker rm CONTAINER_ID(deletes a container) - Remove an image:
docker rmi IMAGE_ID(deletes an image)
You can find the CONTAINER_ID or IMAGE_ID from the docker ps or docker images commands. It’s like organizing your toolbox!
Conclusion
Woohoo! You’ve got Docker running on your Ubuntu 24.04 system, and it works perfectly whether you’re on a standard PC or an ARM64 setup like AWS Graviton. Pretty cool, right? Docker’s like a superpower for managing apps, and now you’re ready to explore it. Try pulling more containers, playing with those commands, or even building your own app with Docker. If you get stuck, just come back, and we’ll figure it out together. Happy Dockerizing!
