
Java is an popular programing language used by billons of application. As we are aware that Oracle JDK requires a commercial license under Oracle Binary Code License Agreement. We will install OpenJDK on your Debian system. OpenJDK is completely free, open source Java with a GNU General Public License.
This tutorial will help you to install Java on Debian 10 Buster Linux system.
Step 1 – Search OpenJDK Packages
OpenJDK packages are available under native apt repositories. You can simply use apt-cache search command to search available java version for your Ubuntu system.
sudo apt update
sudo apt search openjdk
As per above output, you can see openjdk-11-* and openjdk-8-* is available in the package manager.
Step 2 – Install Java on Debian 10
Use the below command to install OpenJDK on your Debian 10 Buster systems using the package manager from the default repository. The below commands will install Java Development Kit (JDK) and Java Runtime Environment (JRE) both on your system. You can install JRE package only to setup Runtime Environment only.
Choose one of the below option to install Java on Debian 10:
- Installing Java 14:
sudo apt install openjdk-14-jdk
- Installing Java 11:
sudo apt install openjdk-11-jdk
- Installing Java 8:
sudo apt install openjdk-8-jdk
Step 3 – Configure Default Java Version
The newly installed OpenJDK Java 11 will be configured as default Java version. But in some cases, you may need to change the default Java version. Run the following command on terminal:
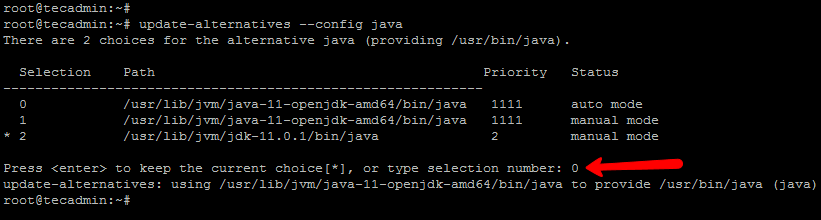
update-alternatives –config java
This will list all configured Java versions on your system. Choose the appropriate version number as showing in below screenshot.
A star (*) shows the currently active version. Here I choose 0 for OpenJDK 11 and press enter.
After installation of Java uses below command to verify the installed version of Java on your system.
java -version

openjdk version "11.0.9.1" 2020-11-04
OpenJDK Runtime Environment (build 11.0.9.1+1-post-Debian-1deb10u1)
OpenJDK 64-Bit Server VM (build build 11.0.9.1+1-post-Debian-1deb10u1, mixed mode, sharing)
Step 4 – Setup Java Environment
It is the best practice to set Java environment variable after installing java. To setup java environment variabless, add the following line to /etc/profile.d/java.sh.
echo "export JAVA_HOME=/usr/lib/jvm/java-11-openjdk-amd64/" > /etc/profile.d/java.sh
Load the environment to current shell.
source /etc/profile.d/java.sh
Now, the JAVA_HOME will automatically set even after system reboot. Use the following command to check the environment variable value
echo $JAVA_HOME

/usr/lib/jvm/java-11-openjdk-amd64/
Conclusion
In this descibed you ot how to install Java (OpenJDK) 14, 11 and 8 on a Debian system.
8 Comments
How can you successfully run “sudo apt install openjdk-14-jdk” when “sudo apt search openjdk” as you write only openjdk-11-* and openjdk-8-* are available?
So where do I get the newer Openjdk versions for Debian 10 now?
Thank god this worked, this is the only tutorial that worked, thanks so much I was about to shove an ax through my computer.
What a load of Rubbish, Rahul you are not professional at all, as when I execute the following command in Debian 10 Buster Terminal.
update-alternatives –config java,
I get error: update-alternatives: error: unknown argument ‘–config’. You give me response if you are a pro!
Yes. Download from debian 9/Stretch repo:
openjdk-8-jre-headless_8u212-b01-1~deb9u1_amd64.deb
openjdk-8-jre_8u212-b01-1~deb9u1_amd64.deb
Working with my XMind8!
very good the installation script
install ‘nvidia-openjdk-8-jre’ from non-free
openjdk-8-* is – at it seems – not available anymore, see link:
https://packages.debian.org/search?suite=buster&arch=any&searchon=names&keywords=openjdk
Is there a way to install it anyway on buster?
Good morning Rahul
Please i emailed you about some help with my server… Kindly look also in your junk folder as well..
Thanks