Java is one of the well-liked computer programming languages to develop PC or mobile apps and is available on various platforms. There are many applications that require Java on your system to function. Apart from that, there are billions of mobile devices that run Java and around 9 million developers who prefer Java to create applications.
If you are a developer and a Linux user then Java is an important component to have on your system, it will not only help you to create applications but also assist in running thousands of apps and games that require Java. This write-up is a guide to install Java on the latest release of Debian known as Bullseye.
Prerequisites
- A running Debian 11 system with sudo privileged account access.
- Compelte the initial server setup to prepare your system with the few recommendations
Step 1 – Installing Java on Debian 11
The default Debian 11 repositories contain the latest stable version OpenJDK 11 and the latest version ie OpenJDK 17. You can install any one of them from the official repositories.
Java Runtime Environment (JRE) will only assist in running applications developed in Java. To create a Java application you may need Java Development Kit or JDK. To install both, use:
- Install Latest Stable Java (OpenJDK 11) on Debian 11 – The following command will install Java Runtime Environment.
sudo apt install default-jre default-jdkYou can ignore JDK or JRE package based on your requirements.
- Install Latest Java (OpenJDK 17) on Debian 11 – Use the following command to install the current latest version OpenJDK 17, execute the following command:
sudo apt install openjdk-17-jre openjdk-17-jdk
You can also have installed both versions on your system.
Once the download and installation is done, you can check the version:
java -version
Output:openjdk version "17-ea" 2021-09-14 OpenJDK Runtime Environment (build 17-ea+19-Debian-1) OpenJDK 64-Bit Server VM (build 17-ea+19-Debian-1, mixed mode, sharing)
To check the JDK version use:
javac -version
Output:javac 17-ea
Step 2 – Switching Between Multiple Java Versions
You can have multiple versions of Java on your system, they can easily be managed by using the command:
sudo update-alternatives --config java
You will get a list of installed Java versions on your system where each version is associated with a number, and any version can be set as the default Java environment of your system. You can choose the Java version which is associated with a number, type number, and press Enter.
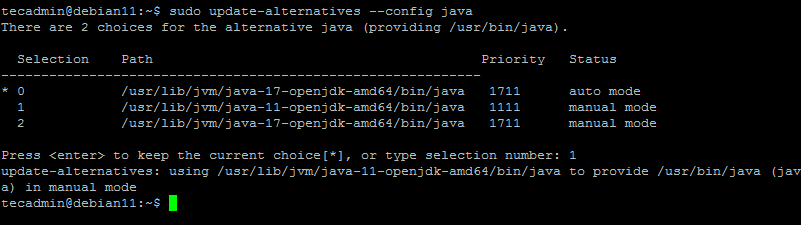
You have successfully updated the default JRE version. If you also have JDK installed, do the same for “javac”:
sudo update-alternatives --config javac
Enter a number to set the required version as default.
Step 3 – Configure Environment Variable
Many Java-based applications use the JAVA_HOME environment variable to get the location of Java saved on your PC. So, to avoid any errors it is suggested to set the JAVA_HOME variable.
First, find the java binary path with the following command:
sudo update-alternatives --list java
After that, to set the variable edit the /etc/environment file in any text editor:
sudo nano /etc/environment
Set the JAVA_HOME environment variable with the value of binary path from the previous command. Write the path by simply skipping “bin/java”:
JAVA_HOME="/usr/lib/jvm/java-11-openjdk-amd64/"
Save changes and close file. Next, reload the file:
source /etc/environment
To check the variable use:
echo $JAVA_HOME
Output:JAVA_HOME="/usr/lib/jvm/java-11-openjdk-amd64/"
In the output, you will get the path.
Conclusion
Java is a cross-platform language that is widely used not only to develop PC but mobile applications as well. Java flawlessly works on any operating system whether it is Windows PC or Linux. Many applications require Java to function on a system, for that you need to have Java installed on your PC.
This write-up is a guide on how to install Java on Debian 11 Bullseye and how to manage it. Finally, we also learned how to set up the JAVA_HOME environment variable in Debian 11.
