The Linux operating system is a very popular and widely used OS for the server. It powers the majority of the world’s websites, including some of the most well-known ones such as Yahoo, Google, and Facebook. The logical acronym LAMP is commonly used to refer to the mixture of free and open-source software that is frequently used together to create a server architecture that can handle dynamic websites, such as those built on PHP, MySQL, and Apache.
Each letter in the acronym refers to a separate software package: That being said, let’s see how we can install and setup LEMP Stack on Ubuntu.
Pre-Requisities
Assuming that you have a running Ubuntu 22.04 Linux system with sudo (or root) privileged access.
Access your system and open a terminal. It will be good to update the package manager cache and upgrade currently installed packages. To do this execute:
sudo apt update && sudo apt upgrade
Let’s begin the LEMP (Linux, Nginx, MySQL, and PHP) stack installation on Ubuntu 22.04 Jammy Jellyfish Linux system.
Step 1 – Installing NGINX
First, we will install the Latest Nginx web server on our system. Use the following commands to add PPA for installing the latest Nginx version on your Ubuntu 22.04 Linux.
Use the following commands to install Nginx web server.
sudo apt install nginx
This will install the Nginx web server and start the service.
Now, you need to allow webserver ports in the firewall. To allow ports 80 and 443 in the UFW firewall, execute the following commands.
sudo ufw allow 80/tcpsudo ufw allow 43/tcp
Open a web browser on your system and type the server’s IP in the address bar. You will get the default Nginx server page

Step 2 – Installing PHP
First, you need to decide on the PHP version to install on your system. You can also install multiple PHP versions on a single system. Currently the repository contains PHP 5.6, PHP 7.1, 7.2, 7.3, 7.4 and PHP 8.0, 8.1. The below instruction will install PHP 8.1. Please change the version as per your requirements.
The ondrej/php ppa contains all PHP version’s for Ubuntu systems. So add this repository in your system with command below:
sudo add-apt-repository ppa:ondrej/php
Now update the apt cache and install PHP 8.1.
sudo apt updatesudo apt install php8.1
This will install PHP on your Ubuntu system along with some useful PHP extensions.
Step 3 — Install and Configure PHP-FPM
PHP-FPM (FastCGI Process Manager) is an alternative PHP FastCGI implementation with some additional features. Nginx web server required php-fpm for processing the PHP scripts.
To install PHP-FPM, run the following command based on the installed PHP version:
sudo apt install php8.1-fpm
Once the installation finished, check the service status:
sudo systemctl status php8.1-fpm
● php8.1-fpm.service - The PHP 8.1 FastCGI Process Manager
     Loaded: loaded (/lib/systemd/system/php8.1-fpm.service; enabled; vendor preset: enabled)
     Active: active (running) since Thu 2022-04-07 06:26:55 UTC; 11min ago
       Docs: man:php-fpm8.1(8)
    Process: 108650 ExecStartPost=/usr/lib/php/php-fpm-socket-helper install /run/php/php-fpm.sock /etc/php/8.1/fpm/pool.d/www.conf 81 (code=exited, status=0/SUCCESS)
   Main PID: 108647 (php-fpm8.1)
     Status: "Processes active: 0, idle: 2, Requests: 2, slow: 0, Traffic: 0req/sec"
      Tasks: 3 (limit: 1034)
     Memory: 10.7M
        CPU: 88ms
     CGroup: /system.slice/php8.1-fpm.service
             ├─108647 "php-fpm: master process (/etc/php/8.1/fpm/php-fpm.conf)
             ├─108648 "php-fpm: pool www
             └─108649 "php-fpm: pool www

Apr 07 06:26:55 ubuntu2204 systemd[1]: Starting The PHP 8.1 FastCGI Process Manager...
Apr 07 06:26:55 ubuntu2204 systemd[1]: Started The PHP 8.1 FastCGI Process Manager.
In Step 6, we will configure the Nginx virtual host with PHP-FPM to serve PHP applications.
Step 4 – Installing MySQL
The default Ubuntu repositories contain MySQL 8.0. Which can be directly installed using the package manager. To install the available MySQL server version, execute the following command.
sudo apt-get install mysql-server
Once the installation is finished, you can secure the MySQL server by executing the following command.
sudo mysql_secure_installation
This will ask for a few questions to secure the MySQL server.
- Press ‘y’ to enable validate password plugin. This will allow you to set a strict password policy for user accounts.
VALIDATE PASSWORD COMPONENT can be used to test passwords
and improve security. It checks the strength of password
and allows the users to set only those passwords which are
secure enough. Would you like to setup VALIDATE PASSWORD component?

Press y|Y for Yes, any other key for No: y
- Chose the password complexity level. Read all 3 options and choose one. For production servers we recommend to choose STRONG policy.
LOW    Length >= 8
MEDIUM Length >= 8, numeric, mixed case, and special characters
STRONG Length >= 8, numeric, mixed case, special characters and dictionary file

Please enter 0 = LOW, 1 = MEDIUM and 2 = STRONG: 1
- Enter a new password and re-enter it. Make sure it matches the complexity level as described above.
New password: *************
Re-enter new password: *************
- Press ‘y’ to continue with provided password.
Do you wish to continue with the password provided?(Press y|Y for Yes, any other key for No) : y
- Remove default anonymous users from MySQL server:
Remove anonymous users? (Press y|Y for Yes, any other key for No) : y
- Disable root login from remote systems
Disallow root login remotely? (Press y|Y for Yes, any other key for No) : y
- Remove test database form MySQL created by default during installation.
Remove test database and access to it? (Press y|Y for Yes, any other key for No) : y
- Reload all privileges to apply above changes immediately.
Reload privilege tables now? (Press y|Y for Yes, any other key for No) : y
You have secured the MySQL server in the LAMP stack on Ubuntu 22.04 Linux system.
Remember that the above password set for the root accounts is used for remote users only. To log in from the same system, just type mysql on terminal.
sudo mysql
Welcome to the MySQL monitor.  Commands end with ; or \g.
Your MySQL connection id is 14
Server version: 8.0.28-0ubuntu4 (Ubuntu)

Copyright (c) 2000, 2022, Oracle and/or its affiliates.

Oracle is a registered trademark of Oracle Corporation and/or its
affiliates. Other names may be trademarks of their respective
owners.

Type 'help;' or '\h' for help. Type '\c' to clear the current input statement.

mysql>
Type ‘quit’ to exit from the MySQL shell and return to the system terminal.
Step 5 – Installing Additional Packages
You may also need to install modules like MySQL and other extensions for PHP based on the application requirements. Use the following command to find our available PHP extensions.
sudo apt search php8.1-*
The above command will list all available PHP7 modules for installation, Let’s begin the installation of modules.
sudo apt install php8.1-mysql php8.1-curl php8.1-xml
You may also need to install other required PHP extensions on your system.
Step 6 — Configure Nginx VirtualHost
Finally, do the configuration of the Nginx virtual host. For this example, we are editing the default configuration file.
sudo nano /etc/nginx/sites-enabled/default
and make changes as below.
server {
        listen   80;

        root /var/www/example.com;

        index index.php;

        server_name  example.com www.example.com;

        location / {
                try_files $uri $uri/ =404;
        }

        location ~ \.php$ {
                include snippets/fastcgi-php.conf;
                fastcgi_pass unix:/run/php/php8.1-fpm.sock;
        }

}
In the above configuration file, look for location ~ \.php$ section. Which is required to service PHP scripts via Nginx server.
You have to do the same changes in all VirtualHosts configured.
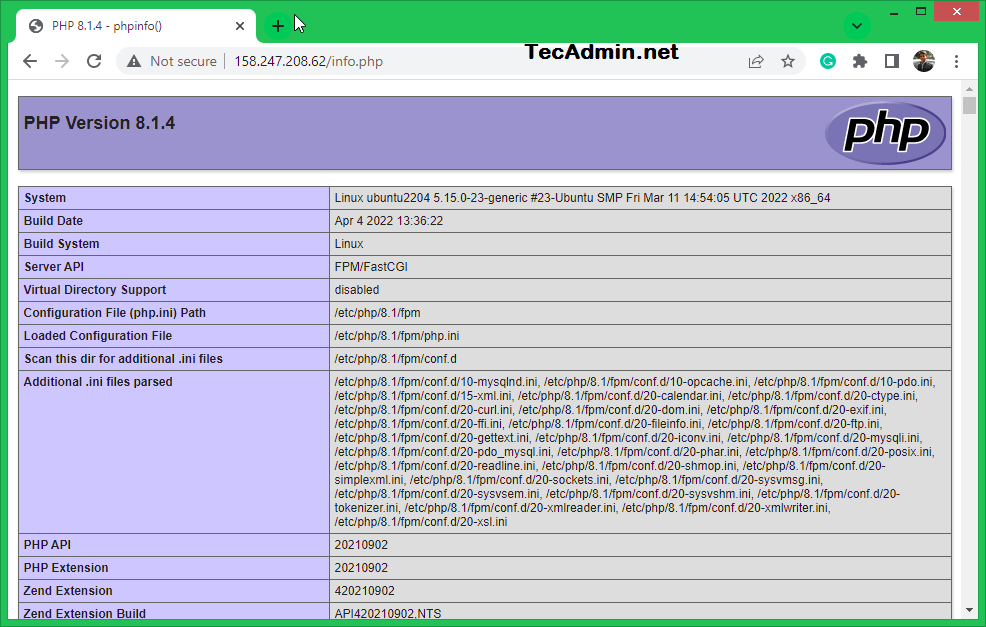
Step 7 – Verify Setup
You have successfully completed the installation of Nginx, MySQL, and PHP on the Ubuntu 22.04 Linux system. To verify the PHP integration with Nginx, create a PHP script (example: info.php) on the website document root and write the below content.
1 2 3 | <?php phpinfo(); ?> |
Now access this file in the web browser. It will so all the details about versions and installation.
http://server-ip-or-domain-name/info.php
Conclusion
This tutorial helped you to set up the LEMP (Linux, Nginx, MySQL, and PHP) stack on Ubuntu 22.04 LTS system. Now, you can host PHP-based web applications on your server.
4 Comments
It doesn’t work this way any more you need to add one more line to php location block for php in order to take effect.
fastcgi_param SCRIPT_FILENAME /scripts$fastcgi_script_name;
See following blog ::
Step 6 – Restart Services
After installing all services on your system, start all required services.
$ sudo service apache2 restart Change it to $service nginx restart
Nice, only you need to change > sudo service nginx restart – in step 6
it is nice information site . you will see more tutorials @ http://www.q-demos.com