Memcached is a distributed memory object caching system which stored data in memory on key-value basis. It is very useful for optimizing dynamic websites and enabled speed by caching objects in memory.
This article will help you to install Memcached with PHP Memcache PECL extension on Ubuntu 20.04 systems.
Prerequisites
You must have shell access to your Ubuntu 20.04 system with sudo privileged account.
Login to your system and complete this tutorial.
Step 1 – Installing Memcached on Ubuntu
First of all, update Apt package cache on your system then install Memcached service on your system. Execute below commands from command prompt.
sudo apt updatesudo apt install memcached
Step 2 – Configure Memcached
You can find the details information about Memcache configuration here. For initial level configuration check for the following settings under Memcache configuration file /etc/memcached.conf.
- -d => Run Memcached in deamon mode. You can use this option to configure your Memcached server to run as service.
- -m => Define the maximum number of Memory can be used by Memcached deamon. (default: 64 MB)
- -p => Defind port for Memcached to listen on. (default: 11211)
- -l => Define the IP address to Memcached listen on. Set 0.0.0.0 to listen on all IPs(enterfaces) configured on system.
After making changes, restart the Memcached service.
sudo systemctl restart memcached
Step 3 – Verify Memcache Setup
Use the following command to check and verify that Memcached service is running properly on your system. This will show you the current statstics of your Memcached server. So the values may be differ that below results.
echo "stats settings" | nc localhost 11211
Output:
STAT maxbytes 134217728
STAT maxconns 1024
STAT tcpport 11211
STAT udpport 11211
STAT inter 127.0.0.1
STAT verbosity 0
STAT oldest 0
STAT evictions on
STAT domain_socket NULL
STAT umask 700
STAT growth_factor 1.25
STAT chunk_size 48
STAT num_threads 4
STAT num_threads_per_udp 4
STAT stat_key_prefix :
STAT detail_enabled no
STAT reqs_per_event 20
STAT cas_enabled yes
STAT tcp_backlog 1024
STAT binding_protocol auto-negotiate
STAT auth_enabled_sasl no
STAT item_size_max 1048576
STAT maxconns_fast no
STAT hashpower_init 0
STAT slab_reassign no
STAT slab_automove 0
STAT lru_crawler no
STAT lru_crawler_sleep 100
STAT lru_crawler_tocrawl 0
STAT tail_repair_time 0
STAT flush_enabled yes
STAT hash_algorithm jenkins
STAT lru_maintainer_thread no
STAT hot_lru_pct 32
STAT warm_lru_pct 32
STAT expirezero_does_not_evict no
END
Step 4 – Installing Memcache/Memcached PHP Module
Now install latest PHP from ppa:ondrej/php PPA on your Ubuntu system. If you have already installed PHP on your system, just skip PHP installation commands below.
sudo add-apt-repository ppa:ondrej/phpsudo apt updatesudo apt install -y php php-dev php-pear libapache2-mod-php
Now install PHP Memcached module on your system. The below command will also do the required configuration.
sudo apt install -y php-memcached php-memcache
After completing the installation, you must restart the Apache service.
sudo systemctl restart apache2
Check if Memcache php extension is enabled and working properly. Create a info.php file under the document root of your domain with following code:
/var/www/html/info.php
1 2 3 | <?php phpinfo(); ?> |
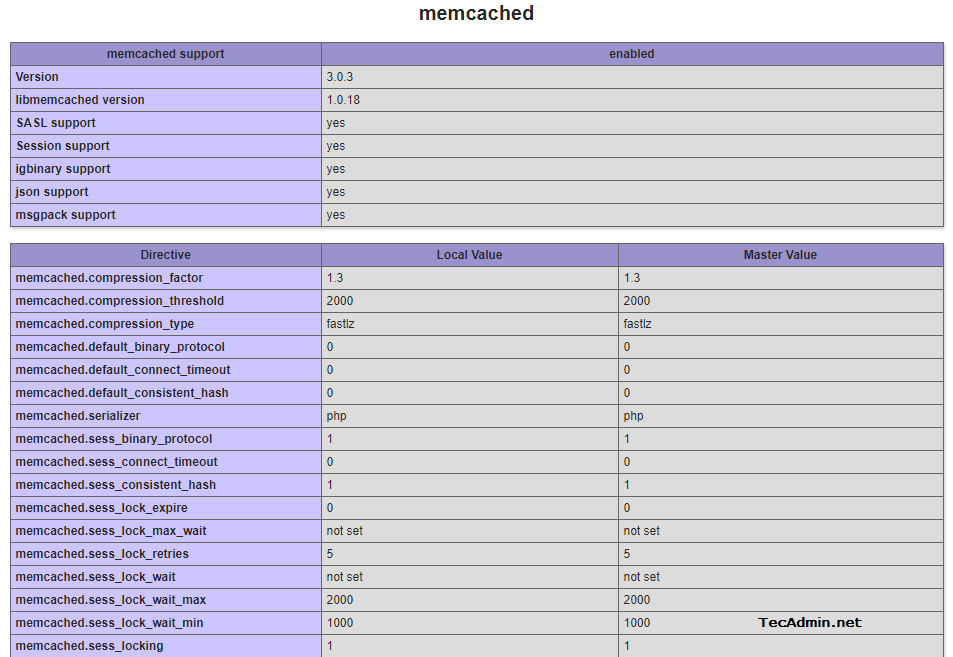
Now access info.php on the web interface and search for Memcache, You will get the result like below.
https://server-ip/info.php
Conclusion
In this tutorial, you have learned to install Memcached service along with PHP extension on your Ubuntu 20.04 system.
