
MySQL, a widely favored open-source relational database management system, is compatible with Linux, Windows, and Mac OS. It’s primarily used as a back-end database for web applications and for data storage in various software types. This system facilitates data storage, organization, retrieval, and conversion, such as from text to numbers. MySQL is a popular choice for businesses large and small for their websites and applications.
This guide provides a concise walkthrough for installing MySQL 8 on Amazon Linux 2. Upon completion, you’ll have an operational MySQL database, accessible through AWS Console or your application. It also introduces the use of Amazon RDS for managing databases beyond MySQL.
How to Install MySQL 8 on Amazon Linux
The MySQL official team provides the RPM packages for the installation of Amazon Linux systems. Follow the below steps one by one to complete the MySQL installation.
- Configure Yum Repository
Most of the packages required the dependencies that are available in other third-party repositories. Use the following command to configure the EPEL repository that is required for package installation.
sudo amazon-linux-extras install epel -yThen configure the MySQL repository by installing the package provided by the MySQL official site.
sudo yum install https://dev.mysql.com/get/mysql80-community-release-el7-5.noarch.rpm - Install MySQL Server
You can successfully configure the repositories, your system is ready for MySQL installation. Execute the below-mentioned command to install MySQL 8 community server on Amazon Linux.
sudo yum install mysql-community-serverPress ‘y’ for the confirmation prompted during the installation.
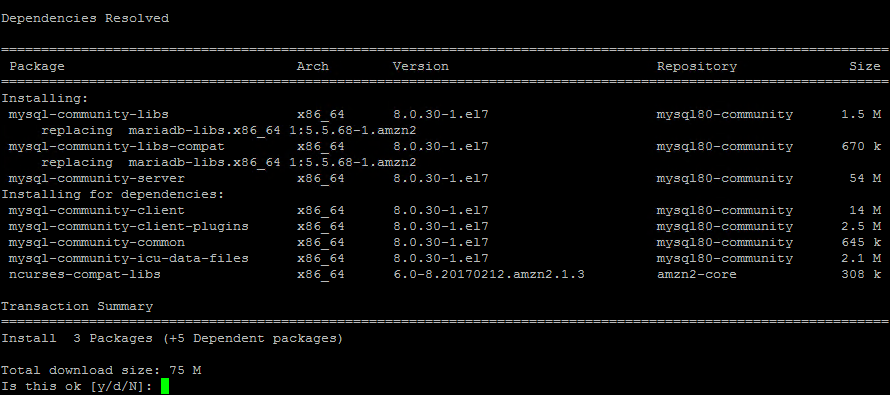
MySQL pacakges installation on Amazon Linux 2 - Activate and Start MySQL Service
Once the installation is successfully finished. The default MySQL service will be stopped and in an inactive state. First, use the following commands to activate the service to auto-start on system startup, then start it manually for the first time.
systemctl active mysqldsystemctl start mysqldThen, use the following command to view the MySQL service status. It should be active and running.
systemctl status mysqld
Activate and start MySQL service - Find initial root password
During the installation of packages, an initial password is configured for the MySQL root account. You can find this password from the MySQL log file.
cat /var/log/mysql.log | grep "A temporary password"You will see the output below that includes the default root password.

Getting the default root password after installation This password will be required in the next step.
- MySQL Post Installation Setup
A post-installation script is provided by the MySQL packages. That is helpful for configuring MySQL once after the installation. This helps us to configure a strong root account password, remote anonymous users, disallow root access remotely and remove the test database.
Execute the following command from the terminal:
sudo mysql_secure_installationEnter the root password found in the above step, then set a new password for the MySQL root account. Next, follow the onscreen instructions and Press Y for all other operations to apply improved security.
- Enter password for user root: [Enter current root password]
- New password: [Enter a new root password]
- Re-enter new password: [Re-Enter the new root password]
- Estimated strength of the password: 100
Change the password for root ? ((Press y|Y for Yes, any other key for No) : n - Remove anonymous users? (Press y|Y for Yes, any other key for No) : y
- Disallow root login remotely? (Press y|Y for Yes, any other key for No) : y
- Remove test database and access to it? (Press y|Y for Yes, any other key for No) : y
- Reload privilege tables now? (Press y|Y for Yes, any other key for No) : y
- All done!
- Connect to MySQL
Your MySQL server is ready to use now. From the terminal, you can run the below command to connect to the MySQL command line interface. It will prompt for the root account password. On successful authentication, you will get the MySQL prompt.
mysql -u root -pEnter the MySQL root user password:
Output:Enter password: Welcome to the MySQL monitor. Commands end with ; or \g. Your MySQL connection id is 14 Server version: 8.0.30 MySQL Community Server - GPL Copyright (c) 2000, 2022, Oracle and/or its affiliates. Oracle is a registered trademark of Oracle Corporation and/or its affiliates. Other names may be trademarks of their respective owners. Type 'help;' or '\h' for help. Type '\c' to clear the current input statement. mysql>Here you can create databases, tables, users, and all the required things by using the structured query language statements.


Next Steps for Maintaining MySQL
As you’re setting up your new database, it’s a good idea to put some thought into how you will maintain the database in the long term. This guide focuses on setting up a new database, but you should also consider ways to make your database more automated and easier to manage. One simple way to do this is to automate the process of backing up your database. This will allow you to keep a copy of your data in case something goes wrong and you need to restore it from a previous point in time. This can be done with the help of some simple scripts that call the MySQL database and write the data to a different location.
We already have created a simple database backup script and one advance MySQL database backup script for the purpose. You can use these scripts to quickly configure the database backups.
Final Words
There are several compelling reasons to host your database on Amazon’s cloud. Key factors include affordability, simplicity in setup and maintenance, and the flexibility to scale according to demand. Opting for Amazon Linux to run your database offers distinct benefits over other Linux distributions. Amazon’s distribution is meticulously tested and tailored for optimal performance on its cloud infrastructure. Choosing the right database solution is crucial, one that not only fulfills your current requirements but also adapts to your business’s growth.
This tutorial highlights the installation of MySQL on Amazon Linux, presenting an efficient and economical approach to establishing a new database.
1 Comment
The log file was at /var/log/mysqld.log and required sudo to access.