Odoo is also known as OpenERP as it contains a package of all applications which are related to business e.g. Production, marketing, etc, and also is an ERP (Enterprise Resource Planning ). It cannot only be used in E-Commerce but also in the manufacturing industry uses it. It is reliable, cost-effective, easy to use, and easy to handle.
This article helps us to know how to install the Odoo 14 on Ubuntu. It’s quite easy to install it on Ubuntu 20.04 with the help of some commands.
Step 1 – Installing Required Packages
There are some steps involved in the installation. Apart from that, there are some files that are necessary to install as a prerequisite.
First, update your server and then upgrade it. If it asks for a password, give it:
sudo apt update && sudo apt upgrade
The command will upgrade available updates for the installed packages. Then install all the required packages for the Odoo setup on the Ubuntu system. This will install essential packages for build, Python and Node.js on your system.
sudo apt install git wget nodejs npm python3 build-essential libzip-dev python3-dev libxslt1-dev python3-pip libldap2-dev python3-wheel libsasl2-dev python3-venv python3-setuptools node-less libjpeg-dev xfonts-75dpi xfonts-base libpq-dev libffi-dev fontconfig
Also, install the below node module to enable RTL support.
sudo npm install -g rtlcss
Step 2 – Installing wkhtmltopdf
Now, you also need to install wkhtmltox debina package, which provided useful wkhtmltoimage and wkhtmltopdf binary commands.
Download the debian package from Github:
wget https://github.com/wkhtmltopdf/packaging/releases/download/0.12.6-1/wkhtmltox_0.12.6-1.bionic_amd64.deb
Then install it on your system.
sudo dpkg -i wkhtmltox_0.12.6-1.bionic_amd64.deb
Step 3 – Create a New System Account
Now for the creation of a user for Odoo who can access the Odoo and can make changes in it.
sudo adduser --system --group --home=/opt/odoo --shell=/bin/bash odoo
This will create a new account to use for Odoo service.
Step 4 – Installing PostgreSQL
As we know that PostgreSQL is required as the database server for Odoo. So we will install it:
sudo apt install postgresql -y
Now for the creation of an Odoo user in PostgreSQL:
sudo su - postgres -c "createuser -s odoo"
This will add a new role odoo in PostgreSQL server.
Step 5 – Installing Odoo 14 on Ubuntu
We can download the Odoo from the Github repository. So clone it on your system. Make sure to clone the correct branch you need to install on your system. As we are installing Odoo 14, so use the branch name “14.0”.
sudo git clone --branch 14.0 --depth 1 https://www.github.com/odoo/odoo /opt/odoo/odoo-server
Change the file ownership to the odoo user.
sudo chown -R odoo:odoo /opt/odoo/odoo-server
It’s a good practice to create a Python virtual environment for isolating applications. Create a virtual environment with the following commands:
cd /opt/odoo/odoo-serverpython3 -m venv venvsource venv/bin/activate
Once the virtual environment is activated, you will see the system prompt as “(venv) $”. Now install the Python dependencies for the Odoo under the virtual environment.
pip3 install wheelpip3 install -r requirements.txt
After finishing the installation, deactivate the virtual environment with the following command.
deactivate
Now we will create the directory of log and also change its permissions settings
sudo mkdir /var/log/odoosudo chown odoo:odoo /var/log/odoosudo chmod 777 /var/log/odoo
Next, create a configuration for the Odoo server. This is useful for customizing the Odoo application. Edit the configuration file /etc/odoo-server.conf in your favorite text editor:
sudo nano /etc/odoo-server.conf
Add the below content to file:
1 2 3 4 5 6 | [options] admin_passwd = pass123 db_user = odoo addons_path = /opt/odoo/odoo-server/addons,/opt/odoo/odoo-server/odoo-custom-addons logfile = /var/log/odoo/odoo-server.log log_level = debug |
Make sure to change the admin_passwd value with a strong password. Save your file and close it.
Next, change the ownership to oddo user for the configuration file. Also, change file permissions
sudo chown odoo:odoo /etc/odoo-server.conf
Step 6 – Create Odoo Systemd Unit File
Create a Systemd unit file for the Oddo service management. It will help you manager Odoo service easily. Also allowed us to start Odoo on system boot. Create a new file odoo.service and edit in a text editor:
sudo nano /etc/systemd/system/odoo.service
Add the following content.
1 2 3 4 5 6 7 8 9 10 11 12 13 14 15 16 | [Unit] Description=Odoo 14.0 Service Requires=postgresql.service After=network.target postgresql.service [Service] Type=simple SyslogIdentifier=odoo PermissionsStartOnly=true User=odoo Group=odoo ExecStart=/opt/odoo/odoo-server/venv/bin/python3 /opt/odoo/odoo-server/odoo-bin -c /etc/odoo-server.conf StandardOutput=journal+console [Install] WantedBy=multi-user.target |
Save the file and close it.
Now, reload the systemd daemon to load the newly created file.
sudo systemctl daemon-reload
Start the Odoo service, Also enable it to auto-start on system boot:
sudo systemctl enable --now odoo.service
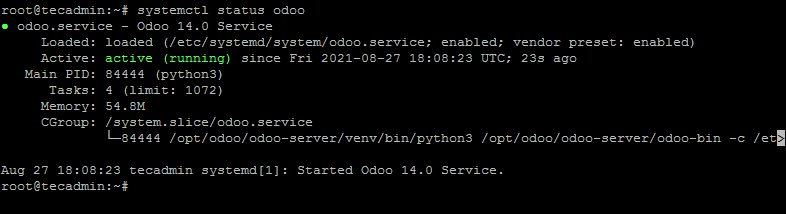
Verify the service status:
sudo systemctl status odoo.service
You should see that the Odoo service is active and running:
Step 7 – Access Odoo Application
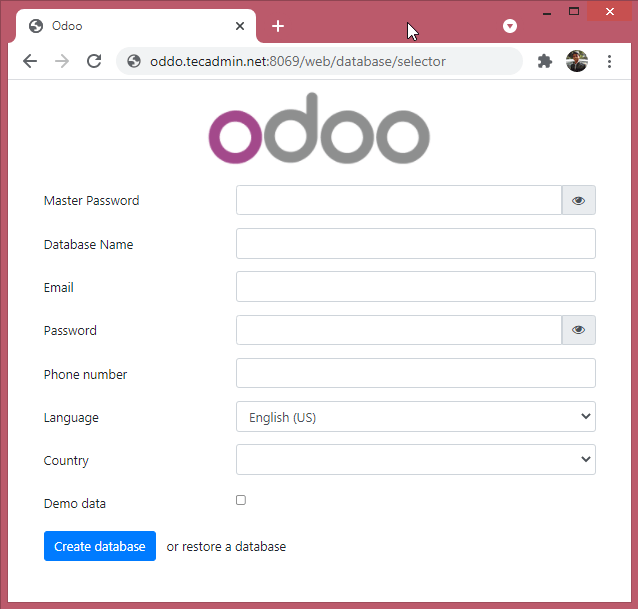
Odoo default runs on port 8069. Open a web browser on your system connect to the Odoo server on 8069 port.
http://server-ip-host:8069
You will find the Odoo web page on your screen.
Conclusion:
Everyone wants ease in life so Odoo fulfills this by providing all departments needed to run a business at one place. Now you don’t have to recruit a lot of employees to handle your company, all the needs are being fulfilled by Odoo. In this article, we learned how Odoo 14 is installed on Ubuntu 20.04.
4 Comments
I have followed all the steps and got odoo service and postgres running on their respective ports but whenever I try to access from browser I get 500 internal server error.
have u got the solutions of the problem ?
i cant start Venv it says
I use Root Privilege’s and account
odoo.service – Odoo 14.0 Service
Loaded: loaded (/etc/systemd/system/odoo.service; enabled; vendor preset: enabled)
Active: failed (Result: exit-code) since Sat 2022-01-29 15:51:36 CET; 3s ago
Process: 81505 ExecStart=/opt/odoo/odoo-server/venv/bin/python3 /opt/odoo/odoo-server/odoo-bin -c /etc/odoo-server.conf (code=exited, status=203/EXEC)
Main PID: 81505 (code=exited, status=203/EXEC)
janv. 29 15:51:36 L systemd[1]: Started Odoo 14.0 Service.
janv. 29 15:51:36 systemd[81505]: odoo.service: Failed to execute command: Permission denied
janv. 29 15:51:36 systemd[81505]: odoo.service: Failed at step EXEC spawning /opt/odoo/odoo-server/venv/bin/python3: Permission denied
janv. 29 15:51:36 systemd[1]: odoo.service: Main process exited, code=exited, status=203/EXEC
janv. 29 15:51:36 systemd[1]: odoo.service: Failed with result ‘exit-code’.
hi, can you resolve this problem ???