Spotify is a digital music platform providing services over the globe. It provides you access to millions of songs instantly on just few clicks. The free Spotify application is available for the installation on Desktop, Mobile devices. You can just install Spotify application on your system and enjoy the music.
The Spotify package is available as Debian package as well as the Snap package is available for this application.
This tutorial help you to install Spotify on Ubuntu 20.04 system via command line.
Install Spotify on Ubuntu 20.04
You can install Spotify on Ubuntu 20.04 by using default Apt package manager or use latest Snap packages. Choose on of the below given options to install Spotify on Ubuntu system.
Method 1 – Installing Spotify with Snap
The Spotify application is available as Snap package for the installation. The Snap daemon is default available under the Ubuntu 20.04 systems. You can simply use snap command to install Spotify on Ubuntu systems.
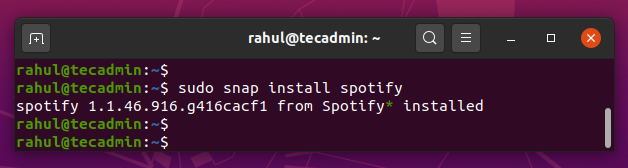
Open a terminal (CTRL + ALT + T) and type:
sudo snap install spotifyOn successful installation, you will see the output as below screenshot:
Snap is the preferred methods for the packages installation on Ubuntu systems. But still you want to go with regular Apt package manager, use below method to install Spotify on Ubuntu system.
Method 2 – Installing Spotify using Apt
Snap is the preferred way to install Spotify on Ubuntu systems. But if you still want to install Spotify with Apt package manager, follow the below steps.
- Add the GPG key to your system
sudo apt-key adv --keyserver hkp://keyserver.ubuntu.com:80 --recv-keys 0DF731E45CE24F27EEEB1450EFDC8610341D9410 - Next, configure the spotify PPA repository to your system.
echo deb http://repository.spotify.com stable non-free | sudo tee /etc/apt/sources.list.d/spotify.list - After adding the PPA, use the following commands to update Apt cache and install Spotify on Ubuntu 20.04 systems.
sudo apt updatesudo apt install spotify-client
That’s it. You have successfully installed Spotify on your Ubuntu 20.04 system.
Launch Spotify Application
In the Activities search bar type “Spotify” and click on the icon to launch the application.

When you start Spotify for the first time, a window like the following will appear:

You can keep using application for free with limited features with advertisements. To use full features, you have to purchase paid subscription.
Conclusion
In this tutorial you have found 2 methods for installing Spotify on Ubuntu 20.04 LTS Linux system.
- Add the GPG key to your system