Apache Tomcat is a widely-used open-source Java Servlet Container developed by the Apache Software Foundation. It powers numerous large-scale, mission-critical web applications across a diverse range of industries and sectors. This guide will walk you through the process of installing Apache Tomcat 10 on Debian Linux, setting you up for deploying your Java web applications efficiently.
Prerequisites
- A system running Debian Linux
- A user account with sudo privileges
- Java SE 8 or later installed on your Debian system
You can get cheaper instances from DigitalOcean hosting.
Step 1: Install Java
Tomcat 10 required JRE 8 or higher version installed on your system. If your system doesn’t have JRE installed, Use the following commands to install OpenJDK to fulfill the requirements.
sudo apt updatesudo apt install default-jdk -y
Check the current active Java version:
java -version

openjdk 11.0.9.1 2020-11-04
OpenJDK Runtime Environment (build 11.0.9.1+1-post-Debian-1deb10u2)
OpenJDK 64-Bit Server VM (build 11.0.9.1+1-post-Debian-1deb10u2, mixed mode, sharing)
Step 2: Create Tomcat System User
It is good to have a dedicated user account for running a Tomcat server. To create a new user with the name “tomcat”, which is recommended for security purposes mainly for production deployments.
To create a new account, type:
sudo useradd -m -d /opt/tomcat -U -s /bin/false tomcat
The above command will create a user and group with the name “tomcat” in your system.
Step 3: Installing Tomcat on Debian
The Apache Tomcat development team releases the latest version of Tomcat from time to time. So it will be good check download the latest Tomcat version from the official download server. Use the below command to download Tomcat 10.
wget https://dlcdn.apache.org/tomcat/tomcat-10/v10.1.19/bin/apache-tomcat-10.1.19.tar.gz
After downloading the archive file, extract the file under the tomcat home directory /opt/tomcat with skipping parent folder.
sudo tar xzvf apache-tomcat-10*tar.gz -C /opt/tomcat --strip-components=1
Next, set the proper file permissions.
sudo chown -R tomcat:tomcat /opt/tomcat/sudo chmod -R u+x /opt/tomcat/bin
You have now the latest Tomcat application on your system.
Step 4: Create Tomcat Application User
Now, configure your tomcat with user accounts to secure access of admin/manager pages. To do this, edit conf/tomcat-users.xml file in your editor and paste the following code inside <tomcat-users> </tomcat-users> tags. We recommend changing the password in the below configuration with high secured password.
sudo nano /opt/tomcat/conf/tomcat-users.xml
Add the following values. Make sure to change the password for admin and manager access.
<!-- user manager can access only manager section -->
<role rolename="manager-gui" />
<user username="manager" password="_SECRET_PASSWORD_" roles="manager-gui" />

<!-- user admin can access manager and admin section both -->
<role rolename="admin-gui" />
<user username="admin" password="_SECRET_PASSWORD_" roles="manager-gui,admin-gui" />
Save file and close.
Step 5: Enable Remote Tomcat Access
The default Tomcat manager and host-manager applications are accessible for localhost only. To allow access to these pages from the remote system, you need to modify the following configuration files.
You can either allow specific remote systems or allow all. Edit the context.xml file for manager and host manager application:
sudo nano /opt/tomcat/webapps/manager/META-INF/context.xml
Comment out the section added for IP address restriction to allow connections from anywhere.
<Context antiResourceLocking="false" privileged="true" >
  <CookieProcessor className="org.apache.tomcat.util.http.Rfc6265CookieProcessor"
                   sameSiteCookies="strict" />
  <!-- <Valve className="org.apache.catalina.valves.RemoteAddrValve"
         allow="127\.\d+\.\d+\.\d+|::1|0:0:0:0:0:0:0:1" /> -->
  ...
</Context>
Also, edit the context.xml for the host-manager interface and comment on the similar section as above.
sudo nano /opt/tomcat/webapps/host-manager/META-INF/context.xml
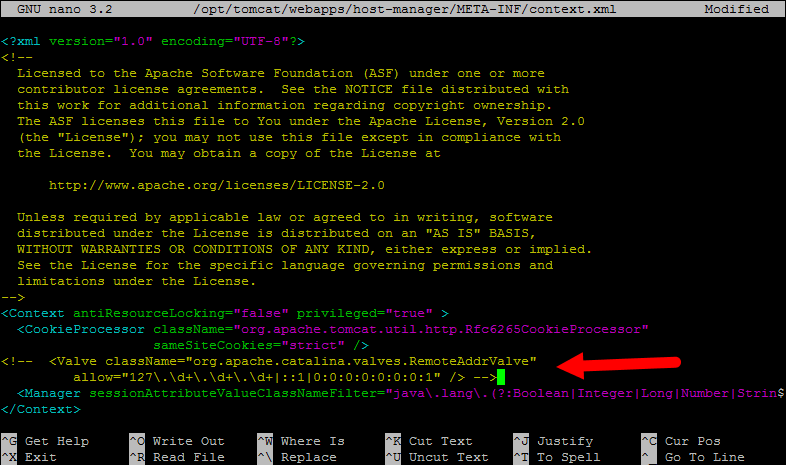
Save all files and close them.
Step 6: Create a Tomcat Systemd Unit File
Tomcat provides bash scripts to start, stop service. But, to make it simple, create a start-up script to manage Tomcat as a systemd service. Let’s create a tomcat.service file:
sudo nano /etc/systemd/system/tomcat.service
Add the following content to it:
[Unit]
Description=Tomcat
After=network.target

[Service]
Type=forking

User=tomcat
Group=tomcat

Environment="JAVA_HOME=/usr/lib/jvm/java-1.11.0-openjdk-amd64"
Environment="JAVA_OPTS=-Djava.security.egd=file:///dev/urandom"
Environment="CATALINA_BASE=/opt/tomcat"
Environment="CATALINA_HOME=/opt/tomcat"
Environment="CATALINA_PID=/opt/tomcat/temp/tomcat.pid"
Environment="CATALINA_OPTS=-Xms512M -Xmx1024M -server -XX:+UseParallelGC"

ExecStart=/opt/tomcat/bin/startup.sh
ExecStop=/opt/tomcat/bin/shutdown.sh

[Install]
WantedBy=multi-user.target
Reload the systemd daemon service to load newly create files.
sudo systemctl daemon-reload
Now, start the Tomcat application for the first time.
sudo systemctl start tomcat.service
Next, enable the tomcat service to auto-start for subsequent system boots. This is more important for the production deployments.
sudo systemctl enable tomcat.service
As of now, the tomcat application is running on your system. You can verify the service status by executing the command as below. Make sure the status is showing “active (running)“.
sudo systemctl status tomcat.service
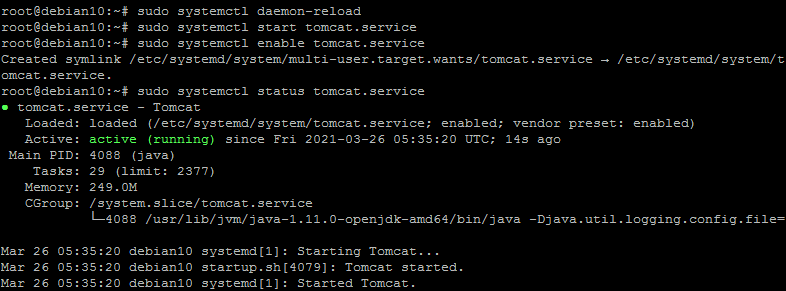
That’s it. You have successfully configured Tomcat 10 on your Debian system.
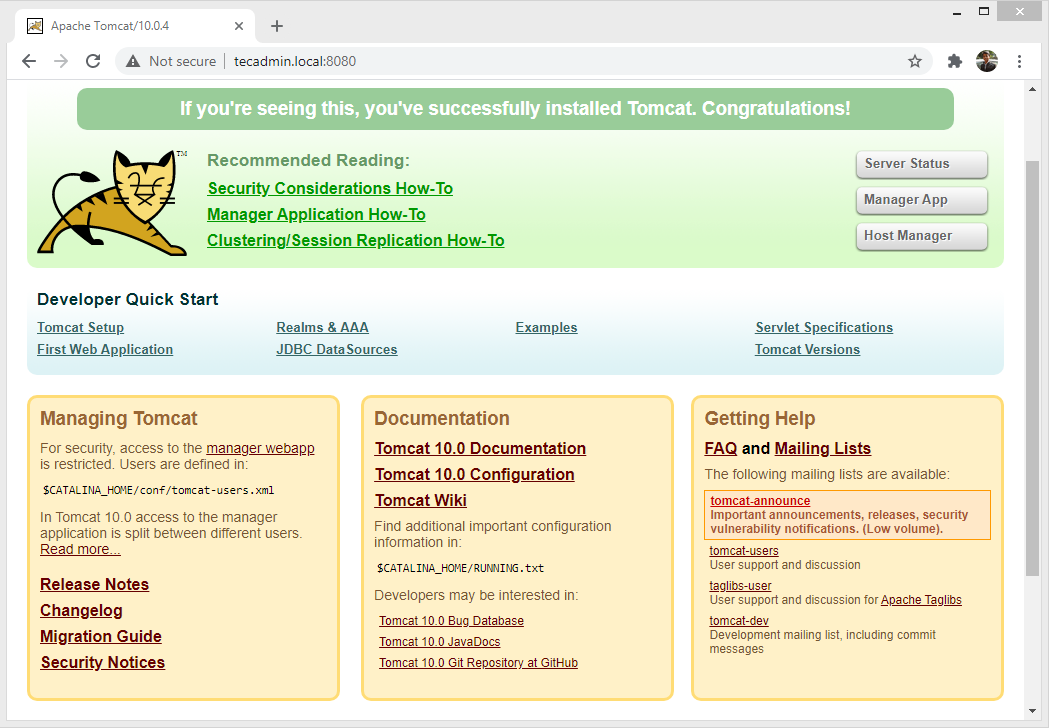
Step 7: Access the Tomcat Web Interface
The default Tomcat server runs on port 8080. As you have configured Tomcat on your system, you can access the web interface from your system. You can access tomcat interfaces by entering your server’s IP address or a domain name pointed to that server, followed by port 8080 in your browser:
Change tecadmin.local with your server ip or domain or localhost.
http://tecadmin.local:8080/
You will see the page like below:
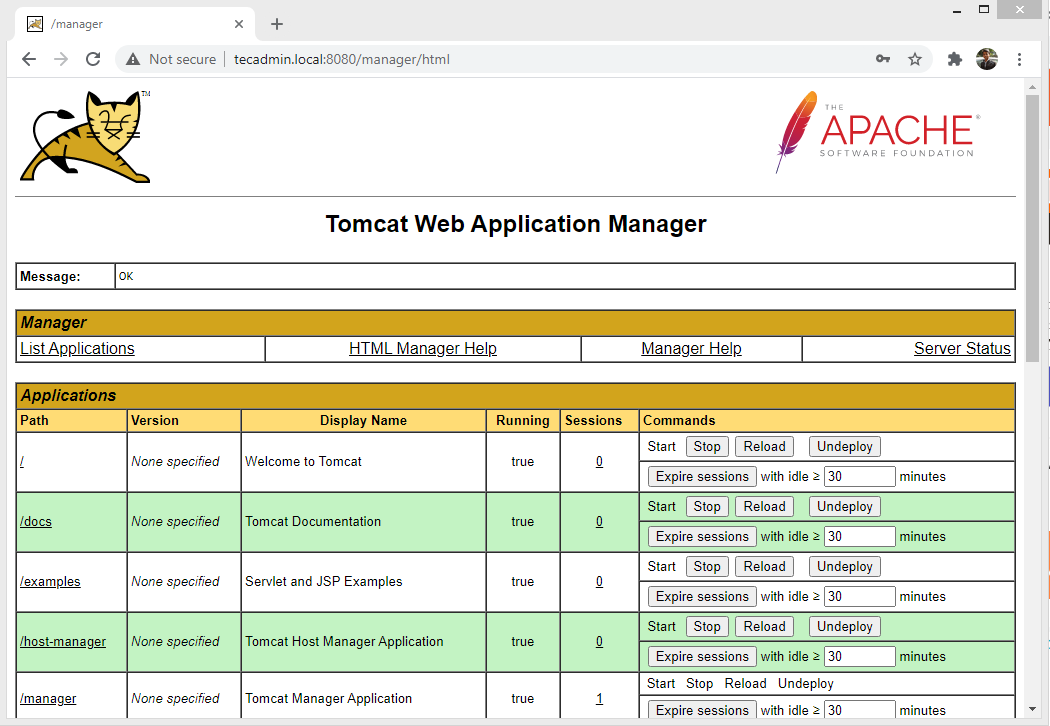
Tomcat Manager App is a web application packaged with the Tomcat server application. The Manager interface provides us with the basic functionality we need to manage our deployed web applications.
Click Manager App button home page or directly type /manager in browser url of main Tomcat server to access it.
http://tecadmin.local:8080/manager/
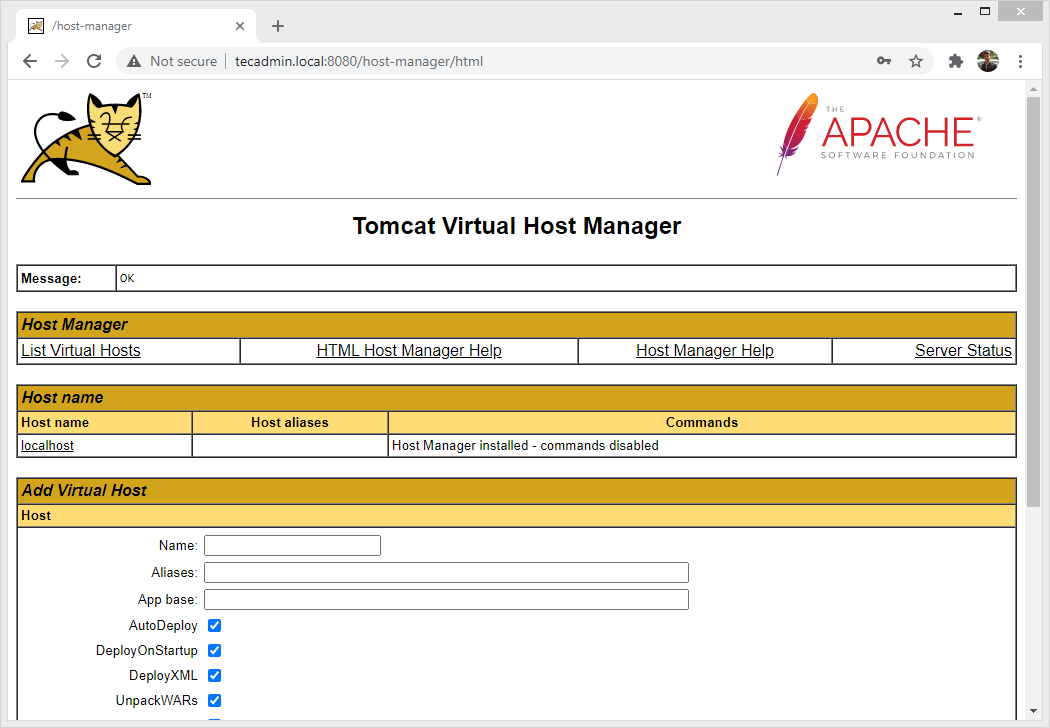
Tomcat Host Manager App is another web application packaged with Tomcat server application. Which is used to creates/removes Virtual Hosts within the Tomcat service. A Virtual Host allows you to define multiple hostnames on a single server.
Click Host Manager button home page or directly type /host-manager url in main Tomcat server to access it.
http://tecadmin.local:8080/host-manager/
Conclusion
You have successfully installed Apache Tomcat 10 on your Debian Linux system. You can now deploy your Java web applications by placing their .war files in the webapps directory of your Tomcat installation. Remember to secure your Tomcat installation before going into production to protect your applications and data.
You may also need to create Virtualhosts in Tomcat or Secure your Tomcat applications with Let’s Encrypt SSL certificate.

2 Comments
I figured out my other issue, another program was listening on port 8080. But now I get an error: “The origin server did not find a current representation for the target resource or is not willing to disclose that one exists.” help?
hey, i tried this tutorial. now when i go to the address where i have tomcat running my browser asks me for credentials. i tried using the ones in /opt/tomcat/conf/tomcat-users.xml but it won’t work. Is this maybe set anywhere else?