
Apache Tomcat is an open-source web application server designed for hosting Java-based applications. It is developed by the Apache foundation and still provides upgrades and features. It’s easy to install and use, and provides a powerful platform for web applications.
In this tutorial, we’ll walk you through the steps of installing Tomcat 10 on Ubuntu 22.04. We’ll also discuss some important concepts related to the installation, such as setting up the environment, downloading and installing the necessary packages, and configuring the Tomcat instance.
Prerequisites
Before you start, you need:
- A fresh Ubuntu 22.04 installation
- Access to a user account with sudo or root privileges
- A terminal window/command line (Ctrl-Alt-T)
- Java Development Kit (JDK) installed (Tomcat 10 requires JDK 11 or later)
Step 1: Update System Packages
It’s always a good idea to update the package lists for upgrades and new installations. Open your terminal, and enter the following command:
sudo apt update && sudo apt upgrade -y
Step 2: Install Java Development Kit (JDK)
As Tomcat is a Java server, we need to have JDK installed on the system. Since Tomcat 10 requires JDK 11 or newer, we will install OpenJDK 11.
sudo apt install openjdk-11-jdk
You can verify the installation with the following command:
java -version
You should see an output confirming the installed version of OpenJDK.
Step 3: Create Tomcat User
For security reasons, Tomcat should not be run under the root user. Therefore, we’ll create a new system user with home directory /opt/tomcat.
sudo useradd -r -m -U -d /opt/tomcat -s /bin/false tomcat
Step 4: Download and Extract Tomcat 10
Next, navigate to the Apache Tomcat official download page (http://tomcat.apache.org/download-10.cgi), and grab the latest version of the binary distribution in tar.gz format. As of my writing, the latest stable version is 10.1.10.
Download the tar.gz file to the /tmp directory:
wget https://downloads.apache.org/tomcat/tomcat-10/v10.1.19/bin/apache-tomcat-10.1.19.tar.gz
Once the download is complete, we’ll extract it to the /opt/tomcat directory.
sudo tar xzf apache-tomcat-*.tar.gz -C /opt/tomcat
Step 5: Set Permissions
We need to give the tomcat user ownership over the extraction directory and make the scripts in the bin directory executable.
First, we’ll change the directory ownership to tomcat.
sudo chown -R tomcat: /opt/tomcat
Next, make all scripts within the bin directory executable.
sudo sh -c 'chmod +x /opt/tomcat/bin/*.sh'
Step 6: Create Tomcat Application Accounts
Now, configure your tomcat with user accounts to secure access of admin/manager pages. To do this, edit conf/tomcat-users.xml file in your editor and paste the following code inside <tomcat-users> </tomcat-users> tags. We recommend changing the password in the below configuration with high secured password.
sudo nano /opt/tomcat/conf/tomcat-users.xml
Add the following values. Make sure to change the password for admin and manager access.
<!-- user manager can access only the manager section -->
<role rolename="manager-gui" />
<user username="manager" password="_SECRET_PASSWORD_" roles="manager-gui" />

<!-- user admin can access manager and admin section both -->
<role rolename="admin-gui" />
<user username="admin" password="_SECRET_PASSWORD_" roles="manager-gui,admin-gui" />
Save the file and close.
Step 7: Allow Remote Hosts to Access Tomcat
The default Tomcat manager and host-manager applications are accessible for localhost only. To allow access to these pages from the remote system, you need to modify the following configuration files.
You can either allow a specific remote system or allow all. Edit the context.xml file for manager and host manager application:
sudo nano /opt/tomcat/webapps/manager/META-INF/context.xml
Comment out the section added for IP address restriction to allow connections from anywhere.
<Context antiResourceLocking="false" privileged="true" >
  <CookieProcessor className="org.apache.tomcat.util.http.Rfc6265CookieProcessor"
                   sameSiteCookies="strict" />
  <!-- <Valve className="org.apache.catalina.valves.RemoteAddrValve"
         allow="127\.\d+\.\d+\.\d+|::1|0:0:0:0:0:0:0:1" /> -->
  ...
</Context>
Similarly edit context.xml for host manager application in text editor:
sudo nano /opt/tomcat/webapps/host-manager/META-INF/context.xml
Comment out the same section to allow connections from anywhere.
<Context antiResourceLocking="false" privileged="true" >
  <CookieProcessor className="org.apache.tomcat.util.http.Rfc6265CookieProcessor"
                   sameSiteCookies="strict" />
  <!--<Valve className="org.apache.catalina.valves.RemoteAddrValve"
         allow="127\.\d+\.\d+\.\d+|::1|0:0:0:0:0:0:0:1" /> -->
  ...
</Context>
Save all files and close it.
Step 8: Create a Systemd Service File
We’ll now create a systemd service file to manage the Tomcat service. Open a new service file in a text editor:
sudo nano /etc/systemd/system/tomcat.service
Paste in the following configuration:
Description=Apache Tomcat 10 Web Application Server
After=network.target

[Service]
Type=forking

User=tomcat
Group=tomcat

Environment="JAVA_HOME=/usr/lib/jvm/java-11-openjdk-amd64"
Environment="CATALINA_HOME=/opt/tomcat"
Environment="CATALINA_BASE=/opt/tomcat"
Environment="CATALINA_PID=/opt/tomcat/temp/tomcat.pid"
Environment="CATALINA_OPTS=-Xms512M -Xmx1024M -server -XX:+UseParallelGC"

ExecStart=/opt/tomcat/bin/startup.sh
ExecStop=/opt/tomcat/bin/shutdown.sh

[Install]
WantedBy=multi-user.target
Save and close the file.
Step 9: Start and Enable Tomcat
After creating the service file, reload the systemd daemon to read the new file:
sudo systemctl daemon-reload
Next, start the Tomcat service with:
sudo systemctl start tomcat
Check the status to ensure it’s running properly:
sudo systemctl status tomcat
If everything went well, enable Tomcat to start on boot:
sudo systemctl enable tomcat
Step 10: Open the Firewall
You also need to check if the firewall is not blocking the incoming connections to Tomcat’s port (default is 8080). This depends on what firewall you are using:
- For UFW (Uncomplicated Firewall) in Ubuntu:
sudo ufw allow 8080 - For FirewallD in CentOS:
sudo firewall-cmd --zone=public --add-port=8080/tcp --permanentsudo firewall-cmd --reload - For iptables:
sudo iptables -A INPUT -p tcp --dport 8080 -j ACCEPT
Step 11: Test the Installation
The default Tomcat server runs on port 8080. As you have configured Tomcat on your system, you can access web interface from your system. You can access tomcat interfaces by entering your server’s IP address or a domain name pointed to that server, followed by port 8080 in your browser:
Change tecadmin.local with your server ip or domain or localhost.
http://tecadmin.local:8080/
You will see the page below:
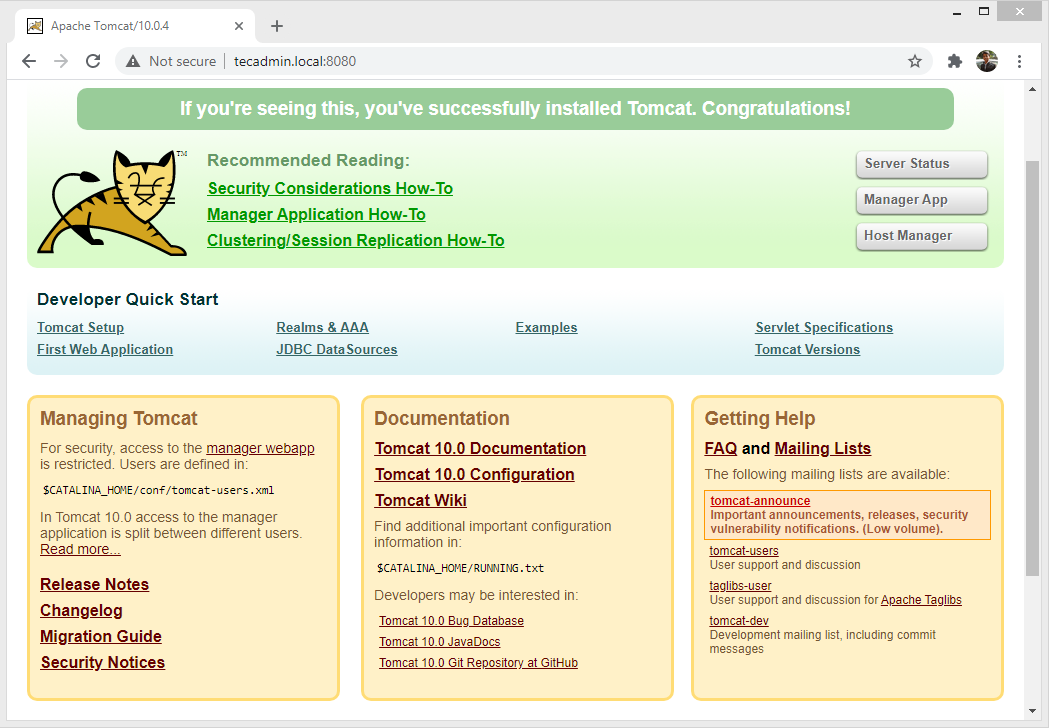
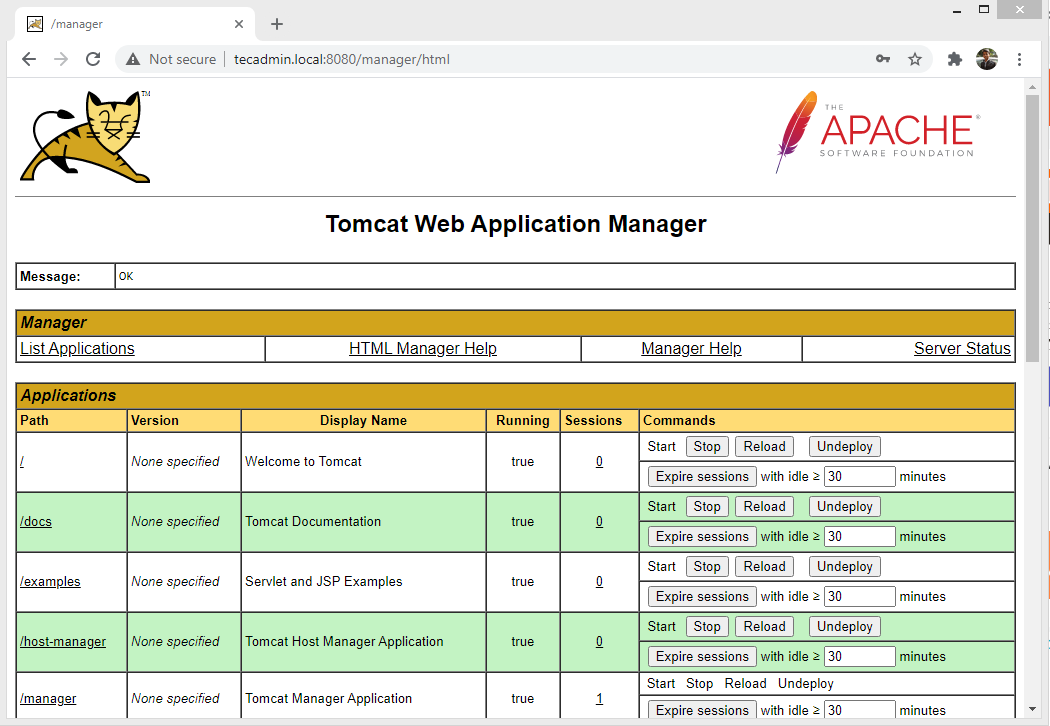
Tomcat Manager App is a web application packaged with the Tomcat server application. The Manager interface provides us with the basic functionality we need to manage our deployed web applications.
Click the Manager App button home page or directly type /manager in the browser URL of the main Tomcat server to access it.
http://tecadmin.local:8080/manager/
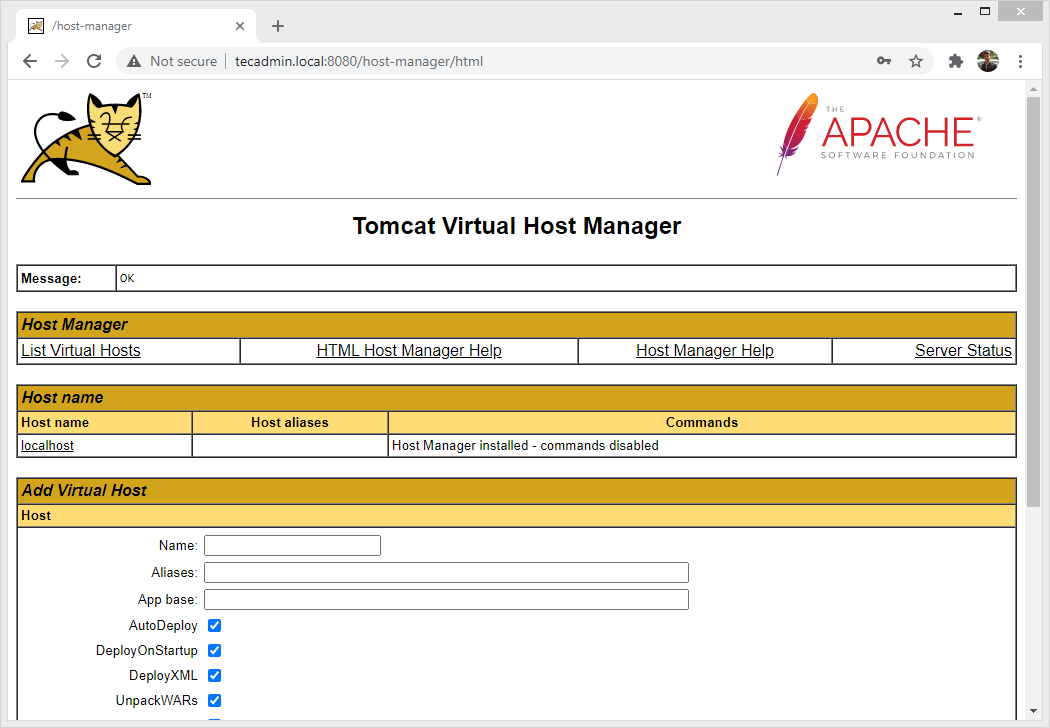
Tomcat Host Manager App is another web application packaged with the Tomcat server application. Which is used to create/remove Virtual Hosts within the Tomcat service. A Virtual Host allows you to define multiple hostnames on a single server.
Click Host Manager button home page or directly type /host-manager URL in the main Tomcat server to access it.
http://tecadmin.local:8080/host-manager/
Conclusion
This step-by-step guide has taken you through the process of installing and configuring Apache Tomcat 10 on Ubuntu 22.04. By following these steps, you’ve set up a robust environment for hosting your Java web applications.
Now that you have Apache Tomcat installed, you’re ready to deploy Java-based web applications to your new server environment. This opens up a world of possibilities for running robust, dynamic web services on your server. Keep in mind that this setup is quite basic and for a production environment, you might need further optimizations and configurations based on your application requirements.
Remember to regularly maintain your server environment, keeping both the system and Tomcat up-to-date, to benefit from the latest features and security patches. Enjoy building and deploying your Java Server Pages (JSP) and servlets with Tomcat!