
Unetbootin is a software program that helps users create Live USB drives. These drives are like regular flash drives, but they’re able to boot your computer into a special operating system instead of the standard one. The process of creating such a drive is called live media creation, and it involves three different types of media: CD/DVD images, ISO files, and USB devices. If you’re trying to create an Ubuntu live drive, this article will help you with that task using the LiveUSB Creator tool. It’s a third-party app that simplifies the process of creating an Ubuntu live drive without needing any command-line knowledge. This guide will show you how to install the LiveUSB Creator on Ubuntu so that you can follow along and get the same result.
A Quick Introduction to Ubuntu Live Drives
Live drives are special types of drives that allow you to boot a computer from a USB device rather than from the hard drive. They’re used in situations where you need a functioning operating system but the computer doesn’t have the OS installed. The most common example of this is when you want to repair a computer that’s been infected with malware or other viruses. You don’t want the infection to spread to your own computer, so you need to use a clean computer to access the infected computer over a network and clean up the drive.
There are two types of live drives: persistent and non-persistent. A persistent live drive keeps the data that’s on the computer even after you turn off the computer. This is helpful for fixing computers because you can leave data on the computer if you want to come back later. A non-persistent live drive deletes all the data on the computer after you turn it off. This is useful for situations where you don’t want to leave anything on the computer you’re accessing.
Installing Unetbootin
The first thing you need to do is install the LiveUSB Creator on Ubuntu. Start by opening a Terminal window and entering the following command: This package isn’t available in the default Ubuntu repositories, so you’ll need to install it from a third-party source. Enter the following command to add the LiveUSB Creator’s repository: You may be asked to enter your computer’s administrative password. After that, you should see a new prompt at the bottom of the Terminal window that says “Added”. Now that you’ve added the LiveUSB Creator’s source, you can install the app with this command:
- Add the PPA to your system:
sudo add-apt-repository ppa:gezakovacs/ppa - Update the Apt cache:
sudo apt update - Install Unetbootin package:
sudo apt install unetbootin
Create A Bootable USB
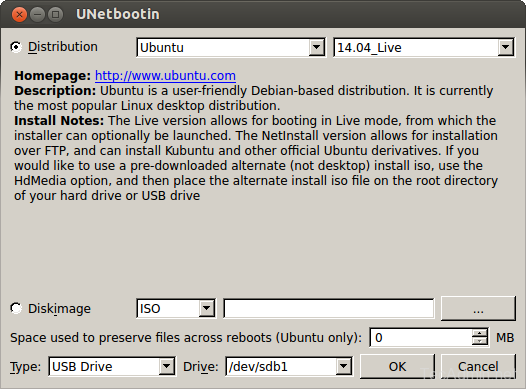
Start the Unetbootin application and attach your USB drive to your system. Now select the distribution name and version from the drop-down for which you need to create a bootable USB. Else you can select ISO from your system.
Final Words
Once you’ve created a live drive, you can use it to boot into a live version of Ubuntu on any computer. This lets you test out Ubuntu to see if you like it without touching your current setup. It’s also helpful if you have a computer that you need to get fixed but is running an operating system on which you don’t have the necessary software. In this case, you can boot into Ubuntu on your live drive and use the computer without installing anything. A LiveUSB drive is a useful tool to have around, and it’s easy to create one with the LiveUSB Creator.
3 Comments
This has nothing to do with creating a bootable usb to install windows 10 over ubuntu.
I NEED TO CHANGE MY OS FROM UBNTU TO WINDOWS 10
Select disk image option instead of distribution..then proceed