Zabbix is a powerful open-source monitoring tool that helps you keep track of your servers, networks, and applications. Once you have configured Zabbix server in your hosting environment, the next step is to add remote hosts for monitoring. The Zabbix Agent collects data from your server and sends it to the Zabbix server for monitoring.
This guide will show you how to install the Zabbix Agent on Ubuntu 24.04. It is designed for beginners, so even if you have little experience with Linux or Zabbix, you can follow along and get your Zabbix Agent up and running.
Step 1: Update Your System
Before installing anything, it’s good practice to update your system. Open your terminal and run the following commands:
sudo apt updatesudo apt upgrade
Step 2: Install Zabbix Repository
Next, you need to add the Zabbix repository to your system. This repository contains the necessary files to install the Zabbix Agent.
wget https://repo.zabbix.com/zabbix/7.0/ubuntu/pool/main/z/zabbix-release/zabbix-release_7.0-2+ubuntu24.04_all.debsudo dpkg -i zabbix-release_7.0-2+ubuntu24.04_all.deb
Step 3: Install Zabbix Agent
Now, install the Zabbix Agent package using the following command:
sudo apt updatesudo apt install zabbix-agent -y
Step 4: Configure Zabbix Agent
After installing the agent, you need to configure it to communicate with your Zabbix server. Open the Zabbix Agent configuration file with a text editor:
sudo nano /etc/zabbix/zabbix_agentd.conf
Find the lines that start with Server=, ServerActive= and Hostname= and change them to match your Zabbix server IP address and your server’s hostname.
Server=YOUR_ZABBIX_SERVER_IP
ServerActive=YOUR_ZABBIX_SERVER_IP
Hostname=YOUR_SERVER_HOSTNAME
Save the file and exit the text editor (Ctrl + X, then Y, then Enter).
Step 5: Start and Enable Zabbix Agent
To start the Zabbix Agent and enable it to run at startup, use these commands:
sudo systemctl start zabbix-agentsudo systemctl enable zabbix-agent
Make sure the Zabbix Agent is running correctly by checking its status:
sudo systemctl status zabbix-agent
You should see a message that says the agent is active (running).
Step 6: Adjust Firewall Rules
Zabbix agent server required to open port 10050 to allow zabbix server to connect. You must need to allow this port for the Zabbix server IP address in the system firewall or other security group.
You can open these ports using the ufw (Uncomplicated Firewall) on Ubuntu. Here are the command:
sudo ufw allow 10050/tcp
Step 7: Add New Host to Zabbix Server
Once the Zabbix agent is installed and configured properly. The next step is to add a new host on Zabbix server.
- Login to the Zabbix dashboard
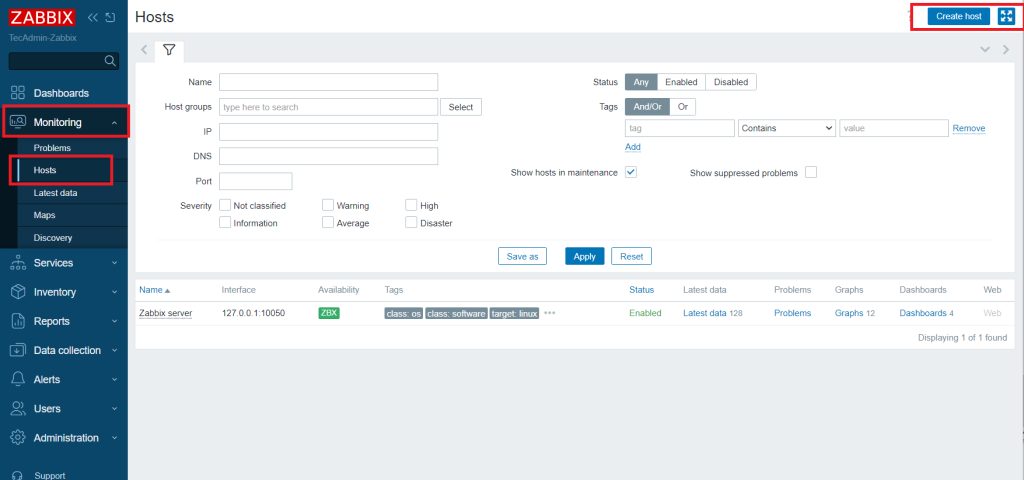
- In the left sidebar select “Monitoring” and then click on “Hosts”. Now click on “Create Host” in top-right corner.

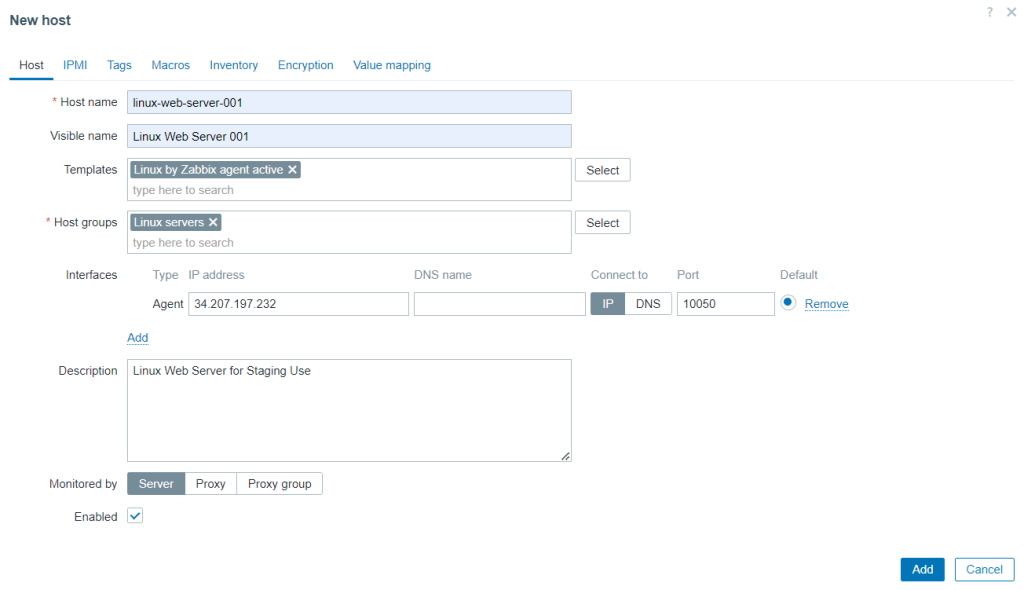
Adding New Host in Zabbix Server - Add host configuration then click “Add” button

Create Zabbix Host Entries - Once added, the Zabbix active client will start connecting to Zabbix server. For any issue check Zabbix server and client logs
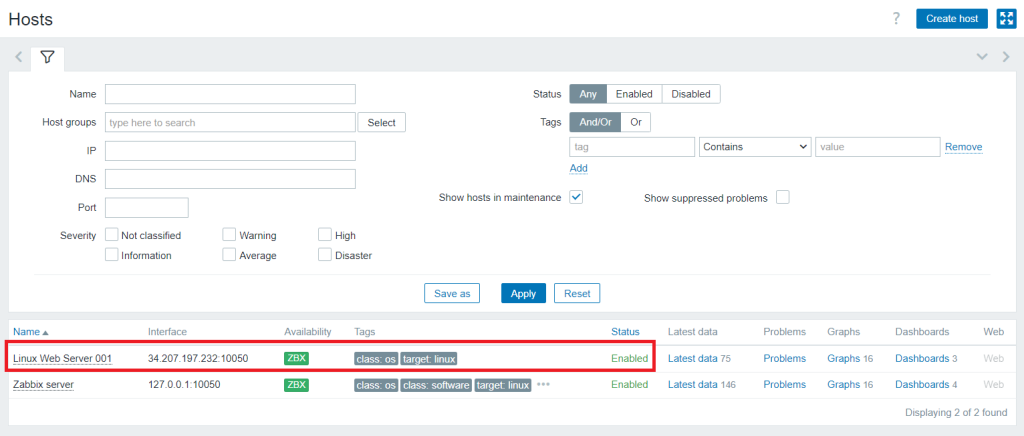
- You can see newly added hosts list

List Zabbix Hosts
Conclusion
Installing the Zabbix Agent on Ubuntu 24.04 is straightforward, even for beginners. By following these simple steps, you can set up the Zabbix Agent to monitor your server’s performance and health. Regular monitoring helps you detect and resolve issues before they become significant problems. Now, you can enjoy the benefits of efficient server monitoring with Zabbix. If you encounter any issues, refer to the Zabbix documentation or seek help from the Zabbix community. Happy monitoring!


2 Comments
You have a mistake in config, right was ServerActive=….
Thanks Igor, for pointing out the Typo. The article has been updated correctly.