
Zabbix is a powerful open-source monitoring tool that helps you keep track of your servers, networks, and applications. Once you have configured Zabbix server in your hosting environment, the next step is to add remote hosts for monitoring. The Zabbix Agent collects data from your server, like CPU load, memory usage, disk space, and running services, and sends it to the Zabbix server for monitoring.
This guide will show you how to install the Zabbix Agent on Ubuntu 26.04 LTS (Resolute Raccoon). We will use the official Zabbix 7.0 LTS repository, which provides the newest agent packages built for Ubuntu 26.04. It is designed for beginners, so even if you have little experience with Linux or Zabbix, you can follow along and get your Zabbix Agent up and running in about ten minutes.
Before you start, make sure you have a running Zabbix server (or Zabbix proxy), a user with sudo privileges on the Ubuntu 26.04 machine, and network connectivity between the two systems.
Step 1: Update Your System
Before installing anything, it’s good practice to update your system. Open your terminal and run the following commands:
sudo apt updatesudo apt upgrade
If the upgrade installs a new kernel, reboot the server before moving ahead. You will also need wget to download the repository package. Install it with sudo apt install wget -y if it is missing.
Step 2: Install Zabbix Repository
Next, you need to add the Zabbix repository to your system. Ubuntu 26.04 ships a Zabbix agent package in its own universe repository, but that version stays frozen for the life of the release. Adding the official repository gives you the latest 7.0 LTS agent builds and regular security updates directly from the Zabbix team.
wget https://repo.zabbix.com/zabbix/7.0/ubuntu/pool/main/z/zabbix-release/zabbix-release_7.0-5+ubuntu26.04_all.debsudo dpkg -i zabbix-release_7.0-5+ubuntu26.04_all.deb
This package simply drops the repository definition and the signing key on your system. It does not install any monitoring service by itself.
Step 3: Install Zabbix Agent
Now, refresh the package list so apt can see the newly added repository, then install the Zabbix Agent package:
sudo apt updatesudo apt install zabbix-agent -y
Prefer the newer Go-based agent? Install zabbix-agent2 instead of zabbix-agent. It supports plugins for MySQL, PostgreSQL, Docker, Redis, and more. Do not install both on the same host, since they compete for the same port. The rest of this guide uses the classic agent.
Check the installed version to confirm everything went well:
zabbix_agentd --version
Step 4: Configure Zabbix Agent
After installing the agent, you need to configure it to communicate with your Zabbix server. Open the Zabbix Agent configuration file with a text editor:
sudo nano /etc/zabbix/zabbix_agentd.conf
Find the lines that start with Server=, ServerActive= and Hostname= and change them to match your Zabbix server IP address and your server’s hostname.
Server=YOUR_ZABBIX_SERVER_IP
ServerActive=YOUR_ZABBIX_SERVER_IP
Hostname=YOUR_SERVER_HOSTNAME
A quick note on these three settings, because mixing them up is the most common mistake:
- Server is a list of addresses allowed to poll this agent (passive checks).
- ServerActive is the address the agent connects to for active checks.
- Hostname must match exactly the host name you create in the Zabbix frontend, or active checks will be rejected.
Save the file and exit the text editor (Ctrl + X, then Y, then Enter).
Step 5: Start and Enable Zabbix Agent
To start the Zabbix Agent and enable it to run at startup, use these commands:
sudo systemctl start zabbix-agentsudo systemctl enable zabbix-agent
Make sure the Zabbix Agent is running correctly by checking its status:
sudo systemctl status zabbix-agent
You should see a message that says the agent is active (running). If the service fails to start, check the agent log at /var/log/zabbix/zabbix_agentd.log. It usually points to a typo in the configuration file.
Step 6: Adjust Firewall Rules
Zabbix agent server required to open port 10050 to allow zabbix server to connect. You must need to allow this port for the Zabbix server IP address in the system firewall or other security group.
You can open these ports using the ufw (Uncomplicated Firewall) on Ubuntu. Here are the command:
sudo ufw allow 10050/tcp
Opening the port to the whole internet is rarely a good idea. On a public server, restrict it to your Zabbix server IP address instead:
sudo ufw allow from YOUR_ZABBIX_SERVER_IP to any port 10050 proto tcp
If your host runs in a cloud environment such as AWS, Azure, DigitalOcean, or Google Cloud, add the same rule to the security group or cloud firewall as well.
Step 7: Add New Host to Zabbix Server
Once the Zabbix agent is installed and configured properly. The next step is to add a new host on Zabbix server.
- Login to the Zabbix dashboard
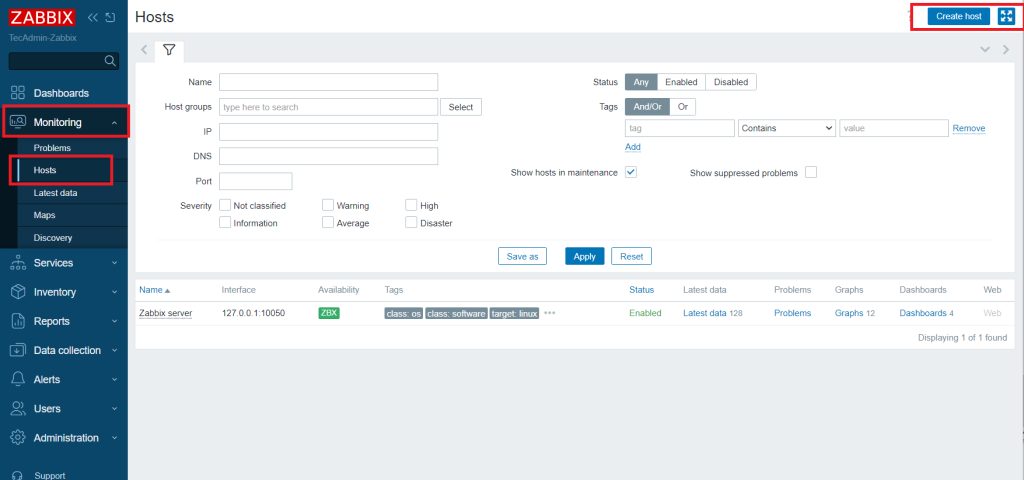
- In the left sidebar select “Monitoring” and then click on “Hosts”. Now click on “Create Host” in top-right corner.
Adding New Host in Zabbix Server - Add host configuration then click “Add” button. Use the same value in “Host name” that you set as Hostname in the agent configuration, attach the “Linux by Zabbix agent” template, pick a host group, and add an agent interface with the IP address and port 10050 of your Ubuntu 26.04 machine.
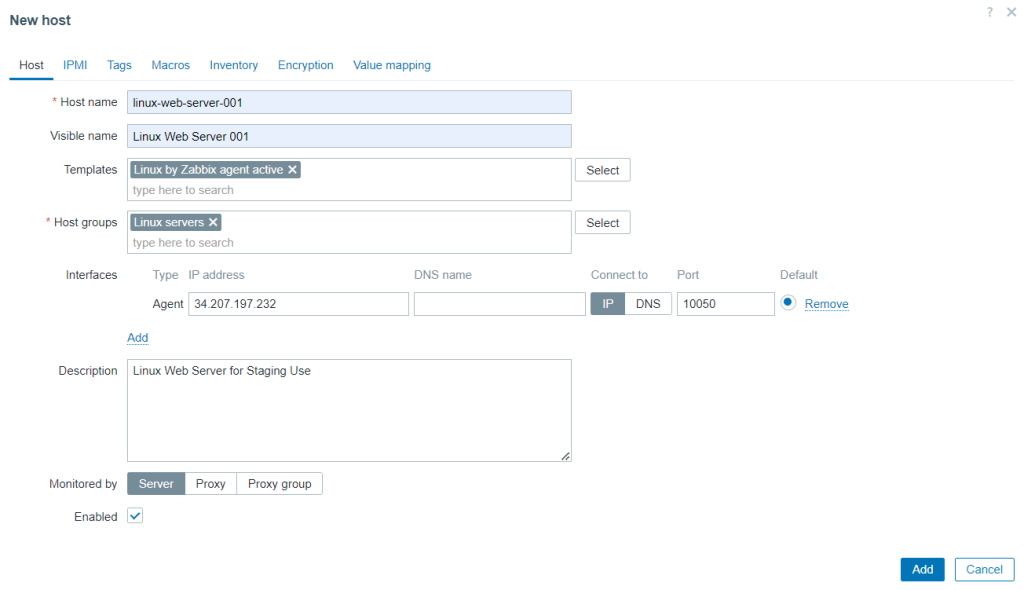
Create Zabbix Host Entries - Once added, the Zabbix active client will start connecting to Zabbix server. For any issue check Zabbix server and client logs
- You can see newly added hosts list. Within a minute or two the “Availability” tag turns green, which confirms the Zabbix server can reach the agent.
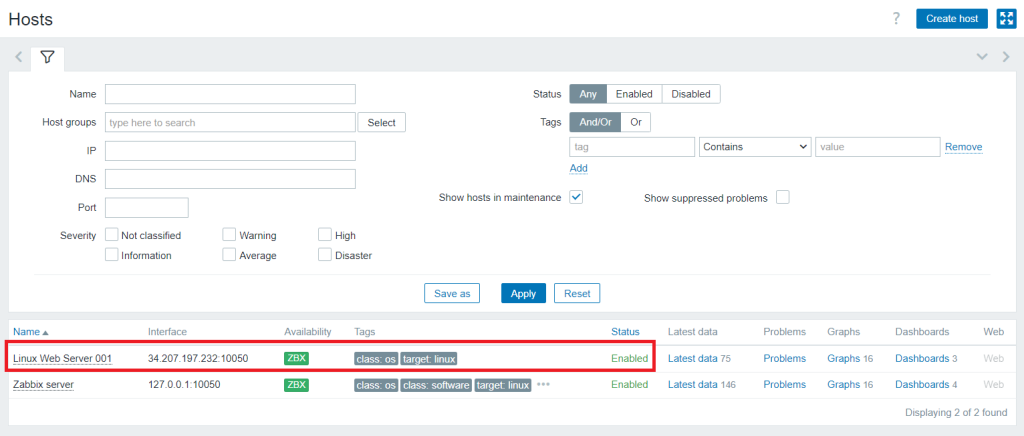
List Zabbix Hosts
You can also test connectivity from the Zabbix server side before troubleshooting anything else:
zabbix_get -s YOUR_AGENT_IP -k agent.ping
A reply of 1 means the agent is reachable and answering requests.
Conclusion
Installing the Zabbix Agent on Ubuntu 26.04 LTS is straightforward, even for beginners. By following these simple steps, you can set up the Zabbix Agent to monitor your server’s performance and health. Regular monitoring helps you detect and resolve issues before they become significant problems. Now, you can enjoy the benefits of efficient server monitoring with Zabbix. If you encounter any issues, refer to the Zabbix documentation or seek help from the Zabbix community. Happy monitoring!
Frequently Asked Questions (FAQs)
Which Zabbix agent version should I install on Ubuntu 26.04?
For a long-term support release like Ubuntu 26.04, the Zabbix 7.0 LTS agent is the safest choice. It receives full support and security fixes for several years, and Zabbix publishes packages built specifically for Ubuntu 26.04. If you run a newer Zabbix server, you can use the matching 7.4 repository instead. An older agent always works with a newer Zabbix server, so there is no rush to upgrade the agent first.
What is the difference between zabbix-agent and zabbix-agent2?
The classic zabbix-agent is written in C and is small, stable, and well tested. zabbix-agent2 is written in Go and adds plugin support for services like MySQL, PostgreSQL, Docker, Redis, and Nginx, plus persistent connections for active checks. Both report to the same Zabbix server. Pick agent2 if you plan to monitor those services from the same host, and pick the classic agent if you just want basic OS metrics with the smallest footprint.
Can I install the Zabbix agent without adding the official repository?
Yes. Ubuntu 26.04 includes a Zabbix agent package in its universe repository, so sudo apt install zabbix-agent works out of the box. The catch is that this version is frozen at whatever shipped with the release and only gets backported fixes. The official repository keeps you on the latest 7.0 LTS point release, which is why this guide uses it.
Which ports does the Zabbix agent use?
The agent listens on TCP port 10050 for passive checks initiated by the Zabbix server. For active checks, the agent connects outbound to the Zabbix server on TCP port 10051. If you only use active checks, you do not need to open 10050 for inbound traffic at all, which is a nice hardening option for public-facing servers.
Why does my host show “unavailable” in the Zabbix frontend?
Nine times out of ten it is one of three things: a firewall blocking port 10050, the Server= line missing the Zabbix server IP address, or a mismatch between the Hostname= value in /etc/zabbix/zabbix_agentd.conf and the host name configured in the frontend. Test the connection with zabbix_get -s AGENT_IP -k agent.ping from the Zabbix server and check /var/log/zabbix/zabbix_agentd.log on the agent side.
How do I monitor a host behind NAT or a strict firewall?
Use active checks only. Set ServerActive= to your Zabbix server address, leave Server= empty or restricted, and configure the items in the frontend as “Zabbix agent (active)”. The agent then initiates every connection outbound, so no inbound port needs to be exposed. Remember that the Hostname= value must match the frontend host name exactly for active checks to be accepted.
How do I update or remove the Zabbix agent later?
Because the agent comes from an apt repository, updates arrive with a normal sudo apt update && sudo apt upgrade. To remove it completely, run sudo apt remove –purge zabbix-agent and, if you no longer need the repository, remove the zabbix-release package as well.
Can I encrypt the traffic between the agent and the Zabbix server?
Yes. Zabbix supports TLS with either a pre-shared key or certificates. The quickest option is PSK: set TLSConnect=psk, TLSAccept=psk, TLSPSKIdentity=, and TLSPSKFile= in the agent configuration, then enter the same identity and key on the host’s “Encryption” tab in the frontend. This is strongly recommended whenever agent traffic crosses the public internet.