
Zabbix is a free and open-source monitoring solution designed for real-time monitoring of servers, virtual machines, networks, and cloud services. It was developed by Alexei Vladishev and actively supported by Zabbix SIA. It is based on the client-server model and capable of monitoring millions of metrics, such as CPU load, network utilization, and disk space consumption from tens of thousands of servers.
In this tutorial, we will explain how to install the Zabbix server on Ubuntu 20.04 LTS system.
Pre-Requsities
We assume you have a running Ubuntu 20.04 system with sudo privileged account access. Follow the below steps to install the Zabbix server on your Ubuntu system.
Step 1 – Setup LAMP
Zabbix required PHP programming language to run, MySQL as a database server, and a Web server like Apache or Nginx. We use an Apache web server for this tutorial. Let’s have the installation of all the required packages on your system by running the following commands.
sudo apt updatesudo apt install apache2 libapache2-mod-phpsudo apt install mysql-serversudo apt install php php-mbstring php-gd php-xml php-bcmath php-ldap php-mysql
Next, you need to set a strong password for the MySQL root user. Execute the below command and follow the instructions. After completing the below command, you will have a password for the root account of MySQL database server.
sudo mysql_secure_installation
You update the PHP configuration variables. Edit the PHP configuration file /etc/php/7.4/apache2/php.ini for Apache and update the timezone as per your requirements.
vim /etc/php/7.4/apache2/php.ini
memory_limit 256M
upload_max_filesize 16M
post_max_size 16M
max_execution_time 300
max_input_time 300
max_input_vars 10000
date.timezone = 'Asia/Kolkata'
Step 2 – Configure Zabbix Repository
Zabbix’s official team provides Apt package repositories for the Debian-based system. Use the following commands to add the repository to your Ubuntu system.
wget https://repo.zabbix.com/zabbix/5.0/ubuntu/pool/main/z/zabbix-release/zabbix-release_5.0-1+focal_all.debsudo dpkg -i zabbix-release_5.0-1+focal_all.deb
Step 3 – Installing Zabbix Server
Once you added the Apt repository, use the following commands to install Zabbix server packages. Here zabbix-server-mysql package includes the Zabbix server with MySQL support. The zabbix-frontend-php package provides the web interface for the Zabbix server.
sudo apt updatesudo apt install zabbix-server-mysql zabbix-frontend-php zabbix-agent zabbix-apache-conf
Step 4 – Create Zabbix Database and User
Next, create a database schema for the Zabbix server. Login to the MySQL server with the root account and create MySQL database and user with the following commands.
mysql -u root -pCREATE DATABASE zabbixdb character set utf8 collate utf8_bin;CREATE USER 'zabbix'@'localhost' IDENTIFIED BY 'password';GRANT ALL PRIVILEGES ON zabbixdb.* TO 'zabbix'@'localhost' WITH GRANT OPTION;FLUSH PRIVILEGES;
After creating the database, load the default schema of Zabbix of the database.
cd /usr/share/doc/zabbix-server-mysqlzcat create.sql.gz | mysql -u zabbix -p zabbixdb
Step 5 – Update Zabbix Configuration
Edit Zabbix server configuration file /etc/zabbix/zabbix_server.conf in your favorite text editor and update the following database configurations. This will be used by the Zabbix server to connect to the database.
sudo vi /etc/zabbix/zabbix_server.conf
  DBHost=localhost
  DBName=zabbixdb
  DBUser=zabbix
  DBPassword=password
Now, enable the Zabbix service to start on system boot and restart the service to reload new settings.
sudo systemctl enable zabbix-serversudo systemctl restart zabbix-server
The Zabbix package also creates its own Apache configuration file ie /etc/zabbix/apache.conf and makes a link to the Apache configuration directory. Let’s use the following command to restart the Apache service.
sudo systemctl restart apache2
Now your system is ready for the Zabbix installation. Just go to the Zabbix web installer and finish the installation.
Step 6 – Adjust Firewall for Zabbix
Next, you will need to allow the Zabbix ports 10050 and 10051. and HTTP service through firewalld. You can allow them with the following command:
sudo firewall-cmd --permanent --add-service=httpsudo firewall-cmd --permanent --add-port=10050/tcpsudo firewall-cmd --permanent --add-port=10051/tcp
Now, reload the firewalld service to implement the changes:
sudo firewall-cmd --reload
Step 7 – Running Zabbix Web Installer
Zabbix web installer can be accessed on /zabbix subdirectory URL on your server’s IP or domain. For example, host.tecadmin.net is pointed to my Zabbix server. Now access Zabbix using the following URL. You must change FQDN as per your setup.
https://server.tecadmin.net/zabbix/
And follow the steps as per the given screenshots below.
Now, open your favorite web browser and type the URL http://your-server-ip/zabbix. You will be redirected to the Zabbix web installation wizard on the following screen:
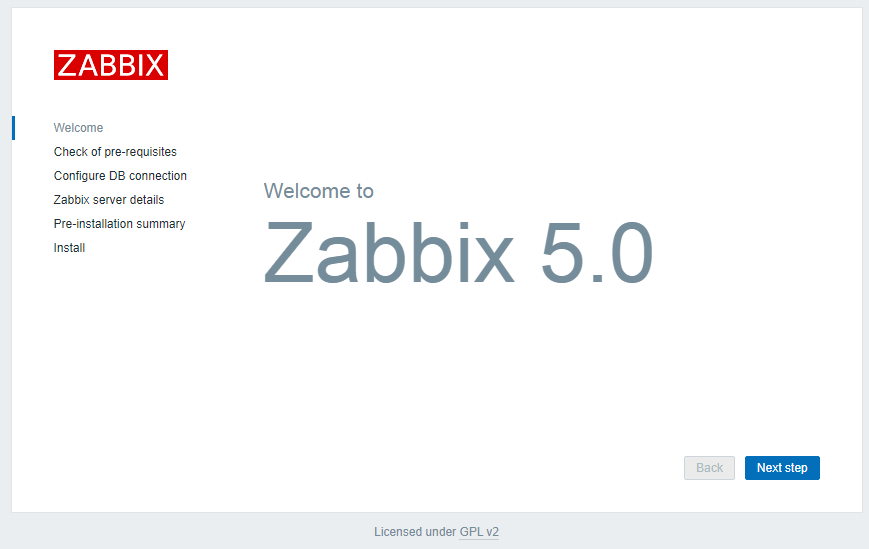
Click on the Next step button. You should see the following page:

Make sure all the requirements are fulfulls by the server. Then click on the Next step button. You should see the following page:

Provide your database credentials created in above steps and click on the Next step button. You should see the following page:

Provide your Zabbix server details and click on the Next step button. You should see the following page:
Make sure all the configuration parameters are correct then click on the Next step button. Once the installation has been completed successfully, you should see the following page:
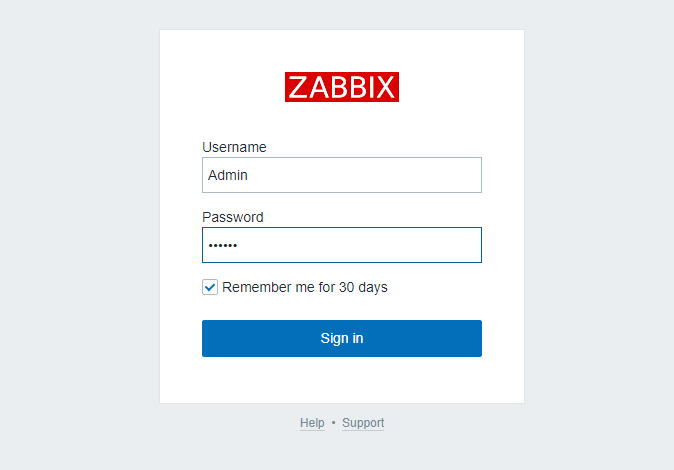
Click on the Finish button. You will be redirected to the Zabbix login page as shown below:
Use the below credentials to log in:
Username: Admin
Password: zabbix
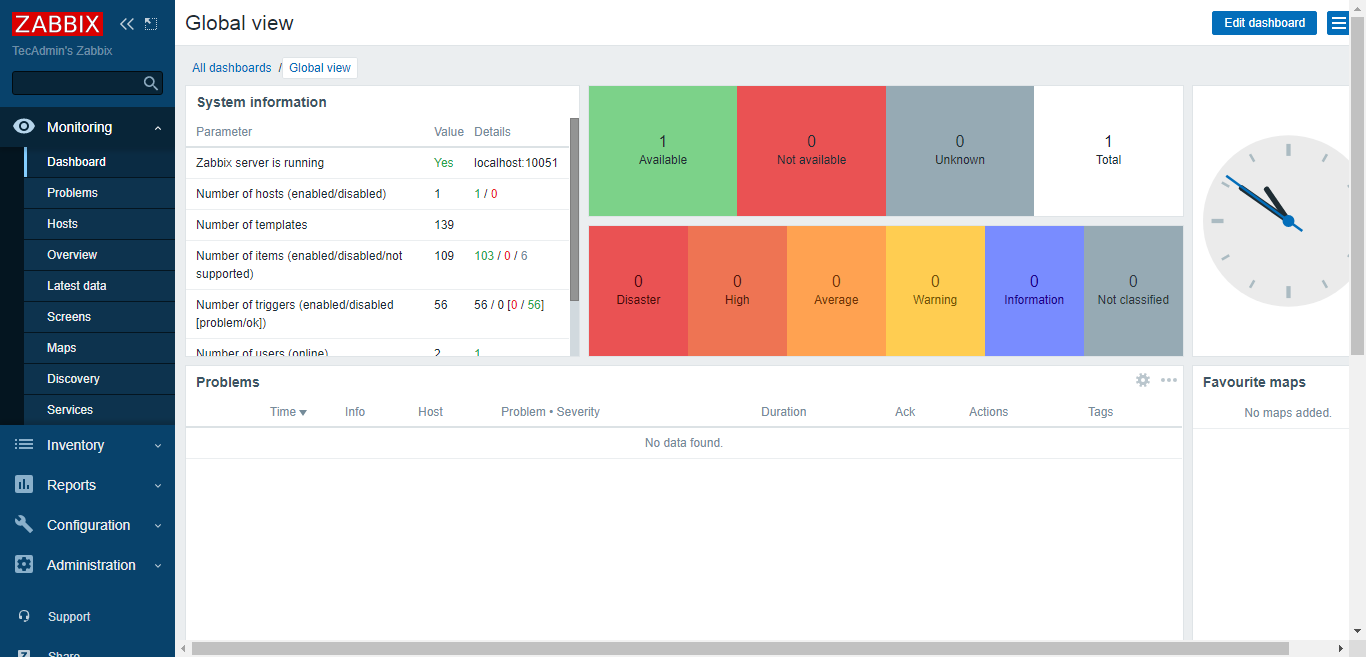
After successful login, you will see the Zabbix dashboard as below screenshot.
Conclusion
Congratulations! you have successfully installed the Zabbix server on Ubuntu 20.04 LTS system. You can now start exploring the Zabbix dashboard for more details and add the client for monitoring.
6 Comments
hi,
while we on mysql it denied access for local host what can we do now
I tried this step and encountered error when accesing my msql database. Error 1-64 (4200).
I went through the instructions & ran in to issue with Step 6 – Adjust Firewall for Zabbix . When running the commands listed i get the error: sudo: firewall-cmd: command not found
It means, the firewalld is not installed on your system. You can just skip this step.
thanks
Thanks. This instruction is very good.