Internet Information Services (IIS) is a powerful web server that allows you to host and manage websites, web applications, and web services on Windows operating systems. One of the key components of IIS is the Application Pool, which serves as a container for one or more web applications. It provides isolation, better security, and improved performance for applications. Recycling an application pool is an essential maintenance task that can help maintain the stability and health of your IIS web applications. This article will guide you through the process of recycling an IIS Application Pool on Windows.
What is Application Pool Recycling?
Application pool recycling is the process of restarting an IIS application pool, which effectively restarts the worker process (w3wp.exe) associated with the pool. Recycling can help mitigate potential issues such as memory leaks, excessive CPU usage, or unresponsive applications. It can also free up resources, clear caches, and refresh application configurations. This ensures that your web applications continue to run smoothly and efficiently.
How to Recycle IIS Application Pool on Windows:
There are several ways to recycle an IIS Application Pool on Windows. We will cover three common methods: using IIS Manager, using the command prompt, and using PowerShell.
Method 1. Using IIS Manager
Follow the below steps to recycle the application pool in the IIS server:
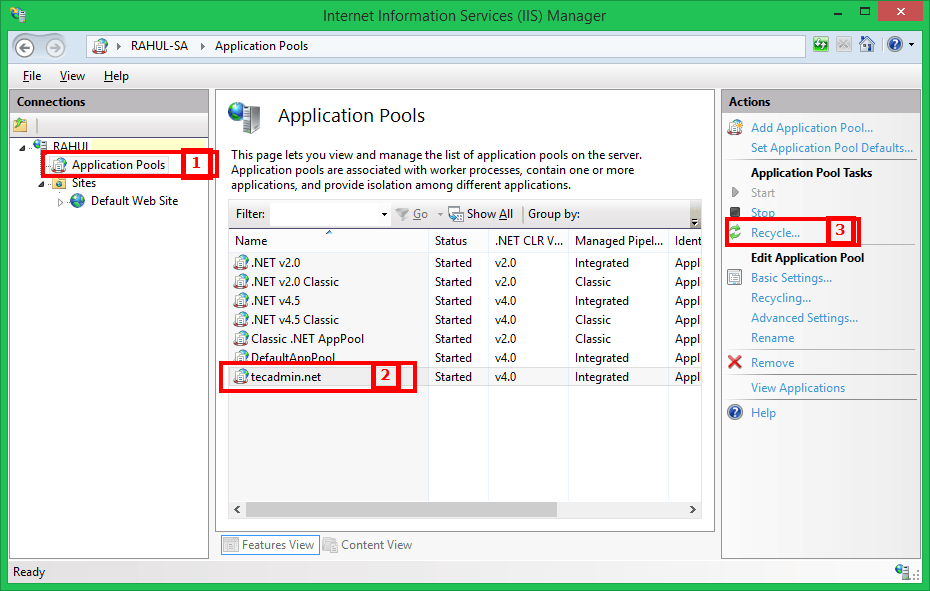
- Open IIS Manager by pressing the Windows key, typing ‘IIS Manager‘ in the search bar, and selecting the application from the search results.
- In the left pane, expand the server node, and then click on ‘Application Pools’.
- Locate the application pool you want to recycle in the list of pools.
- Right-click on the desired application pool and select ‘Recycle’ from the context menu.
- A notification will appear, confirming that the application pool has been successfully recycled.

Method 2. Using the Command Prompt
To recycle an application pool using the command prompt, follow these steps:
- Press the Windows key, type ‘cmd’ in the search bar, and select ‘Command Prompt’ from the search results.
- Enter the following command, replacing ‘YourAppPoolName’ with the name of the application pool you want to recycle:appcmd recycle apppool /apppool.name:"YourAppPoolName"
- Press Enter, and the command prompt will confirm that the application pool has been successfully recycled.
Method 3. Using PowerShell
Recycling an application pool using PowerShell involves these steps:
- Press the Windows key, type ‘PowerShell’ in the search bar, and select ‘Windows PowerShell’ from the search results.
- Enter the following command, replacing ‘YourAppPoolName’ with the name of the application pool you want to recycle:Restart-WebAppPool -Name "YourAppPoolName"
- You can also recycle the application pool by using the website name. Replace the ‘YourWebsiteName’ in the following PowerShell command:
Restart-WebAppPool (Get-Website -Name 'YourWebsiteName').applicationPool- Press Enter, and PowerShell will confirm that the application pool has been successfully recycled.
How to Schedule the Application Pool Recycling
You can also schedule the auto recycling of the application pool at regular intervals. Follow the below steps:
- Login to the Windows system and launch IIS application.
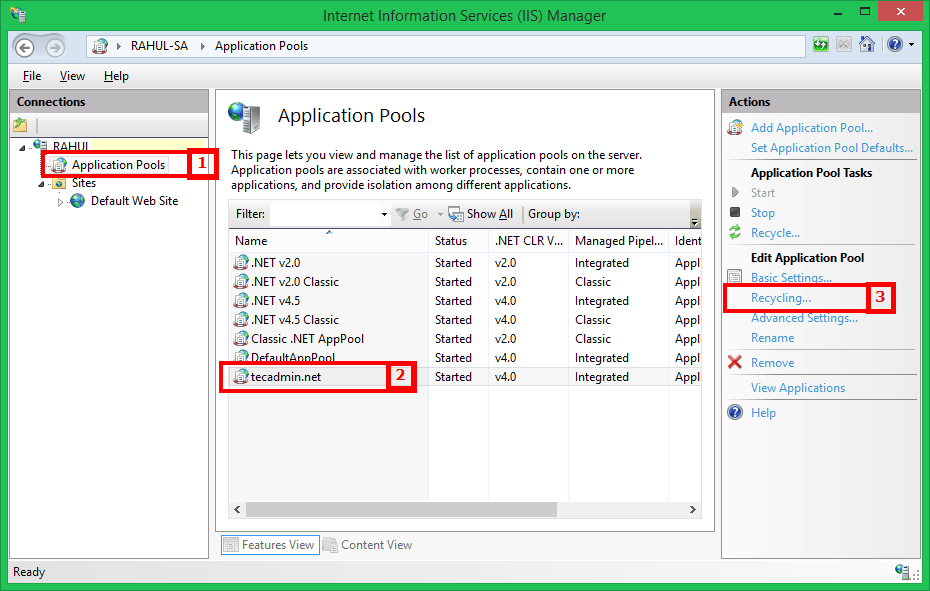
- In the ‘Connections’ pane (left sidebar), select ‘Application Pools’ under the systems hostname.
- Select the application from the list.
- In ‘Actions’ pane (right sidebar), click ‘Recycling…’ link button.
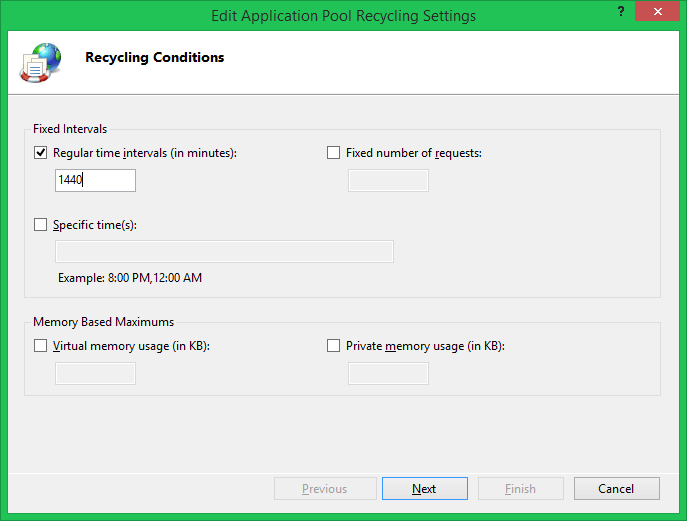
- Set the recycling condition and frequency.
- Click ‘Next’ and on next window Click ‘Finish’.

Schedule Auto Recycle Application Pool in IIS 
Configure auto recycle of application pools condition and interval Conclusion
Recycling IIS Application Pools on Windows is a crucial maintenance task that helps ensure the optimal performance and stability of your web applications. This article has provided you with three different methods to recycle application pools: using IIS Manager, command prompt, and PowerShell. Choose the method that best suits your needs and preferences, and keep your IIS web applications running smoothly.
- You can also recycle the application pool by using the website name. Replace the ‘YourWebsiteName’ in the following PowerShell command:
Add A Comment
