PM2 is a process manager for Node.js applications. It is helpful for running Node.js application on production environment. PM2 keep an eye on your application and restart it automatically in case of application crashes. PM2 also have an build in load balancer for make easier to scale applications.
In this tutorial you will learn to install Angaular CLI on your Linux system. Then create a sample Angular application. Also run your Angular application with PM2 on a Linux system.
Prerequisites
To use this tutorial, you must have shell to your server with sudo privileged account. Login to your server and open shell to continue work.
Step 1 – Install Node.js
The systems doesn’t have Node.js installed, can use below commands to install Node.js on their system suing NVM (Node version manager).
Run below command to install NVM on your system:
curl https://raw.githubusercontent.com/creationix/nvm/master/install.sh | bash
Then install any Nodejs version recommended for your application. Below command will install Node.js 12 on your system. You can change any version number instead of 12.
nvm install 12
Once the installation completed successfully. View the installed version of Node.js and npm by running the following commands.
node -vv12.18.2
npm -v6.14.5
Step 2 – Install Angular CLI with PM2
Angular CLI is the command line utility to create, build and run Angular applications. It is available as Node module to install on any system have npm installed.
Run the below command to install latest Angular cli application on your system:
npm install -g @angular/cli
Also, install pm2 application by running the following command:
npm install -g pm2
At this stage your system is create to create and run angular application.
Step 3 – Create Angular Application
Skip this step, if you already have your Angular application. Otherwise, let’s have create a sample Angular application on your system with few simple commands.
Create and switch to directory to keep your Angular application.
sudo mkdir -p /var/www/apps && cd /var/www/apps
Then create a new application using ng new command followed by application name. Change my-angular-app with a suitable name for your application.
ng new my-angular-app
Following onscreen instruction to enable routing and select one of the stylesheet format. The below screenshot showing that I have enabled the Angular routing and select CSS for stylesheet.
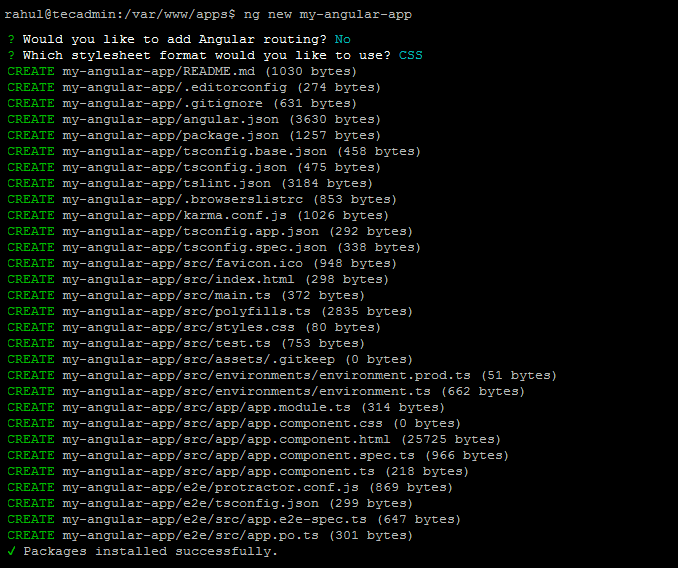
Wait for the installation to complete. After that this will create a directory with the same name of your application in current directory with all files of your Angular application.
Switch to your application and start Angular application in development mode. By default ng serve start application on localhost only. I have used –host 0.0.0.0 to make application available for remote users.
cd my-angular-appng serve --host 0.0.0.0
Once service started, Access your application in a web browser. The default Angular listen on port 4200. In case any other application uses the same port, specify another port using –port with a port number.

Step 4 – Run Angular with PM2
In this step we will describe you to how to run Angular app with pm2 command. You can set run time behaviors of pm2 by providing the inputs on command line. Here we are discussing with quickly used options with pm2. Read one by one and use as per your requirements.
1. This will simply start Angular server to serve your application on 127.0.0.1 (localhost) and port 4200. After starting service you can access your application on from local machine only.
pm2 start "ng serve"
2. Here we are instructing ng to start application application on all system interfaces. So any user can access it from system systems. But this will still use default port 4200.
pm2 start "ng serve --host 0.0.0.0"
3. Next, you can customize your ng server command to run on specific port. For example, below command will start Angular application on port 8082.
pm2 start "ng serve --host 0.0.0.0 --port 8082"
4. Change the name of your application on pm2. Use –name parameter with pm2 command followed by your application name.
pm2 start "ng serve --host 0.0.0.0 --port 8082" --name "My Angular App"
5. Enabling watch is another great feature of pm2. While enabling pm2 keep watch about changes on specified directory. It will also restart the application after getting any changes in files. This reduces your pain of restarting application after making changes everytime.
pm2 start "ng serve --host 0.0.0.0 --port 8082" --name "My Angular App" --watch /var/www/apps/my-angular-app
Once you started your Angular application using pm2. Run the following command to view the status of your application.
pm2 status

For any issues, you can run pm2 logs command followed by the application id showing in above command. This will display application and error log on screen.
pm2 logs 0
Conclusion
In this tutorial you have learned to deploy Angular application using pm2 on any Linux system.
3 Comments
I realize this is old, but it may help someone in the future:
use a ecosystem.config.js (check pm2 documentation):
for my angular app this works:
module.exports = {
apps : [{
name: ‘project-controls-webapp’,
script: ‘node_modules/@angular/cli/bin/ng’,
args: “serve –prod”,
watch: ‘.’
}],
deploy : {
production : {
user : ‘node’,
host : ‘localhost’,
ref : ‘origin/master’,
repo : ‘GIT_REPOSITORY’,
path : ‘/dist’,
‘pre-deploy-local’: ”,
‘post-deploy’ : ‘npm install && pm2 reload ecosystem.config.js –env production’,
‘pre-setup’: ”
}
}
};
This runs the development server and is not ideal for production. Page is not optimised so not the best performance, consumes a lot of memory, and large bundle size so bad page loads.
You may want to add –prod tag for production mode. `pm2 start “ng serve –prod –host 0.0.0.0 –port 8082” –name “My Angular App”`. However, this also has some security issues.
However, an even better way would be to build the angular app using `ng build –prod` and then serve the static assets in dist/my-angular-app using pm2 by using `pm2 serve –spa dist/my-angular-app –name “My Angular App” –port=8082`. Best performance, memory (server’s) consumption, bundle size, most secure, etc.
Hope this helps.
Hi,
I have followed your all steps. I’m using windows 7.
when i hit pm2 start “ng serve” it gives me error like : [PM2][ERROR] Script not found.
Could you please help me to sort out this issue. I’m using Angular 9
Thank you.