
PHP eAccelerator is used for improving performance of php scripts by optimize and cache them in compiled states. eAccelerator stores compiled PHP scripts in shared memory and executes code directly from it. eAccelerator typically reduces server load and increases the speed of your PHP code by 1-10 times. There are also other options available to optimize php scripts such as APC, Memcached, XCache etc. Read More
Installing PHP eAccelerator
PHP eAccelerator can be simply installed using yum package manager on CentOS and RHEL systems. Also we can use source code to install it. This article will help you install and configure php eAccelerator using both methods.
Method 1. Using yum Package Manager
To install php eAccelerator using yum simply type below command.
# yum install php-eaccelerator
While installing PHP eAccelerator using yum, it creates it own php configuration file /etc/php.d/eaccelerator.ini. For initial setup there are no need to make any changes we can simply start using php-eaccelerator.
We also need to restart web server to make it working.
# service httpd restart
Method 2. Using Source Code
Most of users avoid to use source install and prefer to use package manager. If PHP eAccelerator is not available in binary package for you distribution, you can use below steps to install it.
Download and Extract Source Archive
Download latest PHP eAccelerator source code from here or type following commands to download it.
# cd /opt
# wget https://codeload.github.com/eaccelerator/eaccelerator/zip/0.9.6 -O eaccelerator-0.9.6.zip
# unzip eaccelerator-0.9.6.zip
Install PHP eAccelerator
After extracting php eAccelerator type following commands to compile source and install it.
# cd eaccelerator-0.9.6
# phpize
# ./configure
# make
# make install
Update PHP Configuration
Add following values to eaccelerator php configuration file /etc/php.d/eaccelerator.ini. Create a new file it not exists.
# vim /etc/php.d/eaccelerator.ini

[eaccelerator]

extension="eaccelerator.so"
eaccelerator.shm_size = "0"
eaccelerator.cache_dir = "/var/cache/php-eaccelerator"
eaccelerator.enable = "1"
eaccelerator.optimizer = "1"
eaccelerator.debug = 0
eaccelerator.log_file = "/var/log/httpd/eaccelerator_log"
eaccelerator.name_space = ""
eaccelerator.check_mtime = "1"
eaccelerator.filter = ""
eaccelerator.shm_ttl = "0"
eaccelerator.shm_prune_period = "0"
eaccelerator.shm_only = "0"
eaccelerator.allowed_admin_path = "/var/www/html"
Read more about INI settings
Creating Cache Directory
We need to create cache directory and set up required permissions.
# mkdir -p /var/cache/php-eaccelerator
# chmod 777 /var/cache/php-eaccelerator
Restart Web Server
To enable new php configuration we need to restart web server.
# service httpd restart
Testing PHP eAccelerator Set Up
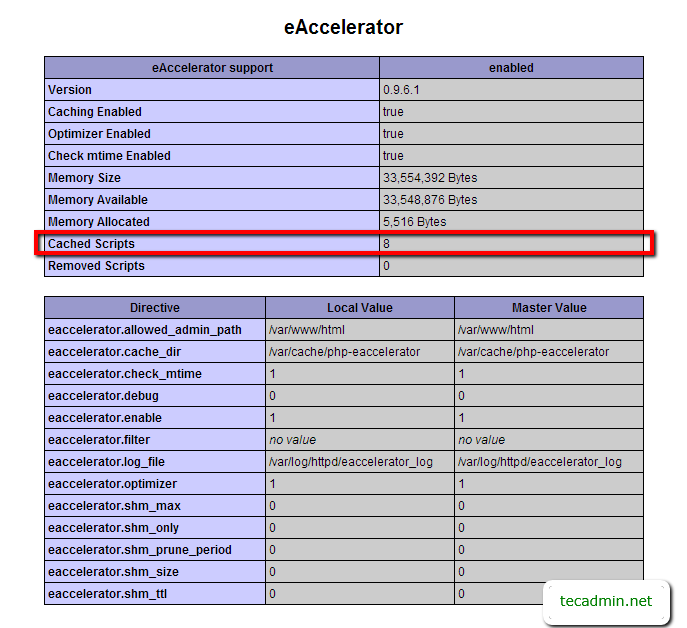
Create php script phpinfo.php using below code on web accessible directory and open it in browser. The main think is to check that it caching php sript. Open some of php urls in browser and watch php info output. If Cached Scripts value is increasing that means its working properly. Check below screenshot with red highlighted value.
1 2 3 | <?php phpinfo(); ?> |
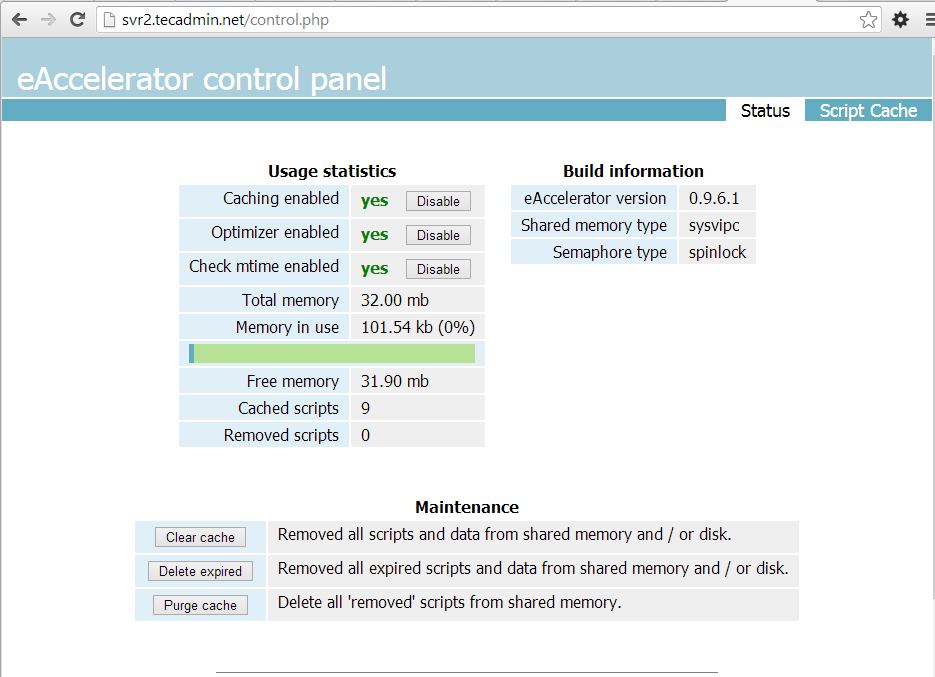
Set Up eAccelerator Control Panel
eAccelerator also provides a control script to check you eAccelerator configuration and status. Search for control.php script in source and copy it to web accessible url and open in browser like below.
http://svr2.tecadmin.net/control.php

Default Login Detail:  admin / eAccelerator
4 Comments
Very good information,thanks
Fantastic eAccelerator installation guide.
Very good info. . Working perfectly for me….
thanks…
Nice article…. I have installed it using yum but in control panel Cached script is not increasing….. pls suggest…..