This article will help you to setup HAProxy load balancing environment on Ubuntu, Debian and LinuxMint. This will configure a Layer 4 Load Balancing (Transport Layer). Which will balance load and transfer requests to different-2 servers based on IP address and port numbers.
Network Details –
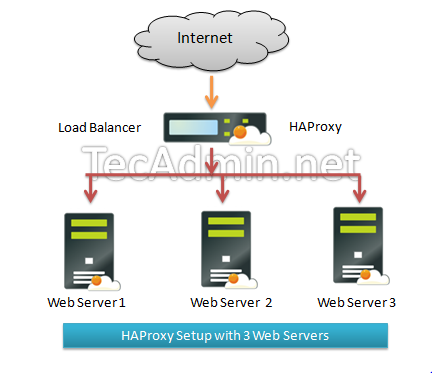
Below is our network server. There are 3 web servers running with Apache2 and listening on port 80 and one HAProxy server.
Web Server Details: Server 1: web1.example.com 192.168.1.101 Server 2: web2.example.com 192.168.1.102 Server 3: web3.example.com 192.168.1.103HAProxy Server: HAProxy: haproxy 192.168.1.12
Step 1 – Install HAProxy
Now start the setup. SSH to your HAProxy server as a privileged user and install HAProxy using following commands.
sudo add-apt-repository ppa:vbernat/haproxy-1.8
sudo apt-get update
sudo apt-get install haproxy
Step 2 – Configure HAProxy Load Balancing
Now edit haproxy default configuration file /etc/haproxy/haproxy.cfg and start configuration.
sudo vi /etc/haproxy/haproxy.cfg
Default Settings:
You will find some default configuration like below. If you don’t have enough idea about this, you can keep as it is.
global log /dev/log local0 log /dev/log local1 notice chroot /var/lib/haproxy stats socket /run/haproxy/admin.sock mode 660 level admin stats timeout 30s user haproxy group haproxy daemon # Default SSL material locations ca-base /etc/ssl/certs crt-base /etc/ssl/private # Default ciphers to use on SSL-enabled listening sockets. # For more information, see ciphers(1SSL). This list is from: # https://hynek.me/articles/hardening-your-web-servers-ssl-ciphers/ ssl-default-bind-ciphers ECDH+AESGCM:DH+AESGCM:ECDH+AES256::RSA+AES:RSA+3DES:!aNULL:!MD5:!DSS ssl-default-bind-options no-sslv3defaults log global mode http option httplog option dontlognull timeout connect 5000 timeout client 50000 timeout server 50000 errorfile 400 /etc/haproxy/errors/400.http errorfile 403 /etc/haproxy/errors/403.http errorfile 408 /etc/haproxy/errors/408.http errorfile 500 /etc/haproxy/errors/500.http errorfile 502 /etc/haproxy/errors/502.http errorfile 503 /etc/haproxy/errors/503.http errorfile 504 /etc/haproxy/errors/504.http
Adding HAProxy Listener:
Now tell HAProxy to where to listen for new connections. As per below configuration HAProxy will list on port 80 of 192.168.1.12 ip address.
frontend Local_Server
    bind 192.168.1.12:80
    mode http
    default_backend My_Web_Servers
Add Backend Web Servers:
As per above configuration haproxy is now listening on port 80. Now define the backend web servers where HAProxy send the request.
backend nodes
    mode http
    balance roundrobin
    option forwardfor
    http-request set-header X-Forwarded-Port %[dst_port]
    http-request add-header X-Forwarded-Proto https if { ssl_fc }
    option httpchk HEAD / HTTP/1.1rnHost:localhost
    server web1.example.com  192.168.1.101:80
    server web2.example.com  192.168.1.102:80
    server web3.example.com  192.168.1.103:80
Enable Stats (Optional)
Now if you want you can enable Haproxy statistics by adding following configuration in HAProxy configuration file.
listen stats *:1936
    stats enable
    stats hide-version
    stats refresh 30s
    stats show-node
    stats auth username:password
    stats uri  /stats
Step 3 – Final HAProxy Configuration File
The final configuration file may look like below:
global log /dev/log local0 log /dev/log local1 notice chroot /var/lib/haproxy stats socket /run/haproxy/admin.sock mode 660 level admin stats timeout 30s user haproxy group haproxy daemon # Default SSL material locations ca-base /etc/ssl/certs crt-base /etc/ssl/private # Default ciphers to use on SSL-enabled listening sockets. # For more information, see ciphers(1SSL). This list is from: # https://hynek.me/articles/hardening-your-web-servers-ssl-ciphers/ ssl-default-bind-ciphers ECDH+AESGCM:DH+AESGCM:ECDH+AES256::RSA+AES:RSA+3DES:!aNULL:!MD5:!DSS ssl-default-bind-options no-sslv3defaults log global mode http option httplog option dontlognull timeout connect 5000 timeout client 50000 timeout server 50000 errorfile 400 /etc/haproxy/errors/400.http errorfile 403 /etc/haproxy/errors/403.http errorfile 408 /etc/haproxy/errors/408.http errorfile 500 /etc/haproxy/errors/500.http errorfile 502 /etc/haproxy/errors/502.http errorfile 503 /etc/haproxy/errors/503.http errorfile 504 /etc/haproxy/errors/504.httpfrontend Local_Server bind 192.168.1.12:80 mode http default_backend My_Web_Serversbackend My_Web_Servers mode http balance roundrobin option forwardfor http-request set-header X-Forwarded-Port %[dst_port] http-request add-header X-Forwarded-Proto https if { ssl_fc } option httpchk HEAD / HTTP/1.1rnHost:localhost server web1.example.com 192.168.1.101:80 server web2.example.com 192.168.1.102:80 server web3.example.com 192.168.1.103:80listen stats *:1936 stats enable stats hide-version stats refresh 30s stats show-node stats auth username:password stats uri /stats
Step 4 – Restart HAProxy
Now you have made all necessary changes in your HAProxy server. Now verify configuration file before restarting service using the following command.
haproxy -c -f /etc/haproxy/haproxy.cfg
If above command returned output as configuration file is valid then restart HAProxy service
sudo service haproxy restart
Step 5 – Verify HAProxy Setting
At this stage, we have a full functional HAProxy setup. At each web server node, I have a demo index.html page showing servers hostname, So we can easily differentiate between servers web pages.
Now access port 80 on IP 192.168.1.12 (as configured above) in the web browser and hit refresh. You will see that HAProxy is sending requests to backend servers one by one (as per round-robin algorithm).


With each refresh you can that HAProxy is sending request one by one to a backend server.
Reference: http://www.haproxy.org/download/1.5/doc/configuration.txt
3 Comments
Hi Rahul, when I pause server1 and server2 I thought Server3 always will be selected but it is not, it got freeze for certain time and if again goes to 1 or 2, lb waits for them instead of select 3, is it feasible to resolve this?
Thanks and regards.
If you have problems starting HAproxy with the error haproxy.service: “Start request repeated too quickly”, check that you don’t have other processes running (f.e. Apache at port 80) on the HAproxy device that bind to the same ports that HAproxy does.
Hi,
In the beginning you’re talking about layer 4, but your actual configuration is on http layer 7… We have trouble routing the origin IP to the backend server. we are currently using HAPROXY and KEEPALIVED and using layer 4 tcp for this. Any idea how to solve this problem, while keeping the HA and LB in place?
Greetings Robert