FTP (File Transfer Protocol) is a network transmission standard that is used to transfer data from client to server and vice versa. It uses TCP (Transmission Control Protocol) which ensures that the data is actually arriving at its destination. TCP is what makes FTP reliable.
FTP is very helpful for businesses as it allows them to perform important functions such as the transfer of large and bulky files on a routine basis. These activities cannot be done over email or through other basic file-sharing programs. It is also used to upload and manage website files to the server.
The FTP is still a very popular way for transferring files but due to the security regions, many peoples prefer SFTP. Use this article to create SFTP only users without shell access.
In this write-up, we will be focusing on how to set up an FTP server with VSFTPD on Ubuntu 20.04.
Installing vsftpd on Ubuntu
VSFTPD is the default FTP server for most Linux distributions. We will start off by installing it on our system. Use the command given below to install VSFTPD.:
sudo apt updatesudo apt install vsftpd
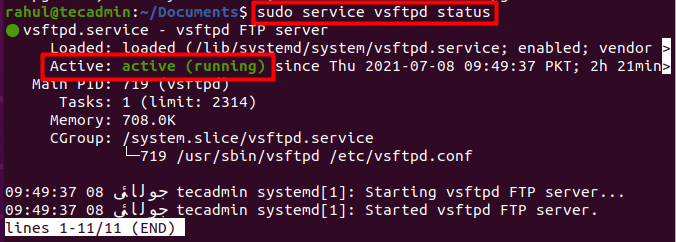
Now verify the successful installation of VSFTPD by executing the following command:
sudo systemctl status vsftpd
How to Configure vsftpd on Ubuntu
Now we will configure the newly installed vsftpd. The configuration rules of vsftpd are stored in /etc/vsftpd.conf. Open the configuration file in any text editor. Here we will use nano to open the configuration file:
sudo nano /etc/vsftpd.conf
Update the following configuration settings:
FTP access
To only allow local users to access FTP server, make sure your configuration file matches the one given below:
anonymous_enable=NO
local_enable=YES
FTP Passive connections
VSFTPD works on the active mode by default. To allow VSFTPD to work on passive mode copy the below-given lines into your configuration file:
pasv_min_port=40000
pasv_max_port=45000
You can give any range of ports to the configuration file. The system will connect a random port from the range you’ve chosen.
The connection is established by the server in active mode whereas in the passive mode the connection is established by the client’s side.
Enable Uploads
To allow the FTP user to modify the filesystem, search for the following line in the configuration file and uncomment it by removing the ‘#’ (hash) symbol from the beginning of the line:
write_enable=YES
Restrict FTP access
To allow only certain users to access VSFTPD, copy the below given lines at the end of the configuration file:
userlist_enable=YES
userlist_file=/etc/vsftpd.user_list
userlist_deny=NO
These configuration settings are very basic. You can set the configuration rules according to your own needs.
Press Ctrl + X and then hit Enter to save and exit the text file. Now run the following command to restart the VSFTPD service:
sudo systemctl restart vsftpd
How to Configure the Firewall For FTP on Ubuntu
Now we will configure the firewall to allow FTP traffic. We will open ports 20 and 21, the default/recommended ports for FTP, and ports 40000:45000 for passive FTP. But first, let’s allow SSH by using the command given below otherwise we may get locked out of our server:
sudo ufw allow OpenSSH
If you get an error “ERROR: Could not find a profile matching ‘OpenSSH’” then you first need to install OpenSSH before running the above command. Use the following command to install OpenSSH on your system:
sudo apt install ssh
Once everything is set up, open the default ports 20 and 21 for FTP:
sudo ufw allow 20:21/tcp
Open the ports 40000:45000 for passive FTP as well:
sudo ufw allow 40000:45000/tcp
Now run the firewall by using the following command. Ignore, if it gives a warning about the disruption of SSH connection. Press y and hit Enter:
sudo ufw enable
The firewall is already active and enabled on my system.
You may run the following command to verify the firewall rules that were just added:
sudo ufw status
How to Create a user for FTP on Ubuntu
Use the “adduser” command to create a new user. We will use this user to login into FTP.
sudo adduser test_user
The terminal will ask you to set the password of the new user. It will also ask for a few other details. Just press Enter if you do not want to provide these details.
You can restrict this user’s SSH access if you only want them to log in through FTP. Use the nano editor to open the SSH configuration files:
sudo nano /etc/ssh/sshd_config
Now copy the following line and paste it into the configuration file to restrict the users access:
DenyUsers test_user
(Do remember to replace “test_user” with the actual name of your user)
Save and exit the configuration file and reboot the SSH service using the below-given command to let the changes take effect:
sudo systemctl restart ssh
Now add the user to the list of FTP users by running the following command:
echo "test_user" | sudo tee -a /etc/vsftpd.user_list
Next make a new directory for the user to use for uploading the files:
sudo mkdir -p /home/test_user/ftp/test_dir
Now give permissions to the new user according to your requirements. Here we are giving the following permission to the test_user:
sudo chmod 550 /home/test_user/ftpsudo chmod 750 /home/test_user/ftp/test_dirsudo chown -R test_user: /home/test_user/ftp
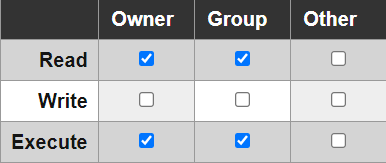
Here 550 gives the “read” and “execute” permission in the following way:
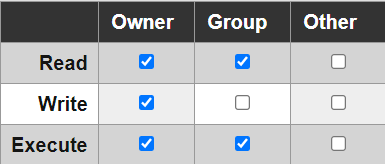
While 750 gives the “write” permission as well to the owner in the following way:
That’s it. Your FTP server has been fully set up.
Conclusion
FTP is used to transfer files between computers on a network. It is a protocol that dictates (instructs) how data is transferred between computers on the network. People still use FTB but it is not as secure as SCP or SFTP.
In this write-up, we focused on how to install, set up, and configure VSFTPD. Moreover, we comprehended how to configure firewalls and create a new user for FTP.
You may also like another tutorial, how to download and upload files using ftp command line.


